Différences entre versions de « ADF-BOARDUINO-UTILISER »
(→Todo1) |
|||
| Ligne 3 : | Ligne 3 : | ||
{{tmbox | text = En cours de préparation}} | {{tmbox | text = En cours de préparation}} | ||
| − | == Boarduino | + | == Introduction == |
| + | |||
| + | The Boarduino is basically like an Arduino. By default it comes with a chip preprogrammed with the Arduino bootloader (also known as an STK500v1bootloader) but you can use it as a general purpose AVR module | ||
| + | |||
| + | == Boarduino & Arduino IDE == | ||
Boarduino est un clone 100% compatible avec Arduino. | Boarduino est un clone 100% compatible avec Arduino. | ||
| Ligne 18 : | Ligne 22 : | ||
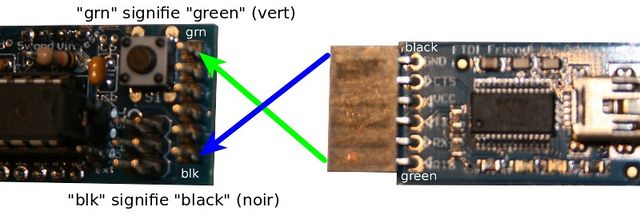
'''Truc & astuce''': Cette erreur peut aussi être causé par un FTDI Friend mal raccordé sur le Boarduino. | '''Truc & astuce''': Cette erreur peut aussi être causé par un FTDI Friend mal raccordé sur le Boarduino. | ||
| − | == | + | == Utilisation avec un Breadboard == |
| − | x | + | |
| + | [[Fichier:x.jpg]] | ||
| + | |||
| + | The Boarduino is designed to be inserted into a solderless breadboard, any standard breadboard will be suitable. Simply insert into the breadboard, making sure that the header pins are straight so that they can be easily inserted. | ||
| + | |||
| + | To remove, grab both ends of the board and gently rock back and forth. This will keep the header pins from bending. | ||
| + | |||
| + | == Boarduino + câble FTDI == | ||
| + | ''Voir aussi "Boarduino + FTDI Friend"'' | ||
| + | |||
| + | The easiest way to start loading Arduino sketches into the DC Boarduino is to use a FTDI USB cable. These cables have the USB chip inside the cable and a 6-pin socket on the end. | ||
| + | |||
| + | [[Fichier:Boarduino-FtdiCable1.jpg]] | ||
| + | |||
| + | This socket plugs into the Boarduino as shown, and then you can simply plug the USB A connector into your computer. Use the same drivers that you would use with a normal Arduino. | ||
| + | |||
| + | [[Fichier:Boarduino-FtdiCable1.jpg]] | ||
| + | |||
| − | + | '''Don't forget to place the jumper into the USB position so you can powr it from the FTDI friend or cable!''' | |
| − | |||
== Boarduino + FTDI Friend == | == Boarduino + FTDI Friend == | ||
Version du 26 novembre 2012 à 11:40
|
|
En cours de préparation |
Introduction
The Boarduino is basically like an Arduino. By default it comes with a chip preprogrammed with the Arduino bootloader (also known as an STK500v1bootloader) but you can use it as a general purpose AVR module
Boarduino & Arduino IDE
Boarduino est un clone 100% compatible avec Arduino.
Vous pouvez donc utiliser Arduino IDE pour écrire, compiler et envoyer vos programmes sur Boarduino.
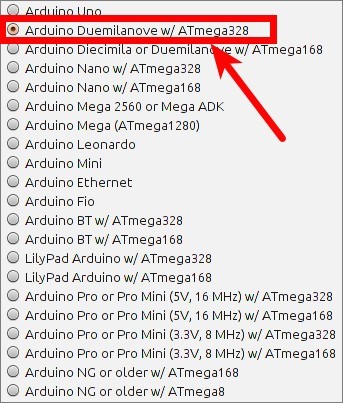
Le Boarduino est reconnu comme une carte "Arduino Duemilanove w/ATMega 328".
Si vous avez laisser la configuration de la carte sur "Arduino Uno", vous recevrez alors l'erreur suivante au moment de l'upload du programme sur le boarduino.
avrdude: stk500_recv(): programmer is not responding
Truc & astuce: Cette erreur peut aussi être causé par un FTDI Friend mal raccordé sur le Boarduino.
Utilisation avec un Breadboard
The Boarduino is designed to be inserted into a solderless breadboard, any standard breadboard will be suitable. Simply insert into the breadboard, making sure that the header pins are straight so that they can be easily inserted.
To remove, grab both ends of the board and gently rock back and forth. This will keep the header pins from bending.
Boarduino + câble FTDI
Voir aussi "Boarduino + FTDI Friend"
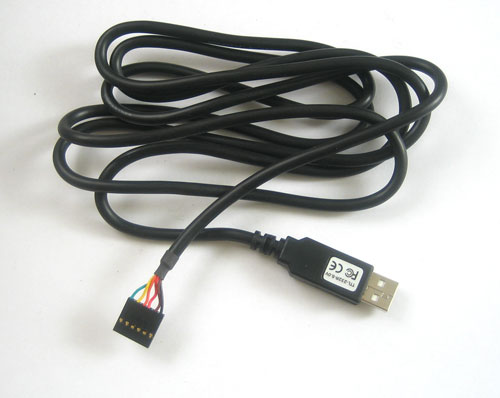
The easiest way to start loading Arduino sketches into the DC Boarduino is to use a FTDI USB cable. These cables have the USB chip inside the cable and a 6-pin socket on the end.
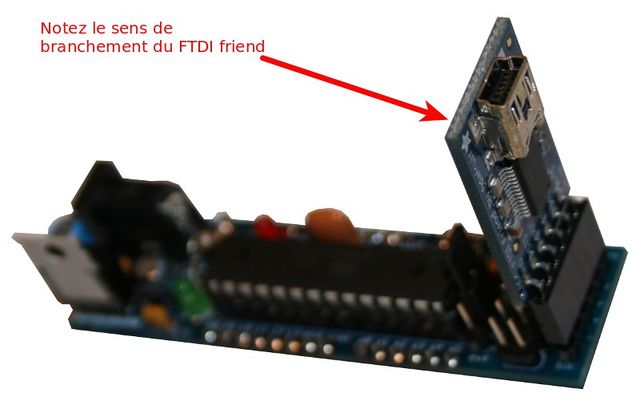
This socket plugs into the Boarduino as shown, and then you can simply plug the USB A connector into your computer. Use the same drivers that you would use with a normal Arduino.
Don't forget to place the jumper into the USB position so you can powr it from the FTDI friend or cable!
Boarduino + FTDI Friend
Comme boarduino standard (Boarduino DC) ne dispose pas d'une puce USB/Serie
sur la carte, il faut utiliser un convertisseur USB/Serie (aussi appelé FTDI Friend) pour
programmer Boarduino.
Une fois équipé d'un tel convertisseur, l'ensemble Boarduino + FTDI Friend sera reconnu comme un simple "Arduino Duemilanove w/ ATMega 328" par Arduino IDE :-)
Truc & Astuce: Placer le cavalier d'alimentation sur la position USB pour alimenter votre Boarduino par l'intermédiaire du FTDI Friend.
Quelques précieuse informations concernant le FTDI Friend
Source: AdaFruit
Traduit avec l'autorisation d'AdaFruit Industries - Translated with the permission from Adafruit Industries - www.adafruit.com
Toute référence, mention ou extrait de cette traduction doit être explicitement accompagné du texte suivant : « Traduction par MCHobby (www.MCHobby.be) - Vente de kit et composants » avec un lien vers la source (donc cette page) et ce quelque soit le média utilisé.
L'utilisation commercial de la traduction (texte) et/ou réalisation, même partielle, pourrait être soumis à redevance. Dans tous les cas de figures, vous devez également obtenir l'accord du(des) détenteur initial des droits. Celui de MC Hobby s'arrêtant au travail de traduction proprement dit.


