Différences entre versions de « Rasp-Retro-Games-PI-Setup »
| Ligne 32 : | Ligne 32 : | ||
{{ambox-stop|text=Linux can be daunting to the uninitiated. Don’t worry about messing something up…if all else fails, you can re-format the SD card and begin again.}} | {{ambox-stop|text=Linux can be daunting to the uninitiated. Don’t worry about messing something up…if all else fails, you can re-format the SD card and begin again.}} | ||
| − | {{ADFImage|Rasp-Retro-Games-PI-Setup-02.png| | + | {{ADFImage|Rasp-Retro-Games-PI-Setup-02.png|640px}} |
When the system is started for the first time, the '''raspi-config''' utility runs automatically. You must select the following options: | When the system is started for the first time, the '''raspi-config''' utility runs automatically. You must select the following options: | ||
Version du 9 mars 2014 à 16:52
Préparer votre Pi
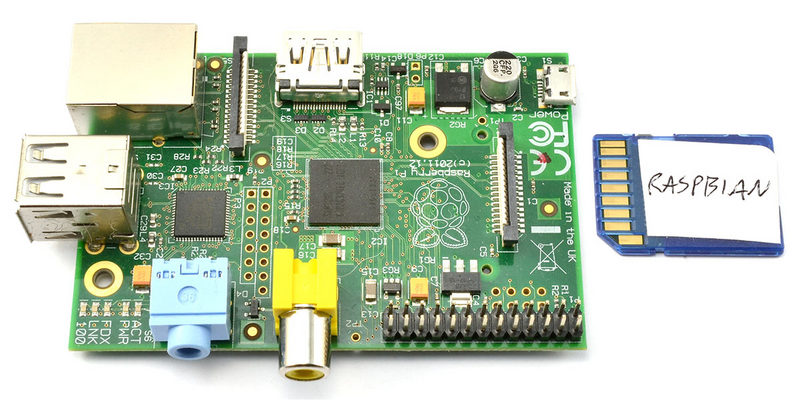
The Raspberry Pi reads software off a regular SD memory card (or a microSD card with adapter). You’ll need one that’s 4GB or larger. We’ll start by loading up the Linux operating system on this card.
There are many “flavors” of Linux available for the Raspberry Pi. For this project, we recommend starting with the official Raspbian distribution, which can be downloaded here:*
This file is about 500 megabytes and will take some time to download. While that’s working, there are some other things you can do:
- Insert the SD card in the card reader, connect to your computer and format the card as a FAT32 (MS-DOS) filesystem.
- Confirm that you have all the other parts needed for your Raspberry Pi: power supply, USB microB cable (for power), HDMI or composite monitor, USB keyboard, mouse and a network connection (a wired Ethernet connection is easier, but WiFi with a supported USB adapter is possible with a few additional steps).
- Prepare a Raspberry Pi case, if you have one (peel plastic from acrylic, etc.). Tutorial link.
After downloading the software, uncompress the ZIP file in preparation for the next step…Here’s a tutorial explaining how to install the downloaded software onto the SD card, with links to nice GUI apps for Windows and Mac. The first couple of pages can be skipped, as we’re already downloading the right software for this project. Since that tutorial was written, another option has become available for Mac: RPi-sd card builder — this one’s even simpler, with no Terminal commands required.
| Use Raspbian 2013-02-09 or later for this project. Occidentalis 0.2 requires very lengthy updates and patches to work. |

Crédit: AdaFruit Industries www.adafruit.com
OS Install and First-Time Configuration
- Connect a monitor and a USB keyboard to the Raspberry Pi.
- Insert the SD card containing the Raspbian Linux software.
- Connect a “Micro B” USB cable to the power connector on the Raspberry Pi.
- Plug the other end of the USB cable into a power source: a mobile phone charger, a powered USB hub, or simply a USB port on your computer.
The Raspberry Pi should now boot, and you’ll see the monitor fill with lots of “Unix stuff.”
| Linux can be daunting to the uninitiated. Don’t worry about messing something up…if all else fails, you can re-format the SD card and begin again. |

Crédit: AdaFruit Industries www.adafruit.com
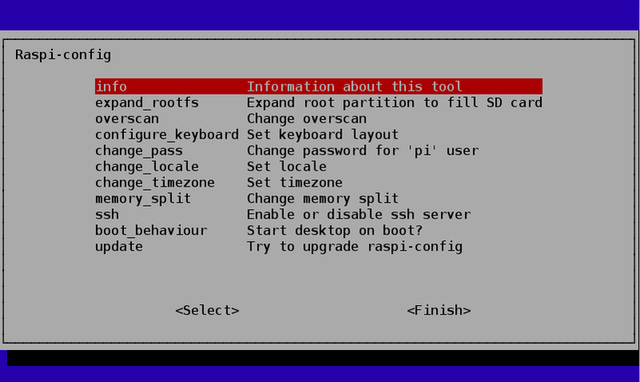
When the system is started for the first time, the raspi-config utility runs automatically. You must select the following options:
- Expand root partition (this lets us use the full capacity the SD card).
- Configure keyboard (“Generic 105-key (Intl) PC” is the default — for the US and most other countries, you’ll want to select an appropriate keyboard layout such as “Generic 104-key PC”).
- Set timezone.
These steps are optional but recommended:
- If using an HDMI monitor, disable overscan.
- Change hostname. I called my system “retro” to distinguish it from other Raspberry Pis already on the network.
- Change password for "pi" user.
- Change memory split. Allocate at least 64 MB to the GPU.
- Enable SSH server (for administration access to the Raspberry Pi over the network).
These options should NOT be selected:
- Start desktop on boot (we’ll run X11 manually when we need it).
A more in-depth tutorial on Raspi-config is available here.
After configuring these options, select “Finish” and reboot the system when prompted.
The first reboot will take a couple minutes while the filesystem is expanded for the SD card.
| {{{text}}} |
Source: Adafruit Retro Gaming with Raspberry Pi
Créé par Phillip Burgess pour AdaFruit Industries.
Traduction réalisée par Meurisse D pour MCHobby.be.
Toute référence, mention ou extrait de cette traduction doit être explicitement accompagné du texte suivant : « Traduction par MCHobby (www.MCHobby.be) - Vente de kit et composants » avec un lien vers la source (donc cette page) et ce quelque soit le média utilisé.
L'utilisation commercial de la traduction (texte) et/ou réalisation, même partielle, pourrait être soumis à redevance. Dans tous les cas de figures, vous devez également obtenir l'accord du(des) détenteur initial des droits. Celui de MC Hobby s'arrêtant au travail de traduction proprement dit.
Traduit avec l'autorisation d'AdaFruit Industries - Translated with the permission from Adafruit Industries - www.adafruit.com