Différences entre versions de « Rasp-Retro-Games-Arcade-Control »
| Ligne 87 : | Ligne 87 : | ||
== Un dernier élément == | == Un dernier élément == | ||
| − | + | Notre utilitaire “retrogame” est la partie logicielle qui permet de "brancher ensemble" les jeux pilotés par clavier avec nos contrôles d'arcade branchés sur le GPIO. | |
| − | [https://github.com/adafruit/Adafruit-Retrogame | + | [https://github.com/adafruit/Adafruit-Retrogame Télécharger ''retrogame'' depuis GitHub] en sélectionnant le bouton "download ZIP" et décompressez ensuite le fichier sur votre Raspberry Pi. |
| − | ''' | + | '''Une version pré-compilée de ''retrogame'' est inclus dans le fichier ZIP. Ce programme peut être utilisé comme tel, si vous utilisez le joystick et les boutons comme décrit ci-dessus'''. Sinon, vous pouvez adapter le code source écrit en C et vous aurez besoin de le compiler (avec le Makefile fourni dans l'archive) après avoir réalisé vos modifications. La correspondant "broche GPIO" <-> "Touche clavier" est maintenu dans le code source à l'aide d'une table (array)... cette table doit être modifié pour correspondre à votre propre raccordement sur le GPIO. |
<nowiki>cd Adafruit-Retrogame | <nowiki>cd Adafruit-Retrogame | ||
nano retrogame.c</nowiki> | nano retrogame.c</nowiki> | ||
| − | ( | + | (Vous pouvez bien entendu utiliser l'éditeur de votre choix — "nano" est juste plus approprié pour les débutants.) |
| − | + | Vous trouverez ensuite le code suivant aux alentours de la ligne 77... il s'agit de la déclaration et initialisation de la table (array) "io": | |
<nowiki>struct { | <nowiki>struct { | ||
| Ligne 112 : | Ligne 112 : | ||
{ 7, KEY_LEFTALT } | { 7, KEY_LEFTALT } | ||
};</nowiki> | };</nowiki> | ||
| + | |||
| + | <small>Note de MCHobby:<br /> | ||
| + | Les constantes (KEY_LEFT,...) correspondant aux touches provient du fichier d'entête input.h. Ces constantes sont en anglais (un standard international). Voici quelques termes de base pour vous aider à comprendre: | ||
| + | * KEY : clé... comprenez touche | ||
| + | * LEFT, RIGHT: Gauche, Droite (KEY_LEFT symbolise la touche gauche... la flèche de déplacement curseur vers la gauche) | ||
| + | * UP, DOWN: Haut, bas | ||
| + | * CTRL: la touche "ctrl" dit 'Contrôle'. | ||
| + | * ALT: la touche "alt". KEY_LEFTALT correspond donc à la "touche alt à gauche" sur le clavier. | ||
| + | N'hésitez pas à consulter le contenu du fichier ''input.h'' dans le répertoire {{code|/usr/include/linux/}} pour découvrir les autres touches mises à votre disposition)</small> | ||
Each line in this table contains two elements. The first is a GPIO pin number (where a button or one direction from a joystick is attached), the second is the corresponding key code to be generated by this control. A list of valid key code names can be found in the file /usr/include/linux/input.h starting around line 178. Remember to enclose each pin/key pair in {curly braces} with a comma between them. | Each line in this table contains two elements. The first is a GPIO pin number (where a button or one direction from a joystick is attached), the second is the corresponding key code to be generated by this control. A list of valid key code names can be found in the file /usr/include/linux/input.h starting around line 178. Remember to enclose each pin/key pair in {curly braces} with a comma between them. | ||
Version du 18 mars 2014 à 12:17
Ajouter un controleur d'Arcade
Si vous êtes arrivé ici, vous disposez d'un (ou plusieurs) jeux auquel vous pouvez jouer au clavier. La prochaine étape consiste à ajouter les contrôles d'Arcade...
C'est maintenant que les choses prennent un tournant créatif. Il n'existe pas une disposition idéale des contrôles (manette et boutons) qui puisse convenir à tous les jeux. Par contre il existe quelques dispositions plus fréquentes qui conviennent à de nombreux cas. Et pour le reste, vous pouvez encore utiliser un clavier.
Vous aurez également besoin de réaliser votre panneau de commande en utilisant les matérieux et outils correspondant au mieux à vos compétences. Chez AdaFruit, nous avons la chance de pouvoir utiliser une découpeuse laser qui fonctionne avec de l’acrylique (plexyglass) mais cela resterait un défi de taille pour la plupart des gens. Du contreplaqué ou boite métallique sont des matériaux viable (une grande boite à cigare peut aussi convenir) pour faire les trous, vous pouvez utiliser une foreuse, une scie a trou, une Dremel ou une lime à bois. n'hésitez pas improviser!
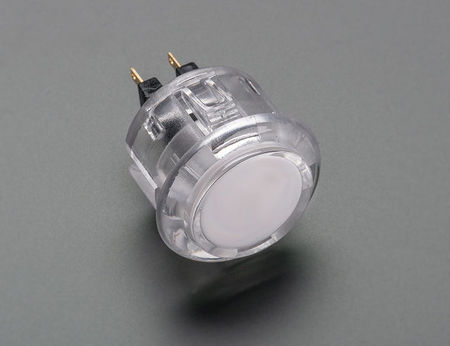
Si vous ne disposez pas d'un fournisseur de bouton sous la main, sachez que MCHobby propose aussi un joli assortiment de bouton d'arcade:
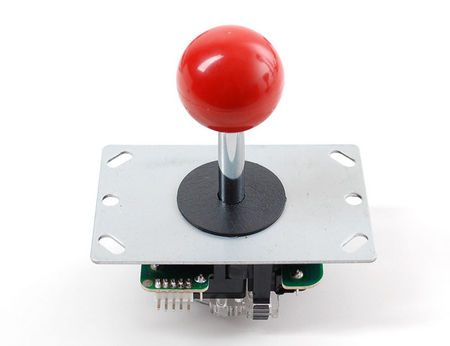
Les éléments
Crédit pour les images ci-dessous à AdaFruit Industries - All images here under are credited to AdaFruit Industries
Le joystick d'un ordinateur Atari ou Commodore peut aussi être utilisé. Les joysticks des consoles plus récentes utilise un protocole série... et malheureusement, cela ne fonctionnera pas ici. Les gamepads USB est une autre option viable.
| Nous proposons des contrôles d'arcade sur le WebShop de MCHobby, contrôles qui doivent être montés. N'oubliez pas que forer et couper sont des opérations à réaliser avec un minimum de précaution et règles de bon sens comme utiliser DES LUNETTES DE SECURITE et couper VERS L'EXTERIEUR (jamais vers soi), porter des vêtements adaptés, etc. |
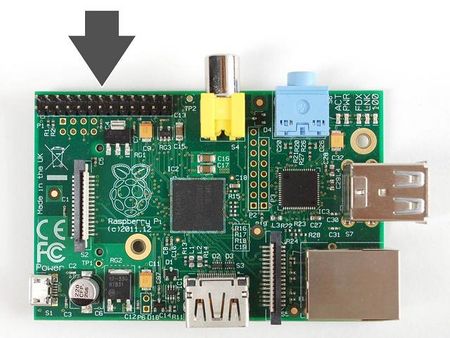
Broches du GPIO
Chaque broche du connecteur dispose d'un "numéro GPIO" unique qui diffère de l'ordre des broches sur le connecteur. Les boutons et joystick (chacun ayant 4 directions) seront connectés parmi les différentes broches GPIO disponible et la masse (GND).
La plupart des cartes Raspberry Pi suivent maintenant l'arrangement des broches de la "Revision 2":
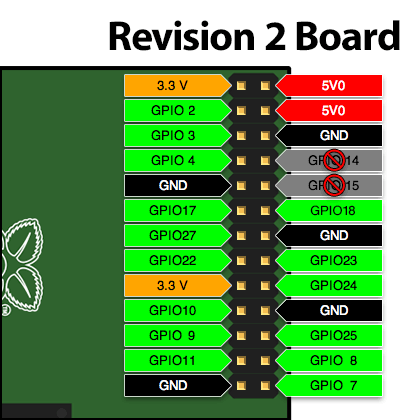
Crédit: AdaFruit Industries www.adafruit.com
Si vous disposez toujours d'un ancien modèle (prédécesseur de la carte Modèle B) est facile à reconnaitre car elle n'a pas de trou de montage. Dans ce cas le numéro des broches est différent:
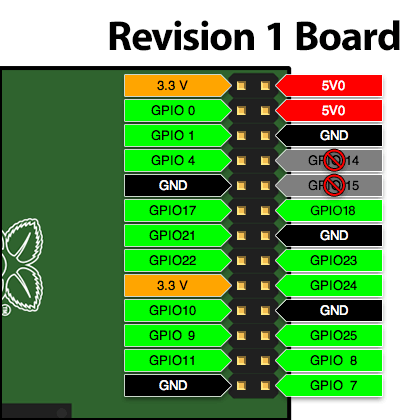
Crédit: AdaFruit Industries www.adafruit.com
Notez que les broches GPIO 14 et 15 sont hors sujet et interdite d'utilisation. Par défaut, elles sont configurées comme port série. Il est possible de désactiver le port série (pour récupérer les broches) mais cela nécessite de modifier la configuration de votre Pi (c'est un peu ennuyant, pas nécessaire puisque nous de nombreuses broches et surtout plus facile).
Les cartes de révision 2 dispose de 4 broches GPIO complémentaires (28–31) sur un connecteur adjacent mais cela nécessite quelques opérations de soudure. Si vous avez désespérément besoin d'entrées supplémentaires, vous trouverez des information sur Embedded Linux Wiki (réservé aux utilisateurs avancés).
Il y a seulement 5 broches de masse (GND) disponibles sur le connecteur, mais certain gamers aurons besoin de plus de contrôles que cela. Une des cartes cartes Perma-Proto peut être utilisée pour fournir un "grand rail de masse" où l'un des côtés de tous les boutons peut être connecté. En alternative, si vous avez des broches GPIO en extra (et non utilisée) et que vous avez besoin de broches de masse (GND) complémentaires.... nous montrerons plus loin qu'il existe une solution logicielle pour transformer une broche du GPIO en broche de masse.
Le processeur du Raspberry Pi à la possibilité d'activer une résistance PullUp 'interne'. Par conséquent, vous n'avez pas besoin de résistance PullUp externe pour les boutons et le contrôleur d'Arcade
Tout comme pour la réalisation de votre panneau de contrôle où vous êtes libre de la technique de construction et interprétation créative... le branchement des contrôles sur le GPIO peut être réaliser à l'aide de différentes méthodes. Vous devez donc opter pour votre propre méthodologie de câblage. Nous proposons néanmoins quelques éléments/produits qui peuvent vous aider. En plus des cartes Perma-Proto déja mentionnées, il y a les fils de connexion rapide qui fonctionne avec les boutons et assortiment de fil de connexion multifonctionnel qui peuvent être utilisés avec les joysticks et branchés directement sur le GPIO (sans avoir besoin d'une carte Perma-Proto). Les options sont abondantes! Vous aurez probablement besoin d'une combinaison d'entre eux et quelques soudures seront certainement nécessaire.
Raccordement
Le joystick
Crédit: AdaFruit Industries www.adafruit.com
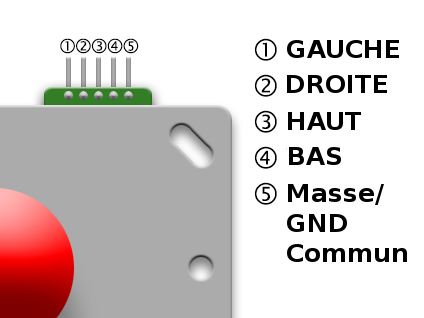
Voici le diagramme du connecteur de notre joystick d'arcade. Un fil doit être connecté sur la masse/GND. Ensuite, chacune des 4 autres broches seront raccordée sur des broches différentes du GPIO.
Les indications de direction ne sont valable que si le joystick est orienté avec le connecteur vers le haut. Il est tout a fait possible d'installer le joystick sous différente orientation... pensez seulement à adapter le raccordement sur le GPIO pour correspondre au changement de direction (orienté de 90° sur la droite, le "haut" devient la "droite", ...).
Raccordement sur le GPIO
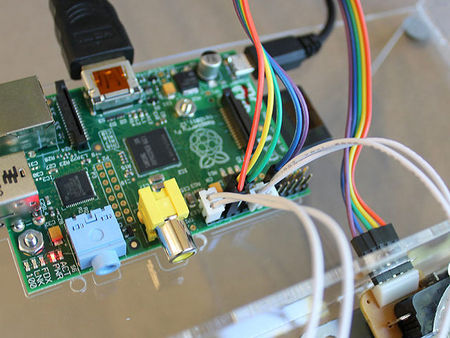
Les fiches au bout des câbles de connexion rapide tendent à bloquer les broches adjacentes sur le connecteur GPIO. Vous pouvez les tailler avec un cutter ou une Dremel afin de les amincir, ou planifier votre cablage pour éviter d'utiliser les broches adjacentes.
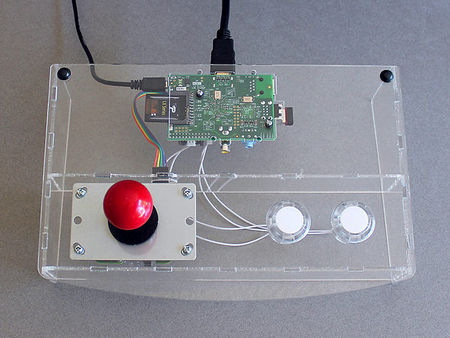
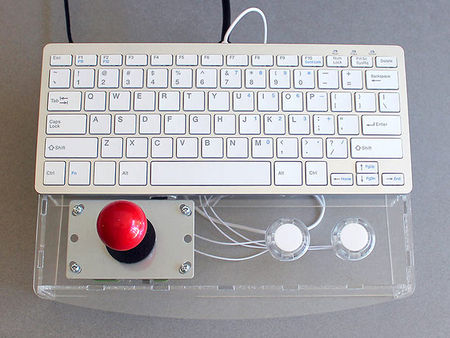
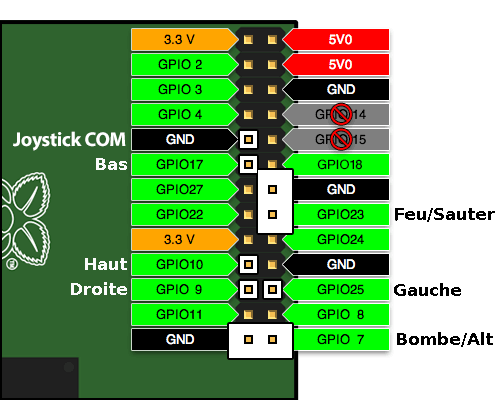
Voici une proposition de câblage pour un joystick et deux boutons: elle utilise 5 fils multifonctionnel femelle-vers-femelle pour le joystick et deux câbles de connexion rapide non modifié pour les boutons. C'est une disposition très élémentaire mais qui convient déjà à quelques jeux classiques. Un clavier USB a proximité sera parfait pour prendre en charge les fonctions plus rarement utilisées (insertion de pièces, démarrer le jeux).
Vous pauvez aussi vous connecter sur d'autres broches du GPIO si les opérations de soudure ne vous effrayent pas - assurez vous de connecter l'une des broches du bouton sur une broche du GPIO et l'autre broche du bouton sur la broche de masse/GND. Vous aurez aussi besoin d'éditer et modifier la programme de commande proposé par AdaFruit (rassurez vous, cela n'est pas bien compliqué).
Crédit: AdaFruit Industries www.adafruit.com
Un dernier élément
Notre utilitaire “retrogame” est la partie logicielle qui permet de "brancher ensemble" les jeux pilotés par clavier avec nos contrôles d'arcade branchés sur le GPIO.
Télécharger retrogame depuis GitHub en sélectionnant le bouton "download ZIP" et décompressez ensuite le fichier sur votre Raspberry Pi.
Une version pré-compilée de retrogame est inclus dans le fichier ZIP. Ce programme peut être utilisé comme tel, si vous utilisez le joystick et les boutons comme décrit ci-dessus. Sinon, vous pouvez adapter le code source écrit en C et vous aurez besoin de le compiler (avec le Makefile fourni dans l'archive) après avoir réalisé vos modifications. La correspondant "broche GPIO" <-> "Touche clavier" est maintenu dans le code source à l'aide d'une table (array)... cette table doit être modifié pour correspondre à votre propre raccordement sur le GPIO.
cd Adafruit-Retrogame
nano retrogame.c
(Vous pouvez bien entendu utiliser l'éditeur de votre choix — "nano" est juste plus approprié pour les débutants.)
Vous trouverez ensuite le code suivant aux alentours de la ligne 77... il s'agit de la déclaration et initialisation de la table (array) "io":
struct {
        int pin;
        int key;
} io[] = {
//        Input    Output (from /usr/include/linux/input.h)
        { 25,      KEY_LEFT     },
        {  9,      KEY_RIGHT    },
        { 10,      KEY_UP       },
        { 17,      KEY_DOWN     },
        { 23,      KEY_LEFTCTRL },
        {  7,      KEY_LEFTALT  }
};
Note de MCHobby:
Les constantes (KEY_LEFT,...) correspondant aux touches provient du fichier d'entête input.h. Ces constantes sont en anglais (un standard international). Voici quelques termes de base pour vous aider à comprendre:
- KEY : clé... comprenez touche
- LEFT, RIGHT: Gauche, Droite (KEY_LEFT symbolise la touche gauche... la flèche de déplacement curseur vers la gauche)
- UP, DOWN: Haut, bas
- CTRL: la touche "ctrl" dit 'Contrôle'.
- ALT: la touche "alt". KEY_LEFTALT correspond donc à la "touche alt à gauche" sur le clavier.
N'hésitez pas à consulter le contenu du fichier input.h dans le répertoire Modèle:Code pour découvrir les autres touches mises à votre disposition)
Each line in this table contains two elements. The first is a GPIO pin number (where a button or one direction from a joystick is attached), the second is the corresponding key code to be generated by this control. A list of valid key code names can be found in the file /usr/include/linux/input.h starting around line 178. Remember to enclose each pin/key pair in {curly braces} with a comma between them.
By default, the code is set up to match our example “no solder” controller wiring. This also works directly with the standard MAME controls. So you might not need to change anything; the pre-built version may have you covered.
If you need an extra ground pin (and have extra GPIO pins available that you’re not using for controls), set the key code to GND instead.
Write your changes to the file and exit the editor, then type:
make
This should build the executable retrogame utility. If you instead get an error message, there’s a problem in the edited table — most likely a missing curly brace, comma or semicolon.
But wait...we’re not ready to run yet! Retrogame requires the uinput kernel module. This is already present on the system but isn’t enabled by default. For testing, you can type:
sudo modprobe uinput
To make this persistent between reboots, append a line to /etc/modules:
sudo sh -c 'echo uinput >> /etc/modules'
Now we’re in good shape to test it!
Retrogame needs to be run as root, i.e.:
sudo ./retrogame
Give it a try. If it seems to be working, press control+C to stop the program and we’ll then set up the system to launch this automatically in the background at startup.
sudo nano /etc/rc.local
Before the final “exit 0” line, insert this line:
/home/pi/Adafruit-Retrogame/retrogame &
If you placed the software in a different location, this line should be changed accordingly. “sudo” isn’t necessary here because the rc.local script is already run as root.
Reboot the system to test the startup function:
sudo reboot
The software will now be patiently waiting in the background, ready for use with any emulators.
Each emulator will have its own method for configuring keyboard input. Set them up so the keys match your controller outputs. Up/down/left/right from the arrow keys is a pretty common default among these programs, but the rest will usually require some tweaking.
Source: Adafruit Retro Gaming with Raspberry Pi
Créé par Phillip Burgess pour AdaFruit Industries.
Traduction réalisée par Meurisse D pour MCHobby.be.
Toute référence, mention ou extrait de cette traduction doit être explicitement accompagné du texte suivant : « Traduction par MCHobby (www.MCHobby.be) - Vente de kit et composants » avec un lien vers la source (donc cette page) et ce quelque soit le média utilisé.
L'utilisation commercial de la traduction (texte) et/ou réalisation, même partielle, pourrait être soumis à redevance. Dans tous les cas de figures, vous devez également obtenir l'accord du(des) détenteur initial des droits. Celui de MC Hobby s'arrêtant au travail de traduction proprement dit.
Traduit avec l'autorisation d'AdaFruit Industries - Translated with the permission from Adafruit Industries - www.adafruit.com
