Différences entre versions de « ADF-RTC-DS1307-UTILISER »
| Ligne 114 : | Ligne 114 : | ||
== Lire l'heure == | == Lire l'heure == | ||
| − | + | Now that the RTC is merrily ticking away, we'll want to query it for the time. Lets look at the sketch again to see how this is done | |
| + | |||
| + | <nowiki>void loop () { | ||
| + | DateTime now = RTC.now(); | ||
| + | |||
| + | Serial.print(now.year(), DEC); | ||
| + | Serial.print('/'); | ||
| + | Serial.print(now.month(), DEC); | ||
| + | Serial.print('/'); | ||
| + | Serial.print(now.day(), DEC); | ||
| + | Serial.print(' '); | ||
| + | Serial.print(now.hour(), DEC); | ||
| + | Serial.print(':'); | ||
| + | Serial.print(now.minute(), DEC); | ||
| + | Serial.print(':'); | ||
| + | Serial.print(now.second(), DEC); | ||
| + | Serial.println();</nowiki> | ||
| + | |||
| + | There's pretty much only one way to get the time using the RTClib, which is to call '''now()''', a function that returns a DateTime object that describes the year, month, day, hour, minute and second when you called '''now()'''. | ||
| + | |||
| + | There are some RTC libraries that instead have you call something like '''RTC.year()''' and '''RTC.hour()''' to get the current year and hour. However, there's one problem where if you happen to ask for the minute right at '''3:14:59''' just before the next minute rolls over, and then the second right after the minute rolls over (so at '''3:15:00''') you'll see the time as '''3:14:00''' which is a minute off. If you did it the other way around you could get '''3:15:59''' - so one minute off in the other direction. | ||
| + | |||
| + | Because this is not an especially unlikely occurance - particularly if you're querying the time pretty often - we take a 'snapshot' of the time from the RTC all at once and then we can pull it apart into '''day()''' or '''second()''' as seen above. Its a tiny bit more effort but we think its worth it to avoid mistakes! | ||
| + | |||
| + | We can also get a 'timestamp' out of the DateTime object by calling '''get''' which counts the number of seconds (not counting leapseconds) since midnight, January 1st 2000 | ||
| + | |||
| + | <nowiki> Serial.print(" since 2000 = "); | ||
| + | Serial.print(now.get()); | ||
| + | Serial.print("s = "); | ||
| + | Serial.print(now.get() / 86400L); | ||
| + | Serial.println("d");</nowiki> | ||
| + | |||
| + | Since there are 60*60*24 = 86400 seconds in a day, we can easily count days since then as well. This might be useful when you want to keep track of how much time has passed since the last query, making some math a lot easier (like checking if its been 5 minutes later, just see if '''get()''' has increased by 300, you dont have to worry about hour changes) | ||
{{ADF-RTC-DS1307-TRAILER}} | {{ADF-RTC-DS1307-TRAILER}} | ||
Version du 20 janvier 2013 à 19:32
Librairie Arduino
Any 5V microcontroller with I2C built-in can easily use the DS1307. We will demonstrate how to use it with an Arduino since it is a popular microcontroller platform.
For the RTC library, we'll be using a fork of JeeLab's excellent RTC library RTClib - a library for getting and setting time from a DS1307 (originally written by JeeLab, our version is slightly different so please only use ours to make sure its compatible!) - download the .zip by clicking on Download Source (top right) and rename the uncompressed folder RTClib Then [[install it in your Arduino directory in a folder called RTClib.
Raccorder
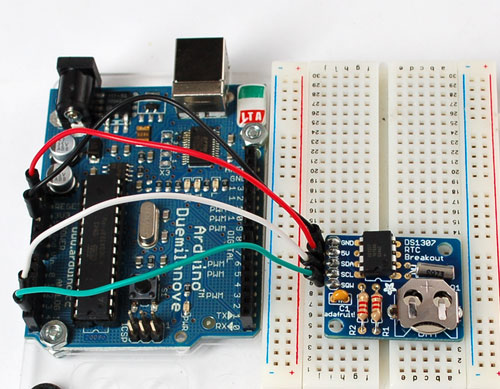
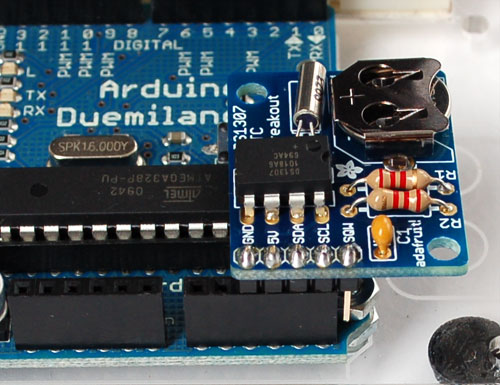
There are only 5 pins: 5V GND SCL SDA SQW.
- 5V is used to power to the RTC chip when you want to query it for the time. If there is no 5V signal, the chip goes to sleep using the coin cell for backup.
- GND is common ground and is required
- SCL is the i2c clock pin - its required to talk to the RTC
- SDA is the i2c data pin - its required to talk to the RTC
- SQW is the optional square-wave output you can get from the RTC if you have configured it to do so. Most people don't need or use this pin
If you set analog pin 3 (digital 17) to an OUTPUT and HIGH and analog pin 2 (digital 16) to an OUTPUT and LOW you can power the RTC directly from the pins!
Premier test RTC
The first thing we'll demonstrate is a test sketch that will read the time from the RTC once a second. We'll also show what happens if you remove the battery and replace it since that causes the RTC to halt. So to start, remove the battery from the holder while the Arduino is not powered or plugged into USB. Wait 3 seconds and then replace the battery. This resets the RTC chip. Now load up the following sketch (which is also found in Examples->RTClib->ds1307) and upload it to your Arduino with the datalogger shield on!
// Date and time functions using a DS1307 RTC connected via I2C and Wire lib

#include <Wire.h>
#include "RTClib.h"

RTC_DS1307 RTC;

void setup () {
    Serial.begin(57600);
    Wire.begin();
    RTC.begin();

  if (! RTC.isrunning()) {
    Serial.println("RTC is NOT running!");
    // following line sets the RTC to the date & time this sketch was compiled
    //RTC.adjust(DateTime(__DATE__, __TIME__));
  }

}

void loop () {
    DateTime now = RTC.now();

    Serial.print(now.year(), DEC);
    Serial.print('/');
    Serial.print(now.month(), DEC);
    Serial.print('/');
    Serial.print(now.day(), DEC);
    Serial.print(' ');
    Serial.print(now.hour(), DEC);
    Serial.print(':');
    Serial.print(now.minute(), DEC);
    Serial.print(':');
    Serial.print(now.second(), DEC);
    Serial.println();

    Serial.print(" since 1970 = ");
    Serial.print(now.unixtime());
    Serial.print("s = ");
    Serial.print(now.unixtime() / 86400L);
    Serial.println("d");

    // calculate a date which is 7 days and 30 seconds into the future
    DateTime future (now.get() + 7 * 86400L + 30);

    Serial.print(" now + 7d + 30s: ");
    Serial.print(future.year(), DEC);
    Serial.print('/');
    Serial.print(future.month(), DEC);
    Serial.print('/');
    Serial.print(future.day(), DEC);
    Serial.print(' ');
    Serial.print(future.hour(), DEC);
    Serial.print(':');
    Serial.print(future.minute(), DEC);
    Serial.print(':');
    Serial.print(future.second(), DEC);
    Serial.println();

    Serial.println();
    delay(3000);
}
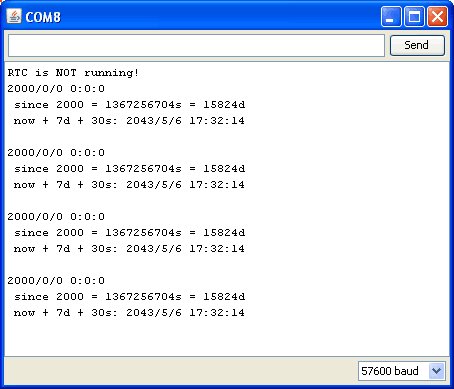
Now run the Serial terminal and make sure the baud rate is set correctly at 57600
bps you should see the following:
Whenever the RTC chip loses all power (including the backup battery) it will report the time as 0:0:0 and it won't count seconds (its stopped). Whenever you set the time, this will kickstart the clock ticking. So basically the upshot here is that you should never ever remove the battery once you've set the time. You shouldn't have to and the battery holder is very snug so unless the board is crushed, the battery wont 'fall out'
Fixer l'heure
With the same sketch loaded, uncomment the line that starts with RTC.adjust like so:
// following line sets the RTC to the date & time this sketch was compiled
RTC.adjust(DateTime(__DATE__, __TIME__));
This line is very cute, what it does is take the Date and Time according the computer you're using (right when you compile the code) and uses that to program the RTC. If your computer time is not set right you should fix that first. Then you must press the Upload button to compile and then immediately upload. If you compile and then upload later, the clock will be off by that amount of time.
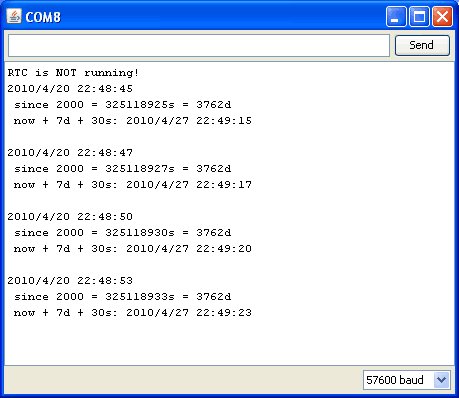
Then open up the Serial monitor window to show that the time has been set
From now on, you wont have to ever set the time again: the battery will last 5 or more years
Lire l'heure
Now that the RTC is merrily ticking away, we'll want to query it for the time. Lets look at the sketch again to see how this is done
void loop () {
    DateTime now = RTC.now();

    Serial.print(now.year(), DEC);
    Serial.print('/');
    Serial.print(now.month(), DEC);
    Serial.print('/');
    Serial.print(now.day(), DEC);
    Serial.print(' ');
    Serial.print(now.hour(), DEC);
    Serial.print(':');
    Serial.print(now.minute(), DEC);
    Serial.print(':');
    Serial.print(now.second(), DEC);
    Serial.println();
There's pretty much only one way to get the time using the RTClib, which is to call now(), a function that returns a DateTime object that describes the year, month, day, hour, minute and second when you called now().
There are some RTC libraries that instead have you call something like RTC.year() and RTC.hour() to get the current year and hour. However, there's one problem where if you happen to ask for the minute right at 3:14:59 just before the next minute rolls over, and then the second right after the minute rolls over (so at 3:15:00) you'll see the time as 3:14:00 which is a minute off. If you did it the other way around you could get 3:15:59 - so one minute off in the other direction.
Because this is not an especially unlikely occurance - particularly if you're querying the time pretty often - we take a 'snapshot' of the time from the RTC all at once and then we can pull it apart into day() or second() as seen above. Its a tiny bit more effort but we think its worth it to avoid mistakes!
We can also get a 'timestamp' out of the DateTime object by calling get which counts the number of seconds (not counting leapseconds) since midnight, January 1st 2000
    Serial.print(" since 2000 = ");
    Serial.print(now.get());
    Serial.print("s = ");
    Serial.print(now.get() / 86400L);
    Serial.println("d");
Since there are 60*60*24 = 86400 seconds in a day, we can easily count days since then as well. This might be useful when you want to keep track of how much time has passed since the last query, making some math a lot easier (like checking if its been 5 minutes later, just see if get() has increased by 300, you dont have to worry about hour changes)
Source: DS1307 Real Time Clock Breakout Board Kit. Ecrit par Tyler Cooper pour AdaFruit. Crédit AdaFruit Industries
Traduit par Meurisse D. pour MCHobby.be
Traduit avec l'autorisation d'AdaFruit Industries - Translated with the permission from Adafruit Industries - www.adafruit.com
Toute référence, mention ou extrait de cette traduction doit être explicitement accompagné du texte suivant : « Traduction par MCHobby (www.MCHobby.be) - Vente de kit et composants » avec un lien vers la source (donc cette page) et ce quelque soit le média utilisé.
L'utilisation commercial de la traduction (texte) et/ou réalisation, même partielle, pourrait être soumis à redevance. Dans tous les cas de figures, vous devez également obtenir l'accord du(des) détenteur initial des droits. Celui de MC Hobby s'arrêtant au travail de traduction proprement dit.


