Différences entre versions de « Adafruit GPS ULTIMATE »
| Ligne 50 : | Ligne 50 : | ||
This does not mean your GPS module is broken, the GPS module will always work as fast as it can to get a fix.</nowiki> </font> | This does not mean your GPS module is broken, the GPS module will always work as fast as it can to get a fix.</nowiki> </font> | ||
| − | === | + | === Interprétation des résultats - Coordonnées - Google Maps === |
Look for the line that says '''$GPRMC,194509.000,A,4042.6142,N,07400.4168,W,2.03,221.11,160412,,,A*77''' | Look for the line that says '''$GPRMC,194509.000,A,4042.6142,N,07400.4168,W,2.03,221.11,160412,,,A*77''' | ||
Version du 1 mai 2012 à 15:40
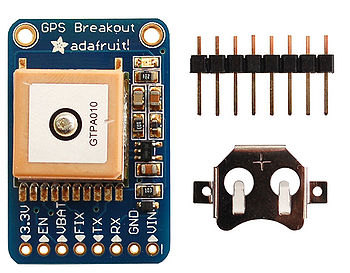
Introduction
http://ladyada.net/products/ultimategps/
Raccorder au PC
GPS modules are great in that the moment you turn them on, they'll start spitting out data, and trying to get a 'fix' (location verification). Like pretty much every GPS in existance, the Adafruit Ultimate GPS uses TTL serial output to send data so the best way to first test the GPS is to wire it directly to the computer via the TTL serial to USB converter on an Arduino. You can also use an FTDI Friend or other TTL adapter but for this demonstation we'll use a classic Arduino.
Le code
First, load a 'blank' sketch into the Arduino:
// this sketch will allow you to bypass the Atmega chip
// and connect the fingerprint sensor directly to the USB/Serial
// chip converter.

// Connect VIN to +5V
// Connect GND to Ground
// Connect GPS RX (data into GPS) to Digital 0
// Connect GPS TX (data out from GPS) to Digital 1

void setup() {}
void loop() {}
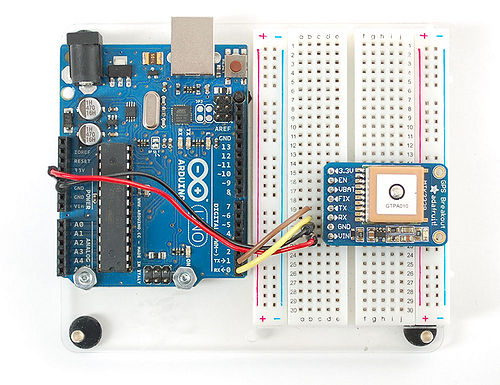
This is will free up the converter so you can directly wire and bypass the Arduino chip. Once you've uploaded this sketch, wire the GPS as follows:
Le montage
Messages GPS
Now plug in the USB cable, and open up the serial monitor from the Arduino IDE and be sure to select 9600 baud in the drop down. You should see text like the following
This is the raw GPS "NMEA sentence" output from the module. There are a few different kinds of NMEA sentences, the most common ones people use are the $GPRMC (Global Positioning Recommended Minimum Coordinates or something like that) and the $GPGGA sentences. These two provide the time, date, latitude, longitude, altitude, estimated land speed, and fix type. Fix type indicates whether the GPS has locked onto the satellite data and received enough data to determine the location (2D fix) or location+altitude (3D fix).
For more details about NMEA sentences and what data they contain, check out this site http://www.gpsinformation.org/dale/nmea.htm
If you look at the data in the above window, you can see that there are a lot of commas, with no data in between them. That's because this module is on my desk, indoors, and does not have a 'fix'. To get a fix, we need to put the module outside.
GPS modules will always send data EVEN IF THEY DO NOT HAVE A FIX!
In order to get 'valid' (not-blank) data you must have the GPS module directly outside, with the square ceramic antenna
pointing up with a clear sky view.
In ideal conditions, the module can get a fix in under 45 seconds. however depending on your location, satellite configuration,
solar flares, tall buildings nearby, RF noise, etc it may take up to half an hour (or more) to get a fix!
This does not mean your GPS module is broken, the GPS module will always work as fast as it can to get a fix.
Interprétation des résultats - Coordonnées - Google Maps
Look for the line that says $GPRMC,194509.000,A,4042.6142,N,07400.4168,W,2.03,221.11,160412,,,A*77
This line is called the RMC (Recommended Minimum) sentence and has pretty much all of the most useful data. Each chunk of data is seperated by a comma.
The first part 194509.000 is the current time GMT. The first two numbers 19 indicate the hour (1900h, otherwise known as 7pm) the next two are the minute, the next two are the seconds and finally the millseconds. So the time when this screenshot was taken is 7:45 pm and 9 seconds
The second part is the 'status code', a savoir:
- V that means the data is Void (invalid).
- A that means its Active (the GPS could get a lock/fix)
The next 4 pieces of data are the geolocation data. According to the GPS, my location is 4042.6142,N (Latitude 40 degrees, 42.3932 minutes North) & 07400.4168,W. (Longitude 74 degrees, 0.4680 minutes West)
To look at this location in Google maps, type +40° 42.6142', -74° 00.4168' into the google maps search box.
Unfortunately gmaps requires you to use +/- instead of NSWE notaion. N and E are postive, S and W are negative.
The next data is the ground speed in knots. We're going 2.03 knots
After that is the tracking angle, this is meant to approximate what 'compass' direction we're heading at based on our past travel
The one after that is 160412 which is the current date (16th of April, 2012).
Finally there is the *XX data which is used as a data transfer checksum
Once you get a fix using your GPS module, verify your location with google maps (or some other mapping software). Remember that GPS is often only accurate to 5-10 meters and worse if you're indoors or surrounded by tall buildings.
Outils
- Ensemble des commandes MTK3329/MTK3339 permettant de changer la fréquence de mise-à-jour, le débit (bauds), la syntaxe de sortie, etc!
- Fiche technique du PA6B (MTK3329), module GPS
- Fiche technique du PA6C (MTK3339), module GPS
- MT3339 GPS PC Tool (windows uniquement) et son manuel
- Mini GPS tool (windows uniquement)
Où Acheter
Le module GPS Ultimate d'AdaFruit est disponible chez MC Hobby.
Traduit avec l'autorisation d'AdaFruit Industries - Translated with the permission from Adafruit Industries - www.adafruit.com
Toute référence, mention ou extrait de cette traduction doit être explicitement accompagné du texte suivant : « Traduction par MCHobby (www.MCHobby.be) - Vente de kit et composants » avec un lien vers la source (donc cette page) et ce quelque soit le média utilisé.
L'utilisation commercial de la traduction (texte) et/ou réalisation, même partielle, pourrait être soumis à redevance. Dans tous les cas de figures, vous devez également obtenir l'accord du(des) détenteur initial des droits. Celui de MC Hobby s'arrêtant au travail de traduction proprement dit.


