ENG-CANSAT-ARDUINO
Install Arduino IDE (the .CC version)
As first operation, you have to install the Arduino IDE from Arduino.CC (not Arduino.ORG). To follow this guide, you must have the version 1.8 or higher.
Register Additional Boards
Once the last version of Arduino IDE installed, open the IDE and select the Preference menu (available in the File menu for Windows and Linux --or-- under the Arduino menu for OS X).
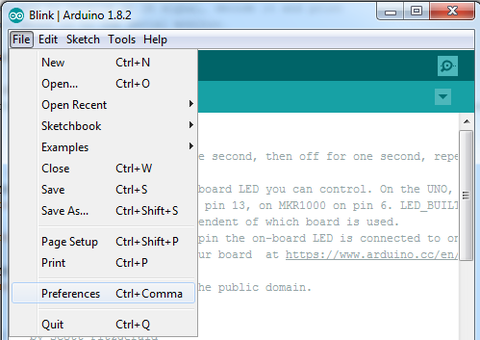
Crédit: AdaFruit Industries www.adafruit.com
You should see a dialog box like the following.
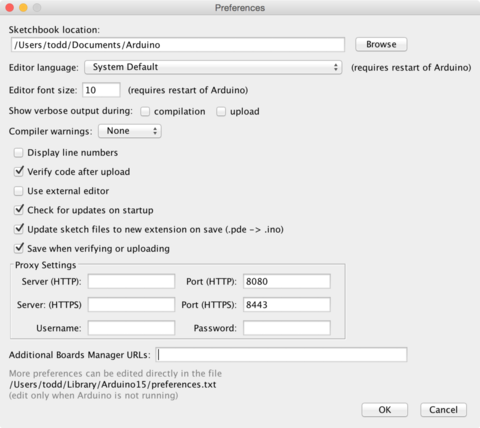
Crédit: AdaFruit Industries www.adafruit.com
We will add an URL in the new option Additional Boards Manager URLs (the URL to handle additional boards).
This field contains an URL list (coma separated). Each new URL can only be added once in this list.
This new Adafruit's board and updates of existing boards will be collected by the "Board Manager" (each time you open it). The URLs point to the index files used by the board manager to build the list of the board available to download.
If you want to know the Arduino IDE's supported boards then browse the list of URLs of managed boards (Arduino Wiki page).
For this board, we only need to add a single URL. However, it is possible to add several URLs separated by a coma.
Copy/paste the link here below in the field Additional Boards Manager URLs (of the Arduino IDE "preference" window).
https://adafruit.github.io/arduino-board-index/package_adafruit_index.json
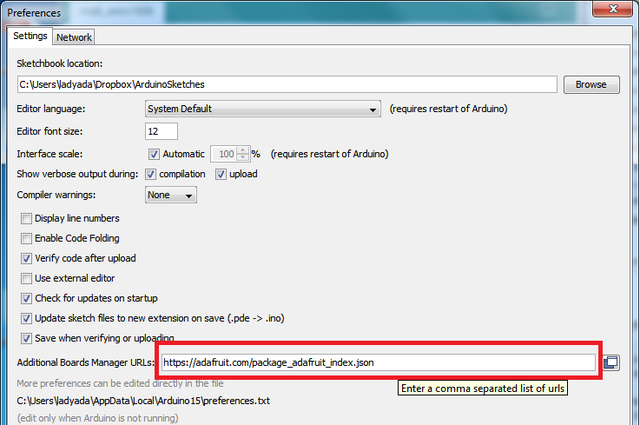
Crédit: AdaFruit Industries www.adafruit.com
Here follows a small description of the boards available with the URLs:
- Adafruit AVR Boards - support for Flora, Gemma, Feather 32u4, Trinket and Trinket Pro.
- Adafruit SAMD Boards - support for the Feather M0, Metro M0, Circuit Playground Express, Gemma M0 and Trinket M0
- Arduino Leonardo & Micro MIDI-USB - Add the MIDI over USB support for Flora, Feather 32u4, Micro & Leonardo (use the projet arcore).
Once the "OK" button pressed, the new preferences are saved.
We can now install the needed board into the Board Manager.
Install the Feather M0 board
Open the Boards Manager available via the menu Tools->Board .
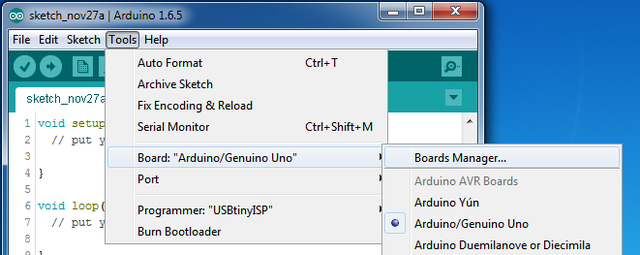
Crédit: AdaFruit Industries www.adafruit.com
Once the Boards Manager opened, select the Contributed type. Once done, you will be able to install the board attached to package_adafruit_index.json URL.
Install the SAMD boards
Now, we will install the Arduino SAMD board version 1.6.15 or higher.
You can type ib the Arduino SAMD in the search box to quickly find the package, then press the Install button.
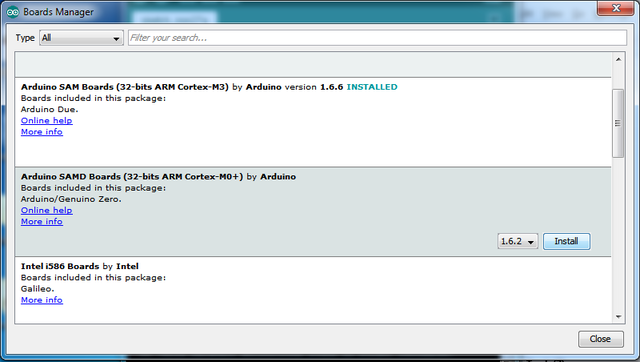
Crédit: AdaFruit Industries www.adafruit.com
Install the ADAFRUIT SAMD board
Ensuite, vous pouvez installer les paquets "Adafruit SAMD" pour ajouter la définition des cartes Adafruit
Vous pouvez saisir Adafruit SAMD dans la zone de recherche puis cliquer sur le bouton Installer lorsque vous avez localisé l'entrée dans la liste.
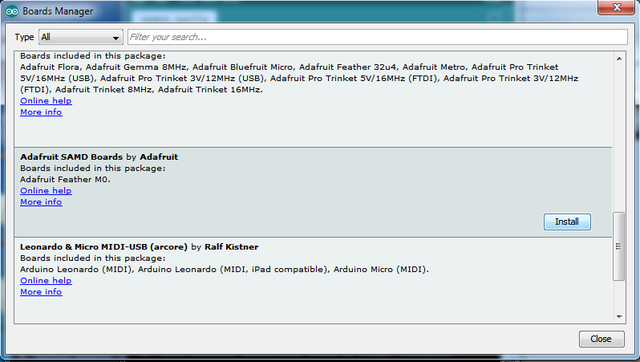
Crédit: AdaFruit Industries www.adafruit.com
Même si cela n'est pas nécessaire en théorie, nous recommandons de redémarrer l'IDE
Check installed boards
Quittez et réouvez Arduino IDE pour vous assurer que toutes les cartes sont correctement installées. Vous devriez être capable de sélectionner de nouvelles cartes (et téléverser du code) vers les nouvelles cartes accessible dans le menu Outils -> Carte (Tools -> Board).
Sélectionnez la carte correspondante à votre achat, les options sont actuellement:
- Feather M0 (pour toutes les cartes Feather M0 autre que l'Express)
- Feather M0 Express
- Metro M0 Express
- Circuit Playground Express
- Gemma M0
- Trinket M0
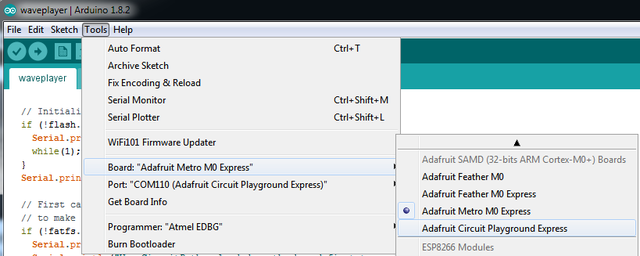
Crédit: AdaFruit Industries www.adafruit.com
Test with BLINK
| If you are using WINDOWS then you should have a look to the "Windows Driver" section here below! |
Nous pouvons maintenant téléverser notre premier croquis "blink"!
Brancher votre Gemma M0, Trinket M0, Metro M0 ou Feather M0 et attendez qu'il soit reconnu par le système d'exploitation (cela devrait prendre quelques secondes). Une fois reconnu, cela créera un port série/COM que vous pourrez sélectionner dans dans la liste déroulante (il devrait même être 'mentionné' un Trinket/Gemma/Metro/Feather M0!)
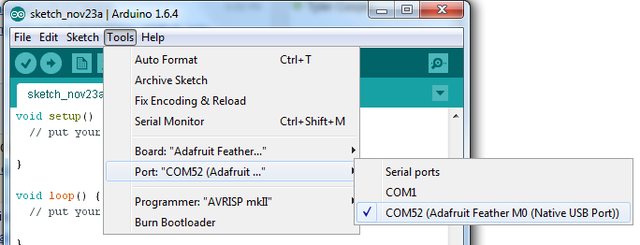
Crédit: AdaFruit Industries www.adafruit.com
Téléversez maintenant l'exemple Blink
// fonction d'initialisation exécutée lorsque la
// plateforme est réinitialisée ou mise sous tension
void setup() {
  // initialiser la broche digitale 13 comme sortie.
  pinMode(13, OUTPUT);
}

// La fonction "loop" est exécutée encore et encore (à l'infini)
void loop() {
  digitalWrite(13, HIGH);   // allumer la LED (HIGH est le niveau haut)
  delay(1000);              // attendre une seconde
  digitalWrite(13, LOW);    // éteindre la LED off (LOW est le niveau bas)
  delay(1000);              // attendre une seconde
}
Et cliquez sur le bouton de téléversement! Vous devriez être capable de voir la LED clignoter. Vous pouvez adapter la vitesse du clignotement en modifiant la valeur du paramètre dans l'appel de fonction delay().
| Si vous rencontrez un problème de téléchargement assurez vous d'avoir sélectionné la carte correspondante au matériel utilisé. |
Install the Windows Driver (Win 7 only)
Il est probable que vous ayez besoin d'installer des pilotes sous Windows lorsque vous branchez la carte.
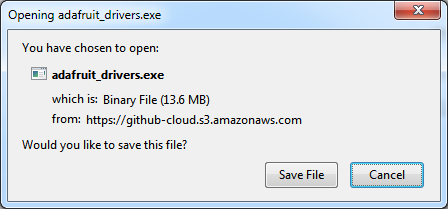
Cliquez sur le bouton de téléchargement ci-dessous pour installer les pilotes Adafruit
Téléchargez et exécutez le programme d'installation
Crédit: AdaFruit Industries www.adafruit.com
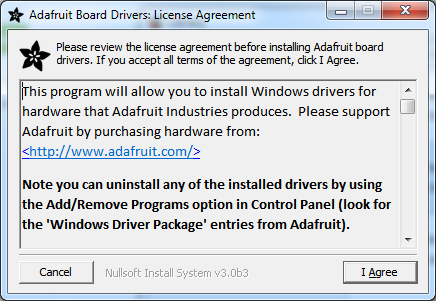
Exécutez le programme d'installation! Etant donné que le programme d'installation de SiLabs et pilotes FTDI, il sera nécessaire de passer les informations de licence en revue.
Crédit: AdaFruit Industries www.adafruit.com
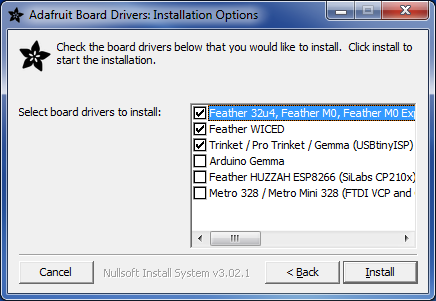
Sélectionnez le pilote que vous désirez installer, la sélection par défaut mettra en place tous les éléments nécessaire au fonctionnement des cartes Adafruit!
Crédit: AdaFruit Industries www.adafruit.com
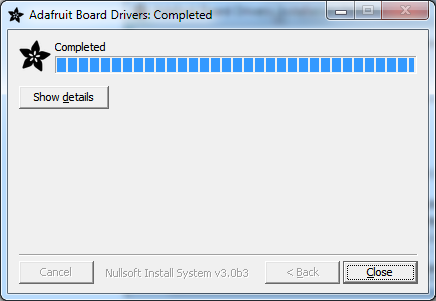
Cliuez sur le bouton Installer pour débuter l'installation.
Crédit: AdaFruit Industries www.adafruit.com
Written by Meurisse D. from MC Hobby - License: CC-SA-BY.