Différences entre versions de « I2C-TCA9548A »
Balises : Modification par le web mobile Modification par mobile |
Balises : Modification par le web mobile Modification par mobile |
||
| Ligne 19 : | Ligne 19 : | ||
En théorie, il est possible d'utiliser jusque 8 multiplexeurs sur un même bus (un pour chaque adresse entre 0x70 et 0x77). Cela permet de contrôler jusqu'à 64 fois la même adresse sans collision. | En théorie, il est possible d'utiliser jusque 8 multiplexeurs sur un même bus (un pour chaque adresse entre 0x70 et 0x77). Cela permet de contrôler jusqu'à 64 fois la même adresse sans collision. | ||
| + | |||
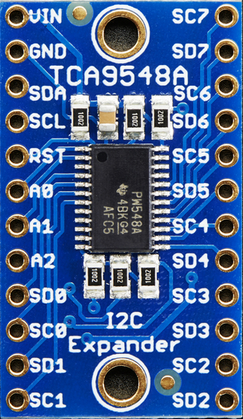
| + | [[Fichier:TCA9548A-pinout.png]] | ||
| + | |||
| + | === Alimentation === | ||
| + | * '''Vin''' : this is the power pin. Since the sensor chip uses 3-5 VDC. To power the board, give it the same power as the logic level of your microcontroller - e.g. for a 5V micro like Arduino, use 5V | ||
| + | * '''GND''' : common ground for power and logic | ||
| + | |||
| + | === I2C Control-Side pins === | ||
| + | * '''SCL''' : this is the I2C clock pin for the chip itself, connect to your microcontrollers I2C clock line. | ||
| + | * '''SDA''' : this is the I2C data pin for the chip itself, connect to your microcontrollers I2C data line. | ||
| + | * '''RST''' : this is the reset pin, for resetting the multiplexer chip. Pulled high by default, connect to ground to reset | ||
| + | * '''A0 A1 A2''' : these are the address selection pins for the multiplexer. By default the multiplexer is at address 0x70 and these three pins are pulled low. Connect them to Vin to set the address to 0x71 - 0x77. A0 à un poids de 1, A1 à un poids de 2, A2 à un poids de 4. | ||
| + | |||
| + | === Broches I2C multiplexées === | ||
| + | |||
| + | '''SDx''' et '''SCx''' : There are 8 sets of '''SDx''' and '''SCx''' pins, from '''SD0/SC0''' to '''SD7/SC7'''. | ||
| + | |||
| + | These are the multiplexed pins. Each one is a completely seperate I2C bus set. | ||
| + | |||
| + | So you have have 8 I2C devices with identical addresses, as long as they are on one I2C bus each. | ||
| + | These pins do not have any pullups installed, so if you are using a chip or breakout without i2c pullups be sure to add them! Nicely, you can have '''Vin''' be 3.3V and have these pins pulled up to 5V (that is, they are 5V compliant). | ||
| + | |||
| + | === Utilisation avec Arduino === | ||
| + | |||
| + | We suggest using this little helper to help you select the port (de 0 à 7). | ||
| + | |||
| + | <nowiki>#define TCAADDR 0x70 | ||
| + | |||
| + | void tcaselect(uint8_t i) { | ||
| + | if (i > 7) return; | ||
| + | |||
| + | Wire.beginTransmission(TCAADDR); | ||
| + | Wire.write(1 << i); | ||
| + | Wire.endTransmission(); | ||
| + | }</nowiki> | ||
| + | |||
| + | You can then call {{fname|tcaselect(0)}} à {{fname|tcaselect(7)}} to set up the multiplexer. | ||
| + | |||
| + | Un code d'exemple Arduino plus complet est disponible sur [https://learn.adafruit.com/adafruit-tca9548a-1-to-8-i2c-multiplexer-breakout/wiring-and-test cette page du tutoriel Adafruit]. | ||
| + | |||
{{I2C-Hacking-TRAILER}} | {{I2C-Hacking-TRAILER}} | ||
Version du 12 février 2021 à 21:16
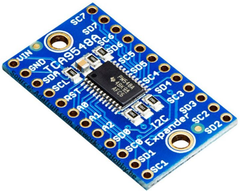
Multiplexeur TCA9548A
Le TCA9548A est un multiplexeur de bus I2C qui permet de brancher le bus I2C en entrée vers l'un des 8 bus I2C en sortie du TCA9548A.
Grâce à ce composant, il est alors possible de brancher un même capteur I2C SANS bit d'adresses plusieurs fois sur un même bus I2C.
Utilisation du TCA9548A
Comme de nombreux breakout Adafruit, le TCA9548A est compatible avec les logiques 3.3V et 5V.
L'utilisation de ce composant est simple:
- le multiplexeur utilise lui même une adresse I2C (0x70, ajustable entre 0x70 à 0x77).
- Pour sélectionner le bus de sortie: envoyer un simple octet/byte pour indiquer le port souhaité
BAM! toutes les autres informations transmises sur le bus I2C seront envoyées vers le port de sortie choisi.
En théorie, il est possible d'utiliser jusque 8 multiplexeurs sur un même bus (un pour chaque adresse entre 0x70 et 0x77). Cela permet de contrôler jusqu'à 64 fois la même adresse sans collision.
Alimentation
- Vin : this is the power pin. Since the sensor chip uses 3-5 VDC. To power the board, give it the same power as the logic level of your microcontroller - e.g. for a 5V micro like Arduino, use 5V
- GND : common ground for power and logic
I2C Control-Side pins
- SCL : this is the I2C clock pin for the chip itself, connect to your microcontrollers I2C clock line.
- SDA : this is the I2C data pin for the chip itself, connect to your microcontrollers I2C data line.
- RST : this is the reset pin, for resetting the multiplexer chip. Pulled high by default, connect to ground to reset
- A0 A1 A2 : these are the address selection pins for the multiplexer. By default the multiplexer is at address 0x70 and these three pins are pulled low. Connect them to Vin to set the address to 0x71 - 0x77. A0 à un poids de 1, A1 à un poids de 2, A2 à un poids de 4.
Broches I2C multiplexées
SDx et SCx : There are 8 sets of SDx and SCx pins, from SD0/SC0 to SD7/SC7.
These are the multiplexed pins. Each one is a completely seperate I2C bus set.
So you have have 8 I2C devices with identical addresses, as long as they are on one I2C bus each. These pins do not have any pullups installed, so if you are using a chip or breakout without i2c pullups be sure to add them! Nicely, you can have Vin be 3.3V and have these pins pulled up to 5V (that is, they are 5V compliant).
Utilisation avec Arduino
We suggest using this little helper to help you select the port (de 0 à 7).
#define TCAADDR 0x70

void tcaselect(uint8_t i) {
  if (i > 7) return;

  Wire.beginTransmission(TCAADDR);
  Wire.write(1 << i);
  Wire.endTransmission();
}
You can then call tcaselect(0) à tcaselect(7) to set up the multiplexer.
Un code d'exemple Arduino plus complet est disponible sur cette page du tutoriel Adafruit.
Réalisé par Meurisse D. pour MCHobby.be.
Toute référence, mention ou extrait de cette traduction doit être explicitement accompagné du texte suivant : « Traduction par MCHobby (www.MCHobby.be) - Vente de kit et composants » avec un lien vers la source (donc cette page) et ce quelque soit le média utilisé.
L'utilisation commercial de la traduction (texte) et/ou réalisation, même partielle, pourrait être soumis à redevance. Dans tous les cas de figures, vous devez également obtenir l'accord du(des) détenteur initial des droits. Celui de MC Hobby s'arrêtant au travail de traduction proprement dit.

