MicroPython-Hack-Outil
|
|
En cours de traduction/élaboration. |
Utiliser la carte PyBoard
Lorsque nous branchons le Pyboard sur un port USB de notre ordinateur, la carte apparaît comme un disque. Vous pouvez éditer le fichier main.py sur le disque, puis éjecter le disque, et finalement presser le bouton RST (Reset) pour réinitialiser la carte afin d'exécuter main.py.
Il existe cependant des façon plus interactive d'utiliser la pyboard comme le mode REPL (Read-Eval-Print Loop, boucle lecture-evaluation-affichage). Pour l'utiliser un programme de communication série (un Terminal) pour vous connecter sur le périphérique /dev/ttyACM0 (sur Linux) ou /dev/tty.usbmodemXXXX (MacOS). Le programme screen sous Unix fonctionne bien mais l'auteur de ce tuto préfère utiliser minicom (lien ArchLinux, existe aussi sur de nombreuses distribution Linux).
pyterm.py
The following script, which I use to call pyterm.py, will connect to a plugged pyboard using minicom:
#!/usr/bin/python
import sys
import os
import fnmatch

"""
Usage: pyterm [device]
Calls minicom on "device". If device is not given, looks for /dev/ttyACM* devices
(the name of the pyboard under Linux) or /dev/tty.usbmodem* devices (name of the
pyboard under MacOS).
"""
def main():
    if len(sys.argv) > 1:
        ttymodems = [sys.argv[1]]
    else:
        ttymodems = fnmatch.filter(os.listdir('/dev'), 'ttyACM*')
        if len(ttymodems) == 0:
            ttymodems = fnmatch.filter(os.listdir('/dev'), 'tty.usbmodem*')
        if len(ttymodems) == 0:
            print('Error: no pyboard found.')
            sys.exit(1)
        ttymodems[0] = '/dev/' + ttymodems[0]
    os.system('minicom -D '+ttymodems[0])

if __name__ == "__main__":
    main()
Avec le script pyterm.py, vous pouvez démarrer une session avec la commande ./pyterm.py /dev/ttyACM1 ou /dev/ttyACM1 est le périphérique correspondant à votre pyboard.
Once connected, you can type Python commands and discover many possibilities of the pyboard. For instance:
led = pyb.LED(1)
led.on()
will turn on the red LED on the pyboard.
led = pyb.LED(1)
def blink(timer):
  led.toggle()
tim = pyb.Timer(4, freq=2, callback=blink)
will make the red LED blink at 1Hz (it is toggled on/off at 2Hz).
Charger du code sur le PyBoard
For writing more complex code, there are two possibilities:
- edit the files on the pyboard, and load them into the REPL using import
- edit the files on your computer, and paste them into the REPL
The first solution works fine and is the only way to work with code that is split into different modules.
The second solution is perhaps easier, but you cannot paste too much text in the REPL without getting errors. You have to switch to the raw REPL by hitting Ctrl-A, pasting your code, and hitting Ctrl-D to finish the transfer. Your code will be running on the pyboard. Hit Ctrl-C to kill it if it does note terminate by itself, then hit Ctrl-B to exit the raw REPL and switch back to the friendly REPL. You can perform a soft reset of the pyboard by hitting Ctrl-D.
Note than when using minicom, you have to hit Ctrl-A twice to send a Ctrl-A to the REPL because Ctrl-A is by default the escape key of minicom. You can use the paste file command in minicom to send a file to the REPL. For this:
- hit Ctrl-A twice to enter the raw REPL
- hit Ctrl-A Y to execute the paste file minicom command
- navigate to your file in the file selection screen that appears and select it
- hit Ctrl-D to finish the transfer
Your file is then loaded. If it contains just definitions, hit Ctrl-B to exit the rawREPL and use the definitions in the regular REPL.
pyboard.py
Another way of executing code on the pyboard is to use the pyboard.py script available in the tools directory of the MicroPython git repository. Exit minicom with Ctrl-A X, then load your file onto the pyboard with pyboard.py file_to_load.py. You can connect to the REPL by launching minicom again.
You can modify the pyboard.py script to find the pyboard device automatically by changing the beginning of the main function as follows:
def main():
    import argparse
    import os
    import fnmatch
    ttymodems = fnmatch.filter(os.listdir('/dev'), 'ttyACM*')
    if len(ttymodems) == 0:
        ttymodems = fnmatch.filter(os.listdir('/dev'), 'tty.usbmodem*')
    if len(ttymodems) == 0:
        print('Error: no pyboard found.')
        sys.exit(1)
    cmd_parser = argparse.ArgumentParser(description='Run scripts on the pyboard.')
    cmd_parser.add_argument('--device', default='/dev/' + ttymodems[0], help='the serial device of the pyboard')
An already patched version (may not be up to date with respect to the git repository) is available.
Si vous desirez utiliser le script original du script, la commande à utiliser pour charger votre fichier mon_fichier.py sur ma pyboard est {{{1}}} . /dev/ttyACM1 correspond à la connexion série associée à votre PyBoard.
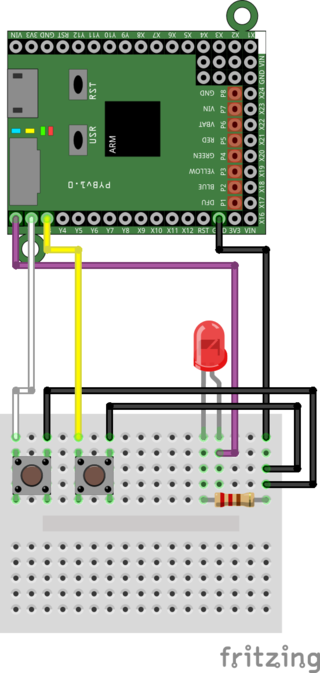
Element Fritzing
I use Fritzing to draw my sketches. I have made a Fritzing part for the pyboard. You can also get the SVG pictures I made for the PCB, the schematics and the icon.
You can see how it looks on the example below:

Source: Supelec.fr
Codes d'exemples
L'article de Mr Boulanger contient également quelques codes d'exemples, vous pourrez les trouver ici.
Source et autorisation de traduction
Le contenu de cette page est une traduction de l'article MicroPython de Mr Boulanger sur CentaleSupélec. Traduit avec l'aimable autorisation de Mr Boulanger.
Vous pouvez retrouver l'article original sur http://wdi.supelec.fr/boulanger/MicroPython/
Source: Micro Python Intro écrit par/written by Damien P.George
Traduit par Meurisse D. pour MCHobby.be - Translated by Meurisse D. for MCHobby.be
Toute référence, mention ou extrait de cette traduction doit être explicitement accompagné du texte suivant : « Traduction par MCHobby (www.MCHobby.be) - Vente de kit et composants » avec un lien vers la source (donc cette page) et ce quelque soit le média utilisé.
L'utilisation commercial de la traduction (texte) et/ou réalisation, même partielle, pourrait être soumis à redevance. Dans tous les cas de figures, vous devez également obtenir l'accord du(des) détenteur initial des droits. Celui de MC Hobby s'arrêtant au travail de traduction proprement dit.
Traduit avec l'autorisation de micropython.org - Translated with the authorisation of micropython.org