Différences entre versions de « MicroPython-Hack-accelerometre »
| Ligne 7 : | Ligne 7 : | ||
Un accéléromètre mesure "l'accélération". Rien de pertinent de prime abord mais étant donné que notre planète Terre dispose également d'une accélération gravitationnelle (de 1G), il est possible de détecter l'orientation du breakout/d'une carte par rapport à la terre avec ce senseur. Un accéléromètre 3 axes peut, par exemple, être utilisé pour détecter l'orientation d'un écran de téléphone (voir [http://fr.wikipedia.org/wiki/Acc%C3%A9l%C3%A9rom%C3%A8tre cet article sur Wikipedia]) ou l'orientation de votre robot dans l'espace (est-il debout sur ses pieds ou couché sur son dos ou encore tête vers le bas?) | Un accéléromètre mesure "l'accélération". Rien de pertinent de prime abord mais étant donné que notre planète Terre dispose également d'une accélération gravitationnelle (de 1G), il est possible de détecter l'orientation du breakout/d'une carte par rapport à la terre avec ce senseur. Un accéléromètre 3 axes peut, par exemple, être utilisé pour détecter l'orientation d'un écran de téléphone (voir [http://fr.wikipedia.org/wiki/Acc%C3%A9l%C3%A9rom%C3%A8tre cet article sur Wikipedia]) ou l'orientation de votre robot dans l'espace (est-il debout sur ses pieds ou couché sur son dos ou encore tête vers le bas?) | ||
| − | Cela semblera plus évident après la lecture de la méthode de calibration de l'accéléromètre (cfr [ADX335-326-Calibrer-Programmer notre tutoriel] sur le breakout accéléromètre ADXL335 d'AdaFruit pour Arduino). | + | Cela semblera plus évident après la lecture de la méthode de calibration de l'accéléromètre (cfr [[ADX335-326-Calibrer-Programmer|notre tutoriel]] sur le breakout accéléromètre ADXL335 d'AdaFruit pour Arduino). |
}} | }} | ||
Version du 24 février 2015 à 12:17
Introduction
Here you will learn how to read the accelerometer and signal using LEDs states like tilt left and tilt right.
Qu'est ce qu'un accéléromètre
Un accéléromètre mesure "l'accélération". Rien de pertinent de prime abord mais étant donné que notre planète Terre dispose également d'une accélération gravitationnelle (de 1G), il est possible de détecter l'orientation du breakout/d'une carte par rapport à la terre avec ce senseur. Un accéléromètre 3 axes peut, par exemple, être utilisé pour détecter l'orientation d'un écran de téléphone (voir cet article sur Wikipedia) ou l'orientation de votre robot dans l'espace (est-il debout sur ses pieds ou couché sur son dos ou encore tête vers le bas?)
Cela semblera plus évident après la lecture de la méthode de calibration de l'accéléromètre (cfr notre tutoriel sur le breakout accéléromètre ADXL335 d'AdaFruit pour Arduino).
Utiliser l'accéléromètre
The pyboard has an accelerometer (a tiny mass on a tiny spring) that can be used to detect the angle of the board and motion. There is a different sensor for each of the x, y, z directions. To get the value of the accelerometer, create a pyb.Accel() object and then call the x() method.
>>> accel = pyb.Accel()
>>> accel.x()
7
This returns a signed integer with a value between around -30 and 30. Note that the measurement is very noisy, this means that even if you keep the board perfectly still there will be some variation in the number that you measure. Because of this, you shouldn’t use the exact value of the x() method but see if it is in a certain range.
We will start by using the accelerometer to turn on a light if it is not flat.
accel = pyb.Accel()
light = pyb.LED(3)
SENSITIVITY = 3

while True:
    x = accel.x()
    if abs(x) > SENSITIVITY:
        light.on()
    else:
        light.off()

    pyb.delay(100)
We create Accel and LED objects, then get the value of the x direction of the accelerometer. If the magnitude of x is bigger than a certain value SENSITIVITY, then the LED turns on, otherwise it turns off. The loop has a small pyb.delay() otherwise the LED flashes annoyingly when the value of x is close to SENSITIVITY. Try running this on the pyboard and tilt the board left and right to make the LED turn on and off.
Exercice
Change the above script so that the blue LED gets brighter the more you tilt the pyboard. HINT: You will need to rescale the values, intensity goes from 0-255.
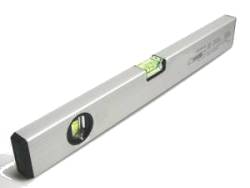
Réaliser un Niveau

Sous licence GPL via Wikimedia Commons - Water_level.jpg
The example above is only sensitive to the angle in the x direction but if we use the y() value and more LEDs we can turn the pyboard into a spirit level.
xlights = (pyb.LED(2), pyb.LED(3))
ylights = (pyb.LED(1), pyb.LED(4))

accel = pyb.Accel()
SENSITIVITY = 3

while True:
    x = accel.x()
    if x > SENSITIVITY:
        xlights[0].on()
        xlights[1].off()
    elif x < -SENSITIVITY:
        xlights[1].on()
        xlights[0].off()
    else:
        xlights[0].off()
        xlights[1].off()

    y = accel.y()
    if y > SENSITIVITY:
        ylights[0].on()
        ylights[1].off()
    elif y < -SENSITIVITY:
        ylights[1].on()
        ylights[0].off()
    else:
        ylights[0].off()
        ylights[1].off()

    pyb.delay(100)
We start by creating a tuple of LED objects for the x and y directions. Tuples are immutable objects in python which means they can’t be modified once they are created. We then proceed as before but turn on a different LED for positive and negative x values. We then do the same for the y direction. This isn’t particularly sophisticated but it does the job. Run this on your pyboard and you should see different LEDs turning on depending on how you tilt the board.
Source: The accelerometer écrit par/written by Damien P.George
Traduit par Meurisse D. pour MCHobby.be - Translated by Meurisse D. for MCHobby.be
Traduit avec l'autorisation de micropython.org - Translated with the authorisation of micropython.org
Toute référence, mention ou extrait de cette traduction doit être explicitement accompagné du texte suivant : « Traduction par MCHobby (www.MCHobby.be) - Vente de kit et composants » avec un lien vers la source (donc cette page) et ce quelque soit le média utilisé.
L'utilisation commercial de la traduction (texte) et/ou réalisation, même partielle, pourrait être soumis à redevance. Dans tous les cas de figures, vous devez également obtenir l'accord du(des) détenteur initial des droits. Celui de MC Hobby s'arrêtant au travail de traduction proprement dit.