RASP-PIZERO-CARTE-SD-Mac
Introduction
Ray Vijoen à créé un script très utile pour créer très facilement une carte SD sur un Mac. C'est un script shell qui prend en charge toutes les étapes nécessaires pour réaliser une carte SD, incluant son formatage. Vous aurez cependant besoin de démarrer ce programme depuis une ligne de commande.
Etape 1
Téléchargez Raspberry-PI-SD-Installer-OS-X depuis https://github.com/RayViljoen/Raspberry-PI-SD-Installer-OS-X
Cherchez le bouton "zip" en haut de la page et téléchargez le.
Etape 2
Faite une extraction du contenu du fichier Zip.
Vous obtiendrez un répertoire appelé 'Raspberry-PI-SD-Installer-OS-X-master'.
Etape 3
Use Finder to move the img file that you downloaded earlier into the Raspberry-PI-SD-Installer-OS-X-master folder.
You can see here that I have multiple images in the folder. That is fine, you can have as many images as you like in the folder.

Crédit: AdaFruit Industries www.adafruit.com
Etape 4
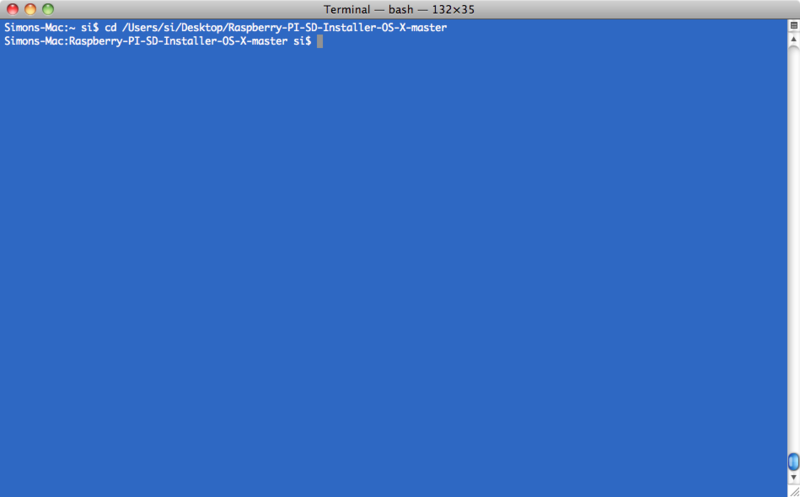
Open the Terminal app – you will find this in the Utilities folder of your Applications folder on your Mac.
Then type the command 'cd' followed by the path of your Raspberry-PI-SD-Installer-OS-X-master folder.

Crédit: AdaFruit Industries www.adafruit.com
Etape 5
Eject any external drives that you have connected to your computer. This just makes it easier to identify the correct drive that corresponds to your SD card.
Insert the SD card that you want to use. Note that all data on this card will be erased.
Etape 6
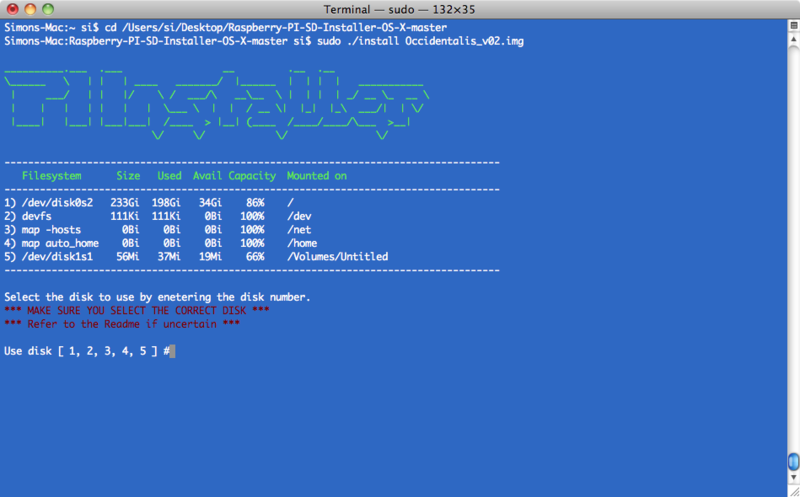
Run the Pi Installer by typing the following command into the Terminal:
sudo ./install Occidentalis_v02.img
Where Occidentalis_v02.img is the name of the img file for the distribution that you want to install.
You will be prompted for your Mac password and then should see this:

Crédit: AdaFruit Industries www.adafruit.com
Etape 7
Enter the number next to the SD card drive. Make sure you get this right, because whichever drive you select will be erased.
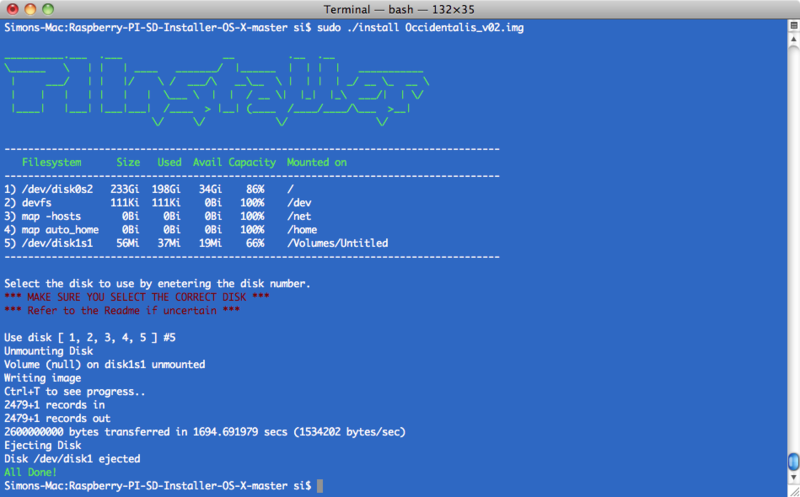
It is then just a matter of waiting until all the image file is installed. This will take a few minutes. You can check on the progress by pressing ctrl-T
When everything is complete, you should see this:

Crédit: AdaFruit Industries www.adafruit.com
hats all there is to it, the SD card is now ready to use with your Raspberry Pi.
Source: Introducing the Raspberry Pi Zero
Créé par LadyAda pour AdaFruit Industries.
Traduction réalisée et augmentée par Meurisse D pour MCHobby.be.
Toute référence, mention ou extrait de cette traduction doit être explicitement accompagné du texte suivant : « Traduction par MCHobby (www.MCHobby.be) - Vente de kit et composants » avec un lien vers la source (donc cette page) et ce quelque soit le média utilisé.
L'utilisation commercial de la traduction (texte) et/ou réalisation, même partielle, pourrait être soumis à redevance. Dans tous les cas de figures, vous devez également obtenir l'accord du(des) détenteur initial des droits. Celui de MC Hobby s'arrêtant au travail de traduction proprement dit.
Traduit avec l'autorisation d'AdaFruit Industries - Translated with the permission from Adafruit Industries - www.adafruit.com