Différences entre versions de « Rasp-Os-Occidentalis-v0.1 »
| Ligne 13 : | Ligne 13 : | ||
[http://www.bootc.net/archives/2012/05/19/i2c-and-the-raspberry-pi/ Pour plus d'informations et idées, vous pouvez consulter ce billet] (par l'incroyable cboot) et les autres articles sur les Forums Raspberry Pi. | [http://www.bootc.net/archives/2012/05/19/i2c-and-the-raspberry-pi/ Pour plus d'informations et idées, vous pouvez consulter ce billet] (par l'incroyable cboot) et les autres articles sur les Forums Raspberry Pi. | ||
| − | + | N'hésitez pas à vérifier les tutoriels sur [[Rasp-Hack-BMP085|BMP085]], [[Rasp-Hack-MCP4725|MCP4725]], [[Rasp-Hack-16-channel-servo-driver|Controleur PWM/Servo 16 canaux]] et [[Rasp-Hack-Led-Backpack|controleur 7 segments]] '''couvrant l'utilisation de I2C avec un Pi et par l'intermédiaire de Python''' - Lire ces tutoriels vous offrira exemple, raccordement, utilisation et des idées pour exploiter le bus I2C! | |
| − | N'hésitez pas à vérifier les tutoriels sur [[Rasp-Hack-BMP085|BMP085]], | ||
| − | |||
== SPI Support == | == SPI Support == | ||
Version du 22 février 2013 à 11:58
|
|
En cours de traduction/élaboration. |
Limite de traduction
| Nous n'allons pas traduire les notes d'installation puisque la version 0.2 contient ces informations. Nous allons uniquement nous concentrer sur les caractéristiques spécifiques de la version 0.1. |
Support I2C
Le support I2C est implémenté sur les broches SDA et SCL. Pour le tester, connectez un périphérique I2C (Alimentation, Masse, SDA et SCL). Exécutez ensuite la commande i2cdetect -y 0 (en root) pour détecter les adresses utilisées sur le bus I2C.
Pour plus d'informations et idées, vous pouvez consulter ce billet (par l'incroyable cboot) et les autres articles sur les Forums Raspberry Pi.
N'hésitez pas à vérifier les tutoriels sur BMP085, MCP4725, Controleur PWM/Servo 16 canaux et controleur 7 segments couvrant l'utilisation de I2C avec un Pi et par l'intermédiaire de Python - Lire ces tutoriels vous offrira exemple, raccordement, utilisation et des idées pour exploiter le bus I2C!
SPI Support
SPI support is on the CLK/MOSI/MISO/CS0/CS1 pins. To test, connect your logic analyser/scope to the pins and run echo "testtext" > /dev/spidev0.0 to send some dummy data to the SPI port. You can simply read/write the /dev/spidev files to read/write from SPI
- GRAS***
Our Light Painting tutorial uses the hardware SPI system to write to digital LED strip, ***LINK MCP3008*** we also have a 'bitbanging' software SPI tutorial here if you need such a thing
- GRAS***
One Wire Support
One wire is most commonly used for DS18B20 temp sensors. The Pi does not have 'hardware' 1-wire support but it can bitbang it with some success. Connect a DS18B20 with VCC to 3V, ground to ground and Data to GPIO #4. Then connect a 4.7K resistor from Data to VCC.
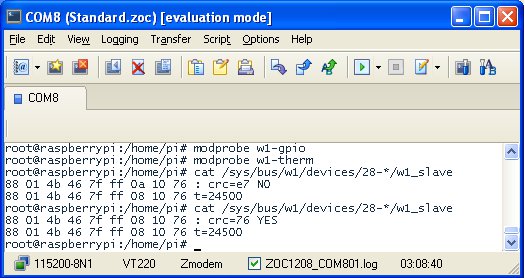
Then run as root: modprobe w1-gpio and then modprobe w1-therm to attach the temperature submodule. Then you can run cat /sys/bus/w1/devices/28-*/w1_slave to read the temperature data from the bus
The first line has the CRC, if its "NO" then the data is corrupted. If you get a good CRC check, the second line has t=temperature in 1/1000 of a degree Centigrade. For example, below, the temperature is 24.5°C
Since 1-wire is bitbanged, its flakier than SPI or I2C. ***LINK*** We have a short tutorial on using a DS18B20 sensor (http://learn.adafruit.com/adafruits-raspberry-pi-lesson-11-ds18b20-temperature-sensing)
Wifi Support
Bonjour Support
Bonjour is what Apple uses to make it easier to find new devices on a LAN. Instead of having to look up the IP address, there's a local name. This distro uses raspberrypi.local by default. All Apple machines have Bonjour servers. If you have ever installed iTunes, it comes with it. Other Windows users can get it from here - its called the print server but its what you want
Test by trying to ping raspberrypi.local when the Pi is booted and connected to Ethernet (or WiFi once you have configured WiFi)
sshd on Boot
This image has sshd on boot - that means you can immediately ssh in using raspberrypi.local! The ssh keys are generated on boot but since the user/pass is simply pi/raspberry you should not put this on an accessible network until you've changed the password
Source: [1]
Traduit avec l'autorisation d'AdaFruit Industries - Translated with the permission from Adafruit Industries - www.adafruit.com
Toute référence, mention ou extrait de cette traduction doit être explicitement accompagné du texte suivant : « Traduction par MCHobby (www.MCHobby.be) - Vente de kit et composants » avec un lien vers la source (donc cette page) et ce quelque soit le média utilisé.
L'utilisation commercial de la traduction (texte) et/ou réalisation, même partielle, pourrait être soumis à redevance. Dans tous les cas de figures, vous devez également obtenir l'accord du(des) détenteur initial des droits. Celui de MC Hobby s'arrêtant au travail de traduction proprement dit.
