Senseur IR Decodeur IR
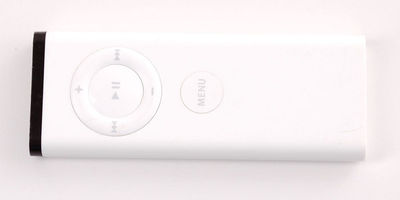
Crédit: AdaFruit Industries www.adafruit.com
Pour notre projet final, nous allons utiliser une commande à distance pour envoyer des messages à un microcontrôleur. Par exemple, cela peut être utile afin de pouvoir piloter un robot à distance. C'est également un technique intéressante pour contrôler un projet à distance, sans avoir besoin de fils.
En guise de télécommande, ce tuto utilise une télécommande Apple. Vous pouvez utiliser n'importe quelle type de télécommande, une déjà utilisée à la maison ou une de récupération.
Nous allons utiliser le code du croquis/sketch précédent pour lire les données en provenance de la télécommande mais cette fois, nous allons afficher le contenu des informations sous forme de tableau afin de détecter plus facilement un pattern (un patron).
void printpulses(void) {
    Serial.println("\n\r\n\rReceived: \n\rOFF \tON");
    for (uint8_t i = 0; i < currentpulse; i++) {
       Serial.print(pulses[i][0] * RESOLUTION, DEC);
       Serial.print(" usec, ");
       Serial.print(pulses[i][1] * RESOLUTION, DEC);
       Serial.println(" usec");
    }
    // print it in a 'array' format
    Serial.println("int IRsignal[] = {");
    Serial.println("// ON, OFF (in 10's of microseconds)");
    for (uint8_t i = 0; i < currentpulse-1; i++) {
       Serial.print("\t"); // tab
       Serial.print(pulses[i][1] * RESOLUTION / 10, DEC);
       Serial.print(", ");
       Serial.print(pulses[i+1][0] * RESOLUTION / 10, DEC);
       Serial.println(",");
    }
    Serial.print("\t"); // tab
    Serial.print(pulses[currentpulse-1][1] * RESOLUTION / 10, DEC);
    Serial.print(", 0};");
}
Le nouveau croquis téléversé sur notre Arduino, pressons le bouton "Jouer" de la télécommande et voyons le résutlat que nous allons obtenir:
int IRsignal[] = { // ON, OFF (in 10's of microseconds)
    912, 438,
    68, 48,
    68, 158,
    68, 158,
    68, 158,
    68, 48,
    68, 158,
    68, 158,
    68, 158,
    70, 156,
    70, 158,
    68, 158,
    68, 48,
    68, 46,
    70, 46,
    68, 46,
    68, 160,
    68, 158,
    70, 46,
    68, 158,
    68, 46,
    70, 46,
    68, 48,
    68, 46,
    68, 48,
    66, 48,
    68, 48,
    66, 160,
    66, 50,
    66, 160,
    66, 52,
    64, 160,
    66, 48,
    66, 3950,
    908, 214,
    66, 3012,
    908, 212,
    68, 0 };
Nous allons essayer de détecter ce code. Essayons de démarrer un nouveau croquis appelé IR Commander (la version finale du code est disponible sur le GitHub d'AdaFruit) qui utilisera une partie de notre précédent croquis.
La première partie écourtera simplement le code Infrarouge et placera les temps d'impulsion dans le tableau pulses[]. Il retournera le nombre d'impulsions détecté comme valeur de retour.
int listenForIR(void) {
currentpulse = 0;
while (1) {
    uint16_t highpulse, lowpulse; // temporary storage timing
    highpulse = lowpulse = 0; // start out with no pulse length
    // while (digitalRead(IRpin)) { // this is too slow!
    while (IRpin_PIN & (1 << IRpin)) {
       // pin is still HIGH
       // count off another few microseconds
       highpulse++;
       delayMicroseconds(RESOLUTION);
       // If the pulse is too long, we 'timed out' - either nothing
       // was received or the code is finished, so print what
       // we've grabbed so far, and then reset
       if ((highpulse >= MAXPULSE) && (currentpulse != 0)) {
          return currentpulse;
       }
    }
    // we didn't time out so lets stash the reading
    pulses[currentpulse][0] = highpulse;
    // same as above
    while (! (IRpin_PIN & _BV(IRpin))) {
       // pin is still LOW
       lowpulse++;
       delayMicroseconds(RESOLUTION);
       if ((lowpulse >= MAXPULSE) && (currentpulse != 0)) {
          return currentpulse;
       }
    }
    pulses[currentpulse][1] = lowpulse;
    // we read one high-low pulse successfully, continue!
    currentpulse++;
    }
}
Notre nouvelle fonction loop() ne fera qu' "écouter" après les impulsions.
void loop(void) {
    int numberpulses;
    numberpulses = listenForIR();
    Serial.print("Heard ");
    Serial.print(numberpulses);
    Serial.println("-pulse long IR signal");
}
Lorsqu'il fonctionne, il affiche quelque chose comme ceci...
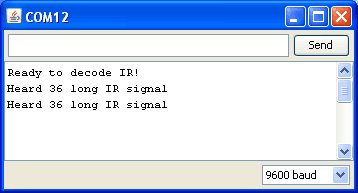
Crédit: AdaFruit Industries www.adafruit.com
OK, il est maintenant temps de faire en sorte que notre croquis compare ce qu'il à reçu et ce qu'il a déjà dans le notre tableau de référence:
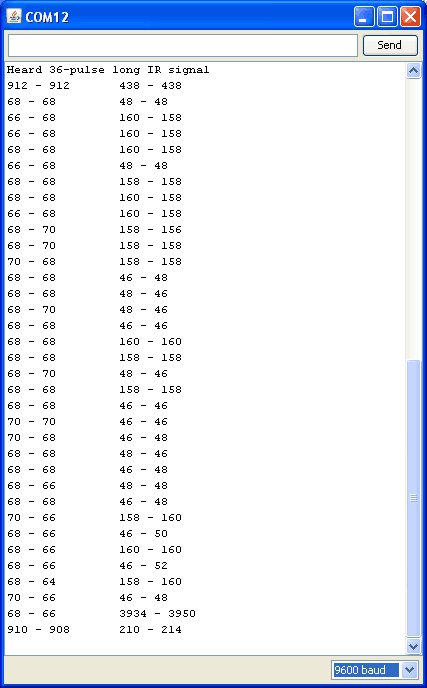
Crédit: AdaFruit Industries www.adafruit.com
Comme vous pouvez le voir, il y a quelques variations. Lorsque nous faisons la comparaison, nous ne pouvons malheureusement pas attendre d'avoir exactement les mêmes valeurs, nous devons opter pour une méthode un peu plus 'créative'.
Disons que la valeur peu varier d'environ 20% - cela devrait être suffisant.
// Quel pourcentage de variation est toléré durant la comparaison de deux code
#define FUZZINESS 20

void loop(void) {
    int numberpulses;
    numberpulses = listenForIR();
    Serial.print("Heard ");
    Serial.print(numberpulses);
    Serial.println("-pulse long IR signal");
    for (int i=0; i< numberpulses-1; i++) {
      int oncode = pulses[i][1] * RESOLUTION / 10;
      int offcode = pulses[i+1][0] * RESOLUTION / 10;

      Serial.print(oncode); // le signal ON réceptionné
      Serial.print(" - ");
      Serial.print(ApplePlaySignal[i*2 + 0]); // Le signal ON attendu
      // Vérifier pour s'arrure que l'erreur est inférieure à FUZZINESS pourcent
      if ( abs(oncode - ApplePlaySignal[i*2 + 0]) <= (oncode * FUZZINESS / 100)) {
        Serial.print(" (ok)");
      } else {
        Serial.print(" (x)");
      }
      Serial.print(" \t"); // tab

      Serial.print(offcode); // Le signal OFF réceptionné
      Serial.print(" - ");
      Serial.print(ApplePlaySignal[i*2 + 1]); // Le signal OFF attendu
      if ( abs(offcode - ApplePlaySignal[i*2 + 1]) <= (offcode * FUZZINESS / 100)) {
        Serial.print(" (ok)");
      } else {
        Serial.print(" (x)");
      }
      Serial.println();
    }
 }
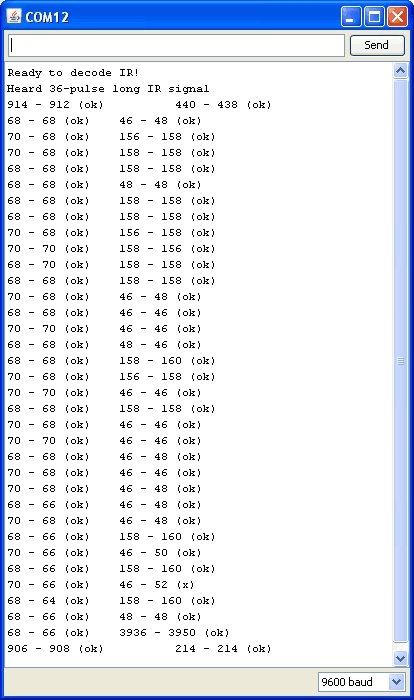
Crédit: AdaFruit Industries www.adafruit.com
This loop, as it goes through each pulse, does a little math. It compares the absolute (abs()) difference between the code we heard and the code we're trying to match abs(oncode - ApplePlaySignal[i*2 + 0]) and then makes sure that the error is less than FUZZINESS percent of the code length (oncode * FUZZINESS / 100)
We found we had to tweak the stored values a little to make them match up 100% each time. IR is not a precision-timed protocol so having to make the FUZZINESS 20% or more is not a bad thing
Finally, we can turn the loop() into its own function which will retunr true or false depending on whether it matched the code we ask it to. We also commented out the printing functions
    boolean IRcompare(int numpulses, int Signal[]) {
    for (int i=0; i< numpulses-1; i++) {
    int oncode = pulses[i][1] * RESOLUTION / 10;
    int offcode = pulses[i+1][0] * RESOLUTION / 10;
    /*
    Serial.print(oncode); // the ON signal we heard
    Serial.print(" - ");
    Serial.print(Signal[i*2 + 0]); // the ON signal we want
    */
    // check to make sure the error is less than FUZZINESS percent
    if ( abs(oncode - Signal[i*2 + 0]) <= (Signal[i*2 + 0] * FUZZINESS / 100)) {
    //Serial.print(" (ok)");
    } else {
    //Serial.print(" (x)");
    // we didn't match perfectly, return a false match
    return false;
    }
    /*
    Serial.print(" \t"); // tab
    Serial.print(offcode); // the OFF signal we heard
    Serial.print(" - ");
    Serial.print(Signal[i*2 + 1]); // the OFF signal we want
    */
    if ( abs(offcode - Signal[i*2 + 1]) <= (Signal[i*2 + 1] * FUZZINESS / 100)) {
    //Serial.print(" (ok)");
    } else {
    //Serial.print(" (x)");
    // we didn't match perfectly, return a false match
    return false;
    }
    //Serial.println();
    }
    // Everything matched!
    return true;
    }
We then took more IR command data for the 'rewind' and 'fastforward' buttons and put all the code array data into ircodes.h to keep the main sketch from being too long and unreadable ([http://github.com/adafruit/IR-Commander vous pouvez obtenir tout le code depuis le GitHib d'AdaFruit)
Finally, the main loop looks like this:
    void loop(void) {
    int numberpulses;
    numberpulses = listenForIR();
    Serial.print("Heard ");
    Serial.print(numberpulses);
    Serial.println("-pulse long IR signal");
    if (IRcompare(numberpulses, ApplePlaySignal)) {
    Serial.println("PLAY");
    }
    if (IRcompare(numberpulses, AppleRewindSignal)) {
    Serial.println("REWIND");
    }
    if (IRcompare(numberpulses, AppleForwardSignal)) {
    Serial.println("FORWARD");
    }
    }
We check against all the codes we know about and print out whenever we get a match. You could now take this code and turn it into something else, like a robot that moves depending on what button is pressed.
After testing, success!
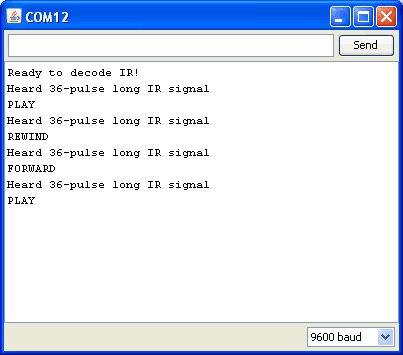
Crédit: AdaFruit Industries www.adafruit.com
Source: IR Sensor
Crée par LadyAda pour AdaFruit Industries.
Traduit par Meurisse D. pour MCHobby
Traduit avec l'autorisation d'AdaFruit Industries - Translated with the permission from Adafruit Industries - www.adafruit.com
Toute référence, mention ou extrait de cette traduction doit être explicitement accompagné du texte suivant : « Traduction par MCHobby (www.MCHobby.be) - Vente de kit et composants » avec un lien vers la source (donc cette page) et ce quelque soit le média utilisé.
L'utilisation commercial de la traduction (texte) et/ou réalisation, même partielle, pourrait être soumis à redevance. Dans tous les cas de figures, vous devez également obtenir l'accord du(des) détenteur initial des droits. Celui de MC Hobby s'arrêtant au travail de traduction proprement dit.