Différences entre versions de « Spark-Core-NetLED »
| Ligne 5 : | Ligne 5 : | ||
== Contrôler des LEDs par Internet == | == Contrôler des LEDs par Internet == | ||
| − | {{bloc-etroit|text= | + | {{bloc-etroit|text=Maintenant que nous savons comment faire clignoter une LED, nous allons voir comment la contrôler via Internet? C'est maintenant que nous allons avoir du fun.}} |
== Montage == | == Montage == | ||
Version du 26 novembre 2014 à 19:17
|
|
En cours de traduction/élaboration. |
Contrôler des LEDs par Internet
Maintenant que nous savons comment faire clignoter une LED, nous allons voir comment la contrôler via Internet? C'est maintenant que nous allons avoir du fun.
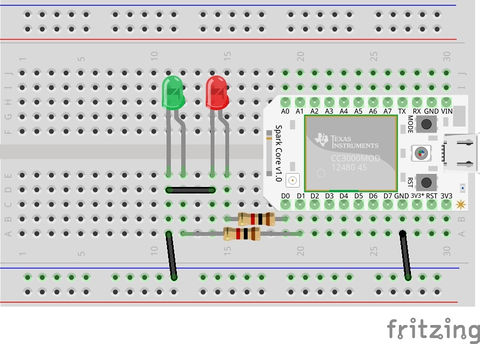
Montage
Lets hook up two LEDs this time.

Crédit: Particle.IO www.particle.io
Le Programme
L'algorithme
Voici comment fonctionne le programme
- Set up the pins as outputs that have LEDs connected to them
- Create and register a Spark function ( this gets called automagically when you make an API request to it)
- Parse the incoming command and take appropriate actions
Le code
Voici le code proposé par Spark... avec traduction des commentaires pour faciliter la compréhension
// -----------------------------------
// Controlling LEDs over the Internet
// -----------------------------------

// name the pins
int led1 = D0;
int led2 = D1;

// This routine runs only once upon reset
void setup()
{
   //Register our Spark function here
   Spark.function("led", ledControl);

   // Configure the pins to be outputs
   pinMode(led1, OUTPUT);
   pinMode(led2, OUTPUT);

   // Initialize both the LEDs to be OFF
   digitalWrite(led1, LOW);
   digitalWrite(led2, LOW);
}


// This routine loops forever
void loop()
{
   // Nothing to do here
}


// This function gets called whenever there is a matching API request
// the command string format is l<led number>,<state>
// for example: l1,HIGH or l1,LOW
//              l2,HIGH or l2,LOW

int ledControl(String command)
{
   int state = 0;
   //find out the pin number and convert the ascii to integer
   int pinNumber = (command.charAt(1) - '0') - 1;
   //Sanity check to see if the pin numbers are within limits
   if (pinNumber < 0 || pinNumber > 1) return -1;

   // find out the state of the led
   if(command.substring(3,7) == "HIGH") state = 1;
   else if(command.substring(3,6) == "LOW") state = 0;
   else return -1;

   // write to the appropriate pin
   digitalWrite(pinNumber, state);
   return 1;
}
Faire une requête sur l'API
Note that the API endpoint is 'led', not 'ledControl'. This is because the endpoint is defined by the first argument of Spark.function(), which is a string of characters, rather than the second argument, which is a function.
The API request will look something like this:
POST /v1/devices/{DEVICE_ID}/led
- EXAMPLE REQUEST IN TERMINAL
- Core ID is 0123456789abcdef
- Your access token is 123412341234
curl https://api.spark.io/v1/devices/0123456789abcdef/led \
  -d access_token=123412341234 \
  -d params=l1,HIGH
Mieux comprendre l'API
To better understand the concept of making API calls to your Core over the cloud checkout the Cloud API reference.
Source: Particle Core Examples créé par Particle.IO.
Traduction (et augmentation de contenu) réalisée par Meurisse D pour MCHobby.be - Translated (and enhanced) by Meurisse D. for MCHobby.be
Traduit avec l'autorisation de Particle.IO - Translated with the permission from Particle.IO - Particle.IO
Toute référence, mention ou extrait de cette traduction doit être explicitement accompagné du texte suivant : « Traduction par MCHobby (www.MCHobby.be) - Vente de kit et composants » avec un lien vers la source (donc cette page) et ce quelque soit le média utilisé.
L'utilisation commercial de la traduction (texte) et/ou réalisation, même partielle, pourrait être soumis à redevance. Dans tous les cas de figures, vous devez également obtenir l'accord du(des) détenteur initial des droits. Celui de MC Hobby s'arrêtant au travail de traduction proprement dit.