Différences entre versions de « MicroPython-Hack-fading »
| Ligne 36 : | Ligne 36 : | ||
{{MPImage|MicroPython-Hack-fading-01.png}} | {{MPImage|MicroPython-Hack-fading-01.png}} | ||
| − | By examining the Quick reference for the pyboard, we see that X1 is connected to channel 1 | + | == Le code == |
| + | By examining the Quick reference for the pyboard, we see that X1 is connected to canal 1 (''channel 1'') du Timer 5 (noté ''TIM5 CH1'' sur le schéma). | ||
| + | |||
| + | {{MPImage|pybv10-pinout.jpg|640px}} | ||
| + | |||
| + | Therefore we will first create a Timer object for timer 5, then create a TimerChannel object for channel 1: | ||
<nowiki>from pyb import Timer | <nowiki>from pyb import Timer | ||
Version du 28 avril 2015 à 20:37
|
|
En cours de traduction/élaboration. |
Contrôler la luminosité
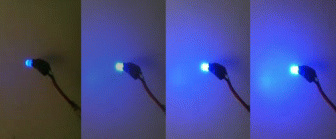
En plus de pouvoir allumer et éteindre une LED, il est également possible d'en contrôler la luminosité en utilisant un signal PWM (voir ci-dessous). L'utilisation d'un signal PWM est une technique très répandue pour obtenir une sortie variable sur une broche digital. Cela permet d'estomper la luminosité d'une LED:
Composants nécessaires
Vous aurez besoin:
- LED standard 5mm
- Résistance de 100 Ohm
- Des fils
- Breadboard (optionnel mais facilite beaucoup les choses)
C'est quoi PWM?
PWM est l'acronyme anglais de "pulse width modulation" que l'on traduit par "modulation par largeur d'impulsions".
PWM est un terme fort répandu sur le net, Arduino et en hacking électronique... raison de laquelle nous allons le préserver tel quel.
La modulation par largeur d'impulsion (MLI en français) est une technique utilisée pour contrôler la puissance envoyée à un périphérique. Nous l'utiliserons dans ce tutoriel pour contrôler la quantité d'énergie alimentant le moteur et par conséquent sa vitesse de rotation.
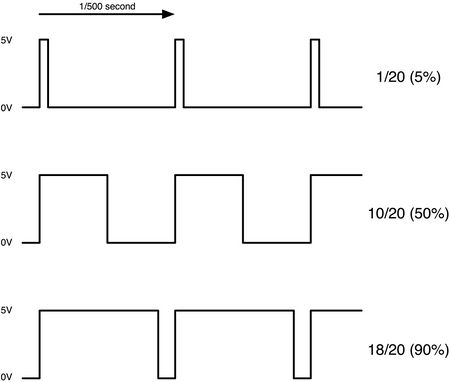
Le graphique ci-dessous montre le signal PWM tel qu'il est envoyé par la broche PWM du Raspberry Pi

Crédit: AdaFruit Industries www.adafruit.com
Chaque 1/500 ième de seconde, la sortie PWM produit une impulsion. La longueur de cette impulsion (dans le temps) contrôle la quantité d'énergie qui alimente le moteur. Comme vous pouvez le constater sur le graphique la longueur de l'impulsion peut varier de 0 à 100%.
Sans impulsion, le moteur ne fonctionne pas, une courte impulsion le fera tourner lentement. Si l'impulsion est active pendant cinquante pour cent du cycle, le moteur recevra la moitié de la puissance qu'il recevrait avec des impulsions maximales (constante dans le temps).
Branchement
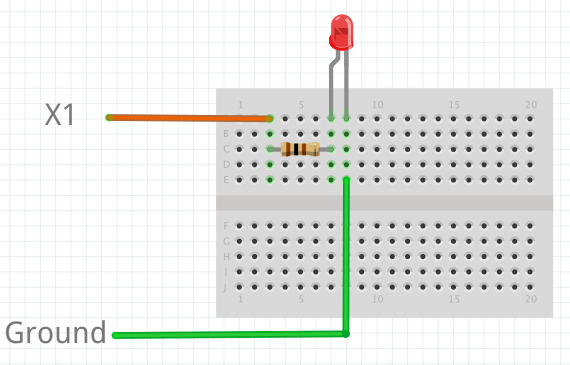
For this tutorial, we will use the X1 pin. Connect one end of the resistor de 100 Ohms to X1, and the other end to the anode of the LED, which is the longer leg. Connect the cathode of the LED to ground.

Crédit: MicroPython micropython.org
Le code
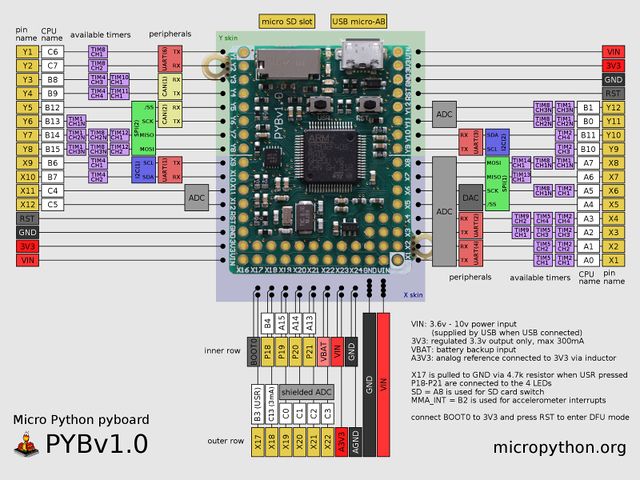
By examining the Quick reference for the pyboard, we see that X1 is connected to canal 1 (channel 1) du Timer 5 (noté TIM5 CH1 sur le schéma).

Crédit: MicroPython micropython.org
Therefore we will first create a Timer object for timer 5, then create a TimerChannel object for channel 1:
from pyb import Timer
from time import sleep

# timer 5 will be created with a frequency of 100 Hz
tim = pyb.Timer(5, freq=100)
tchannel = tim.channel(1, Timer.PWM, pin=pyb.Pin.board.X1, pulse_width=0)
Brightness of the LED in PWM is controlled by controlling the pulse-width, that is the amount of time the LED is on every cycle. With a timer frequency of 100 Hz, each cycle takes 0.01 second, or 10 ms.
To achieve the fading effect shown at the beginning of this tutorial, we want to set the pulse-width to a small value, then slowly increase the pulse-width to brighten the LED, and start over when we reach some maximum brightness:
# maximum and minimum pulse-width, which corresponds to maximum
# and minimum brightness
max_width = 200000
min_width = 20000

# how much to change the pulse-width by each step
wstep = 1500
cur_width = min_width

while True:
  tchannel.pulse_width(cur_width)

  # this determines how often we change the pulse-width. It is
  # analogous to frames-per-second
  sleep(0.01)

  cur_width += wstep

  if cur_width > max_width:
    cur_width = min_width
Effet de battement
If we want to have a breathing effect, where the LED fades from dim to bright then bright to dim, then we simply need to reverse the sign of wstep when we reach maximum brightness, and reverse it again at minimum brightness. To do this we modify the while loop to be:
while True:
  tchannel.pulse_width(cur_width)

  sleep(0.01)

  cur_width += wstep

  if cur_width > max_width:
    cur_width = max_width
    wstep *= -1
  elif cur_width < min_width:
    cur_width = min_width
    wstep *= -1
Exercice avancé
You may have noticed that the LED brightness seems to fade slowly, but increases quickly. This is because our eyes interprets brightness logarithmically (la loi de Weber), while the LED’s brightness changes linearly, that is by the same amount each time. How do you solve this problem? (Hint: what is the opposite of the logarithmic function?)
Addendum
We could have also used the digital-to-analog converter (DAC) to achieve the same effect. The PWM method has the advantage that it drives the LED with the same current each time, but for different lengths of time. This allows better control over the brightness, because LEDs do not necessarily exhibit a linear relationship between the driving current and brightness.
Source: Fading leds écrit par/written by Damien P.George
Traduit par Meurisse D. pour MCHobby.be - Translated by Meurisse D. for MCHobby.be
Traduit avec l'autorisation de micropython.org - Translated with the authorisation of micropython.org
Toute référence, mention ou extrait de cette traduction doit être explicitement accompagné du texte suivant : « Traduction par MCHobby (www.MCHobby.be) - Vente de kit et composants » avec un lien vers la source (donc cette page) et ce quelque soit le média utilisé.
L'utilisation commercial de la traduction (texte) et/ou réalisation, même partielle, pourrait être soumis à redevance. Dans tous les cas de figures, vous devez également obtenir l'accord du(des) détenteur initial des droits. Celui de MC Hobby s'arrêtant au travail de traduction proprement dit.
