PN532-RFID-NFC-Arduino-Lib
Par le passé, Adafruit proposait deux bibliothèques Arduino pour utiliser sa carte NFC. Une version de la bibliothèque était destinée à l'usage du shield (support du bus I2C) et l'autre version pour le breakout NFC (support du busSPI). Depuis, les deux bibliothèques ont étés unifiées en une seule bibliothèque Arduino Adafruit-PN532 (GitHub).
La bibliothèque Adafruit PN532 peut lire des cartes MiFare, inlus le numéro l'identifiant de la carte (fixé matériellement), ainsi que la lecture/écriture de section d'EPEPROM et l’authentification. Cette bibliothèque fonctionne avec le breakout et le shield utilisant soit la connexion SPI ou I2C.
Installer la bibliothèque
Download the Adafruit PN532 library from github. Uncompress the folder and rename the folder Adafruit_PN532. Inside the folder you should see the Adafruit_PN532.cpp and Adafruit_PN532.h files. Install the Adafruit_PN532 library foler by placing it in your arduinosketchfolder/libraries folder. You may have to create the libraries subfolder if this is your first library. You can read more about installing libraries in our tutorial.
Restart the Arduino IDE. You should now be able to select le croquis/sketch Fichier > Exemples > Adafruit_PN532 > readMifare.
If you're using the NFC breakout with a SPI connection that uses the wiring shown on previous pages you can immediately upload the sketch to the Arduino and skip down to the Testing MiFare section.
If you're using the NFC shield, or are using the breakout with an I2C connection then you must make a small change to configure the example for I2C. Scroll down to these lines near the top of the sketch:
// Uncomment just _one_ line below depending on how your breakout or shield
// is connected to the Arduino:

// Use this line for a breakout with a SPI connection:
Adafruit_PN532 nfc(PN532_SCK, PN532_MISO, PN532_MOSI, PN532_SS);

// Use this line for a breakout with a hardware SPI connection.  Note that
// the PN532 SCK, MOSI, and MISO pins need to be connected to the Arduino's
// hardware SPI SCK, MOSI, and MISO pins.  On an Arduino Uno these are
// SCK = 13, MOSI = 11, MISO = 12.  The SS line can be any digital IO pin.
//Adafruit_PN532 nfc(PN532_SS);

// Or use this line for a breakout or shield with an I2C connection:
//Adafruit_PN532 nfc(PN532_IRQ, PN532_RESET);
Change them so the second line is uncommented and the first line is commented. This will configure the sketch to make the library use I2C for communication with the NFC shield or breakout. The modified code should look like:
// Uncomment just _one_ line below depending on how your breakout or shield
// is connected to the Arduino:

// Use this line for a breakout with a SPI connection:
//Adafruit_PN532 nfc(PN532_SCK, PN532_MISO, PN532_MOSI, PN532_SS);

// Use this line for a breakout with a hardware SPI connection.  Note that
// the PN532 SCK, MOSI, and MISO pins need to be connected to the Arduino's
// hardware SPI SCK, MOSI, and MISO pins.  On an Arduino Uno these are
// SCK = 13, MOSI = 11, MISO = 12.  The SS line can be any digital IO pin.
//Adafruit_PN532 nfc(PN532_SS);

// Or use this line for a breakout or shield with an I2C connection:
Adafruit_PN532 nfc(PN532_IRQ, PN532_RESET);
Then upload the example to the Arduino and continue on. Note that you need to make a similar change to pick the interface for any other NFC example from the library.
Tester les tags MiFare
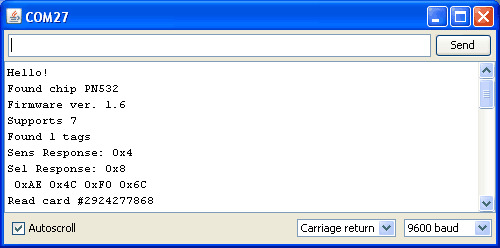
In the serial monitor, you should see that it found the PN532 chip. Then you can place your tag nearby and it will display the 4 byte ID code (this one is 0xAE 0x4C 0xF0 0x6C) and then the integer version of all four bytes together. You can use this number to identify each card. Recently NXP made so many cards that they actually ran through all 4 Bytes (2^32) so the number is not guaranteed to be absolutely unique. However, the chances are extremely slim you will have two cards with the same ID so as long as you aren't using these cards for anything terribly important (like money transfer) its fine to use the number as a unique identifier

Crédit: AdaFruit Industries www.adafruit.com
Source: PN532 RFID/NFC Breakout and Shield créé par LadyAda pour AdaFruit Industries. Crédit [www.adafruit.com AdaFruit Industries]
Traduit par Meurisse D. pour MCHobby.be
Traduit avec l'autorisation d'AdaFruit Industries - Translated with the permission from Adafruit Industries - www.adafruit.com
Toute référence, mention ou extrait de cette traduction doit être explicitement accompagné du texte suivant : « Traduction par MCHobby (www.MCHobby.be) - Vente de kit et composants » avec un lien vers la source (donc cette page) et ce quelque soit le média utilisé.
L'utilisation commercial de la traduction (texte) et/ou réalisation, même partielle, pourrait être soumis à redevance. Dans tous les cas de figures, vous devez également obtenir l'accord du(des) détenteur initial des droits. Celui de MC Hobby s'arrêtant au travail de traduction proprement dit.