Différences entre versions de « RASP-SENSE-HAT-ASTRO-PI-Matrice »
| Ligne 67 : | Ligne 67 : | ||
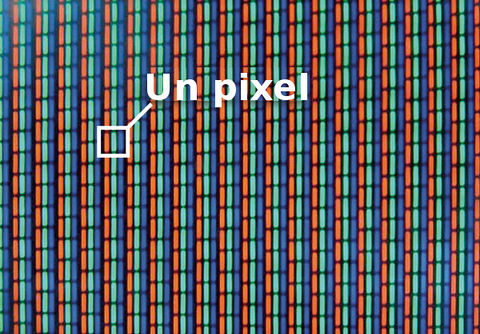
This image shows the pixels on a laptop LCD screen. You can see that the pixels are turned on and off to form the pattern of letters and numbers. | This image shows the pixels on a laptop LCD screen. You can see that the pixels are turned on and off to form the pattern of letters and numbers. | ||
| − | [[Fichier:RASP-SENSE-HAT-ASTRO-PI-Matrice-10.jpg| | + | [[Fichier:RASP-SENSE-HAT-ASTRO-PI-Matrice-10.jpg|480px]] |
This is how all computer and smartphone screens work. If you want to make recognisable shapes on the LED matrix this is what you also need to do. You only have a resolution of 8 by 8 pixels to work with on the Sense HAT LED matrix though, so you must make shapes and icons that will look quite blocky. This can be a nice challenge! | This is how all computer and smartphone screens work. If you want to make recognisable shapes on the LED matrix this is what you also need to do. You only have a resolution of 8 by 8 pixels to work with on the Sense HAT LED matrix though, so you must make shapes and icons that will look quite blocky. This can be a nice challenge! | ||
Version du 20 octobre 2015 à 19:59
|
|
En cours de traduction/élaboration. |
La matrice LED
The Sense HAT LED matrix contains 64 multi-colour LEDs. Each of the 64 LEDs actually have three smaller LEDs inside them, one for each primary colour, just like a pixel on a TV, monitor or smartphone screen.
Mélange des couleurs
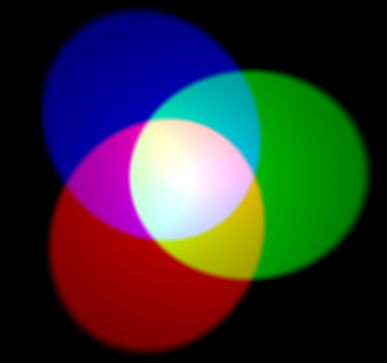
In additive colour mixing there are three primary colours: red, green, and blue. In the image above, there are three spotlights of equal brightness, one for each primary colour. In the absence of any colour the result is black. If all three primary colours are mixed, the result is white. When red and green combine, the result is yellow. When red and blue combine, the result is magenta. When blue and green combine, the result is cyan. It's possible to make even more colours than this by varying the brightness of the primary colours used.
1. Open Python 3 from a terminal window as sudo by typing:
sudo idle3 &
2. Type in the following code:
from sense_hat import SenseHat

sense = SenseHat()

r = 255
g = 255
b = 255

sense.clear((r, g, b))
3. Select File > Save (Fichier > Sauver) and choose a file name for your program.
4. Then select Run > Run module (Executer > Executer le module).
5. The LED matrix will then go bright white.
6. The variables r, g and b represent the primary colours red, green, and blue. The numbers they contain specify how bright each colour should be; they can be between 0 and 255. In the above code the maximum value for each colour has been used, so the result is white.
7. Change the values to specify 255 red but 0 green and blue, then run the code again.
8. Quels autres couleurs pouvez vous créer.
Modifier la couleur d'avant plan et d'arrière plan
This colour mixing system is used throughout the Astro Pi programming module. You can use colour mixing to great effect by programming scrolling text. In this example, you can set the colour of the text that will appear on the matrix.
1. Type the following code into a new file:
from sense_hat import SenseHat

sense = SenseHat()

sense.show_message("Hello my name is Tim Peake", text_colour=(255, 0, 0))
Note the syntax {{{1}}} . Don't forget the comma!
2. You can also modify the background colour for the message like so:
from sense_hat import SenseHat

sense = SenseHat()

sense.show_message("Hello my name is Tim Peake", text_colour=(255, 255, 0), back_colour=(0, 0, 255))
Note: The comma is important, don't forget it!
Les Pixels
Les 'Pixels' sont des points. Le terme est très répandu dans le monde informatique où le Pixel représente toujours un point dans l'interface graphique. Il est donc très fréquent de rencontrer le terme 'Pixel', même dans la littérature francophone.
This image shows the pixels on a laptop LCD screen. You can see that the pixels are turned on and off to form the pattern of letters and numbers.
This is how all computer and smartphone screens work. If you want to make recognisable shapes on the LED matrix this is what you also need to do. You only have a resolution of 8 by 8 pixels to work with on the Sense HAT LED matrix though, so you must make shapes and icons that will look quite blocky. This can be a nice challenge!
1. Select File > New Window (Fichier > Nouvelle fenêtre).
2. Type in the following code:
from sense_hat import SenseHat

sense = SenseHat()

sense.clear()

x = 0
y = 0

sense.set_pixel(x, y, 255, 255, 255)
3. Select File > Save and choose a file name for your program.
4.Then select Run > Run module (Executer > Executer le module).
5. This will turn one LED in the corner white.
6. Remember that you can change the colour if you wish.
Activer un pixel avec les coordonnées
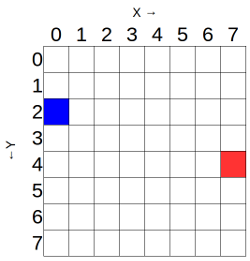
The x and y variables can be used to control which individual LED the set_pixel command should change. X is horizontal and ranges from 0 on the left to 7 on the right. Y is vertical and ranges from 0 at the top to 7 on the bottom. Therefore, an x, y coordinate of 0, 0 is the top left and an x, y coordinate of 7, 7 is the bottom right.
You can get a different colour in each corner of the LED matrix. You will need to use the set_pixel command multiple times in your code like this:
from sense_hat import SenseHat

sense = SenseHat()

sense.clear()
sense.set_pixel(0, 0, 255, 0, 0)
sense.set_pixel(0, 7, 0, 255, 0)
sense.set_pixel(7, 0, 0, 0, 255)
sense.set_pixel(7, 7, 255, 0, 255)
Afficher des formes
You may be tempted to try and draw shapes or patterns using the set_pixel command over and over in your code. There is a set_pixels command though, and with it you can change all 64 LEDs using one line of code! For example, you could draw a Minecraft creeper face on the LED Matrix:
from sense_hat import SenseHat

sense = SenseHat()

O = (0, 255, 0) # Green
X = (0, 0, 0) # Black

creeper_pixels = [
    O, O, O, O, O, O, O, O,
    O, O, O, O, O, O, O, O,
    O, X, X, O, O, X, X, O,
    O, X, X, O, O, X, X, O,
    O, O, O, X, X, O, O, O,
    O, O, X, X, X, X, O, O,
    O, O, X, X, X, X, O, O,
    O, O, X, O, O, X, O, O
]

sense.set_pixels(creeper_pixels)
You can even use more than two colours, like in this example of Steve from Minecraft:
from sense_hat import SenseHat

sense = SenseHat()

B = (102, 51, 0)
b = (0, 0, 255)
S = (205,133,63)
W = (255, 255, 255)

steve_pixels = [
    B, B, B, B, B, B, B, B,
    B, B, B, B, B, B, B, B,
    B, S, S, S, S, S, S, B,
    S, S, S, S, S, S, S, S,
    S, W, b, S, S, b, W, S,
    S, S, S, B, B, S, S, S,
    S, S, B, S, S, B, S, S,
    S, S, B, B, B, B, S, S
]

sense.set_pixels(steve_pixels)
Charger une image depuis un fichier
Instead of setting the LED matrix, you may wish to use images which are loaded from files. This is a convenient option if you want to have lots of stock images, for example international flags.
Source: Getting Started with Astro PI et Astro-Pi Guide proposé par Raspberry Pi Learning Resource (www.raspberrypi.org)
Licence Creative Commons - CC-BY-SA
The learning resource is provided for free by the Raspberry Pi Foundation under a Creative Commons licence.
Find more at raspberrypi.org/resources and github.com/raspberrypilearning.
Crédit de traduction: Toute référence, mention ou extrait de cette traduction doit également être explicitement accompagné du crédit de traduction suivant : « Traduction par MCHobby (shop.MCHobby.be) » avec un lien vers la source (donc cette page) et ce quelque soit le média utilisé.


