Différences entre versions de « Trinket-Alarme-Installer »
| Ligne 20 : | Ligne 20 : | ||
Solder connections between the sensor wires and the wiring to the control box. To keep connections from the elements, wrap them in electrical tape or heat shrink. You might consider a small box to place the connections in. | Solder connections between the sensor wires and the wiring to the control box. To keep connections from the elements, wrap them in electrical tape or heat shrink. You might consider a small box to place the connections in. | ||
| − | == Test système == | + | == Test du système == |
The act of testing your system is called walk testing. First, the green LED of the Trinket should be on. If you use Bluetooth, ensure the computer is close by to monitor your work. A second person would be helpful at this point to avoid having to test then run to the PC to see what it did. | The act of testing your system is called walk testing. First, the green LED of the Trinket should be on. If you use Bluetooth, ensure the computer is close by to monitor your work. A second person would be helpful at this point to avoid having to test then run to the PC to see what it did. | ||
Version du 30 mai 2014 à 10:05
Installation

Crédit: AdaFruit Industries www.adafruit.com
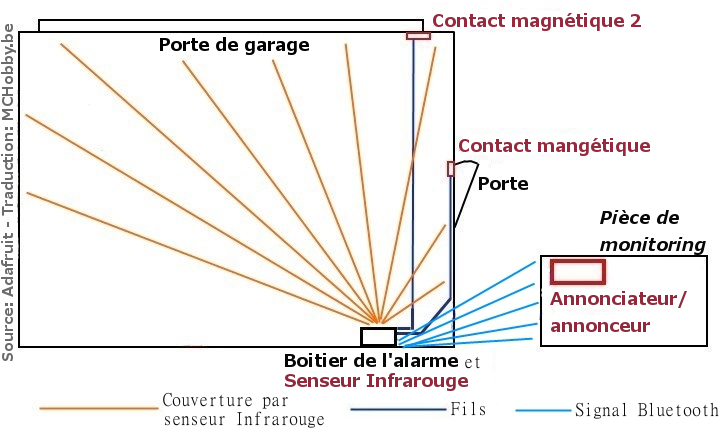
You will want to install your alarm system box away from entry points. If you can, install the box where it takes a ladder or other pains to get at it so the intruder cannot just rip it off the wall.
You will need to have wall power (mains) nearby for the 5 volt DC step-down power supply.
Even if the system is not installed outside, consider an environmental-rated case for the control unit to keep it dry.
Secure the case to the wall with screws. Best to have case holes predrilled before installation.
String your sensor wires: two conductor wire is straightforward but 3 or 4 conductor could be used for the magnetic contacts to use one run, multiple wires. If you use a fine gauge wire, the resistance will be higher but wires might be a bit easier to run.
You can use many methods to secure the wires: outdoors, heavy-duty staples may work. Plastic sticky tubing (Panduit or similar in the US) works to run cables along walls. Making them hidden or above reach is good. In a carpeted room, you can feed them in the space between the baseboard and the carpet. Ensure wires are firmly in place. You can leave a bit extra at each end to be sure when you hook things up you are not a bit short especially if you cut a wire while stripping it.
Mount your sensors. Mount magnetic sensors above/very near the door/window. Put a multimeter on the wires and you will register an open circuit. Now place the magnet on the closed door/window and move it until it registers as a closed circuit (near zero ohms) That is where you want the magnet screwed in. You should probably tape the magnet in place and move the door/window open and closed a few times to make sure it consistently registers. When you are satisfied, permanently screw in the magnet and contact. Test to ensure it works the way you expect it to.
Solder connections between the sensor wires and the wiring to the control box. To keep connections from the elements, wrap them in electrical tape or heat shrink. You might consider a small box to place the connections in.
Test du système
The act of testing your system is called walk testing. First, the green LED of the Trinket should be on. If you use Bluetooth, ensure the computer is close by to monitor your work. A second person would be helpful at this point to avoid having to test then run to the PC to see what it did.
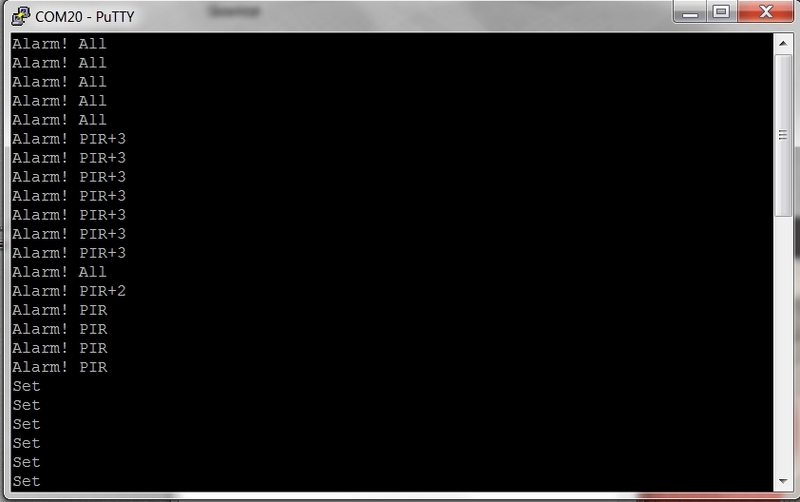
Close all the doors/windows. If you have a motion sensor, stand still so it stops registering movement. The red LED on the Trinket should not blink and the Bluetooth serial monitor will indicate "Set". Now "trip" each sensor in turn and check that the correct number of blinks are displayed on the LED and the Bluetooth link states the correct indications on the PC. If everything is working, each sensor trip (or combination) will work as intended. If not, check your connections.
Below is a terminal window with various sensors tripped then all sensors set up (no alarm).

Crédit: AdaFruit Industries www.adafruit.com
If you get the word "Error", then the circuit is reading analog values outside of those we found on the bench. Go back to loading the code with DEBUG to record the values for each open/close combination and you will probably find one or more values that changed due to resistance in the wire.
If you cannot get one or more sensors to "set up" (not alarm), for magnetic contacts adjust the magnet to trip when the door is closed. For the PIR, you must be still for the unit to set up.
Adjust the PIR's sensitivity and trip time again if necessary.
Utilisation
My circuit is monitored by my Bluetooth-enabled PC in the basement about 10 feet away (well within the 33 foot range of the Bluefruit). The PC monitors the stream for any text not "Set". You can write a Processing, Python or other program to connect through the Internet to alert if there is an alarm (left as an exercise for the Maker).
Be careful if you think about directly having your alarm alert the authorities. In many jurisdictions, alarm systems have to be registered and if there are nuisance alarms, you can be fined. You do not want the police coming for every small animal that might wander into your alarmed space.
In the next section, we'll discuss annunciating circuits that are more complex.
Source: Trinket Bluetooth Alarm System
Tutoriel créé par MICHAEL BARELA pour AdaFruit Industries. Tutorial created by MICHAEL BARELA for AdaFruit Industries
Traduit et augmenté par Meurisse.D pour MCHobby.be
Traduit avec l'autorisation d'AdaFruit Industries - Translated with the permission from Adafruit Industries - www.adafruit.com
Toute référence, mention ou extrait de cette traduction doit être explicitement accompagné du texte suivant : « Traduction par MCHobby (www.MCHobby.be) - Vente de kit et composants » avec un lien vers la source (donc cette page) et ce quelque soit le média utilisé.
L'utilisation commercial de la traduction (texte) et/ou réalisation, même partielle, pourrait être soumis à redevance. Dans tous les cas de figures, vous devez également obtenir l'accord du(des) détenteur initial des droits. Celui de MC Hobby s'arrêtant au travail de traduction proprement dit.