Différences entre versions de « Senseur FSR »
| Ligne 186 : | Ligne 186 : | ||
This Arduino sketch that assumes you have the FSR wired up as above, with a 10K? pull down resistor and the sensor is read on Analog 0 pin. It is pretty advanced and will measure the approximate Newton force measured by the FSR. This can be pretty useful for calibrating what forces you think the FSR will experience. | This Arduino sketch that assumes you have the FSR wired up as above, with a 10K? pull down resistor and the sensor is read on Analog 0 pin. It is pretty advanced and will measure the approximate Newton force measured by the FSR. This can be pretty useful for calibrating what forces you think the FSR will experience. | ||
| − | [ | + | [[Fichier:FSR-SAMLE3-1.jpg]] |
| + | |||
| + | [[Fichier:FSR-SAMLE3-2.jpg]] | ||
| + | |||
| + | [[Fichier:FSR-SAMLE3-3.jpg]] | ||
| + | |||
| + | <nowiki> | ||
| + | /* FSR testing sketch. | ||
| + | Connect one end of FSR to power, the other end to Analog 0. | ||
| + | Then connect one end of a 10K resistor from Analog 0 to ground | ||
| + | For more information see www.ladyada.net/learn/sensors/fsr.html */ | ||
| + | |||
| + | int fsrPin = 0; // the FSR and 10K pulldown are connected to a0 | ||
| + | int fsrReading; // the analog reading from the FSR resistor divider | ||
| + | int fsrVoltage; // the analog reading converted to voltage | ||
| + | unsigned long fsrResistance; // The voltage converted to resistance, can be very big so make "long" | ||
| + | unsigned long fsrConductance; | ||
| + | long fsrForce; // Finally, the resistance converted to force | ||
| + | |||
| + | void setup(void) { | ||
| + | Serial.begin(9600); // We'll send debugging information via the Serial monitor | ||
| + | } | ||
| + | |||
| + | void loop(void) { | ||
| + | fsrReading = analogRead(fsrPin); | ||
| + | Serial.print("Analog reading = "); | ||
| + | Serial.println(fsrReading); | ||
| + | // analog voltage reading ranges from about 0 to 1023 which maps to 0V to 5V (= 5000mV) | ||
| + | fsrVoltage = map(fsrReading, 0, 1023, 0, 5000); | ||
| + | Serial.print("Voltage reading in mV = "); | ||
| + | Serial.println(fsrVoltage); | ||
| + | if (fsrVoltage == 0) { | ||
| + | Serial.println("No pressure"); | ||
| + | } else { | ||
| + | // The voltage = Vcc * R / (R + FSR) where R = 10K and Vcc = 5V | ||
| + | // so FSR = ((Vcc - V) * R) / V yay math! | ||
| + | fsrResistance = 5000 - fsrVoltage; // fsrVoltage is in millivolts so 5V = 5000mV | ||
| + | fsrResistance *= 10000; // 10K resistor | ||
| + | fsrResistance /= fsrVoltage; | ||
| + | Serial.print("FSR resistance in ohms = "); | ||
| + | Serial.println(fsrResistance); | ||
| + | fsrConductance = 1000000; // we measure in micromhos so | ||
| + | fsrConductance /= fsrResistance; | ||
| + | Serial.print("Conductance in microMhos: "); | ||
| + | Serial.println(fsrConductance); | ||
| + | // Use the two FSR guide graphs to approximate the force | ||
| + | if (fsrConductance <= 1000) { | ||
| + | fsrForce = fsrConductance / 80; | ||
| + | Serial.print("Force in Newtons: "); | ||
| + | Serial.println(fsrForce); | ||
| + | } else { | ||
| + | fsrForce = fsrConductance - 1000; | ||
| + | fsrForce /= 30; | ||
| + | Serial.print("Force in Newtons: "); | ||
| + | Serial.println(fsrForce); | ||
| + | } | ||
| + | } | ||
| + | Serial.println("--------------------"); | ||
| + | delay(1000); | ||
| + | } | ||
| + | </nowiki> | ||
== Source == | == Source == | ||
Version du 13 juillet 2012 à 11:20
|
|
En cours de traduction |
Introduction
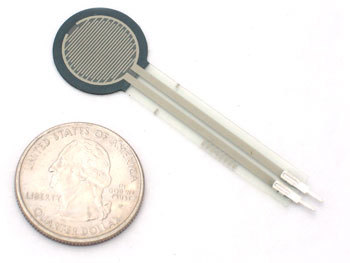
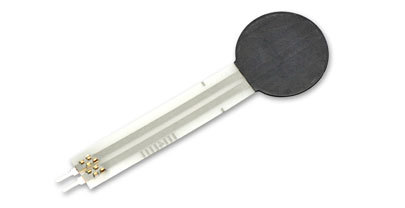
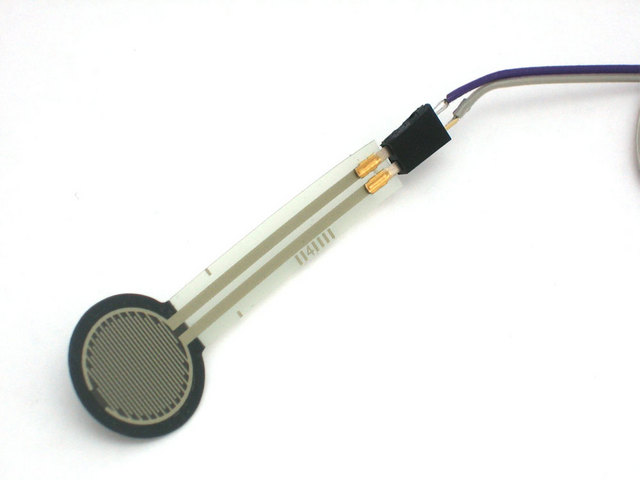
FSRs are sensors that allow you to detect physical pressure, squeezing and weight. They are simple to use and low cost. This is a photo of an FSR, specifically the Interlink 402 model. The 1/2" diameter round part is the sensitive bit.
Tester un FSR
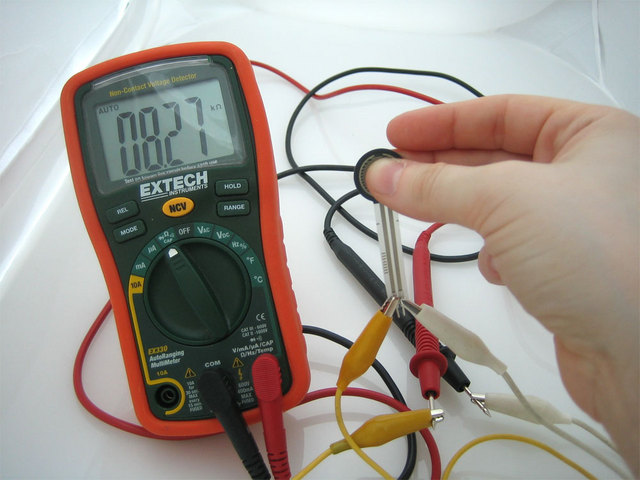
The easiest way to determine how your FSR works is to connect a multimeter in resistance-measurement mode to the two tabs on your sensor and see how the resistance changes. Because the resistance changes a lot, a auto-ranging meter works well here. Otherwise, just make sure you try different ranges, between 1 Mohm and 100 ohm before 'giving up'.
Brancher un FSR
Because FSRs are basically resistors, they are non-polarized. That means you can connect them up 'either way'a and they'll work just fine!
Dans un breadboard
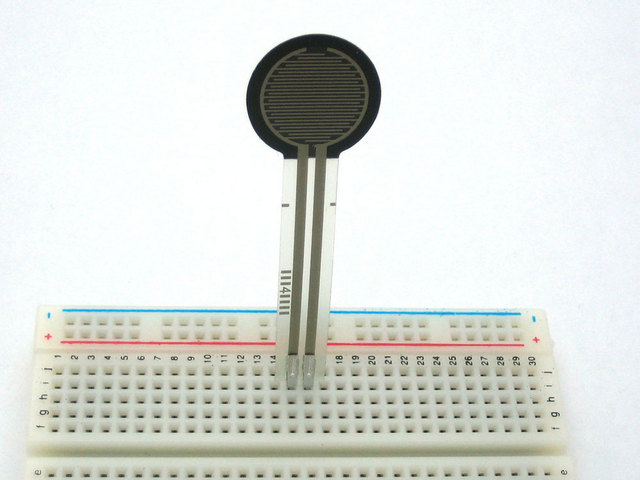
FSRs are often a polymer with conductive material silk-screened on. That means they're plastic and the connection tab is crimped on somewhat delicate material. The best way to connect to these is to simply plug them into a breadboard.
Un connecteur femelle
or use a clamp-style connector like alligator clips, or a female header.
Un bornier
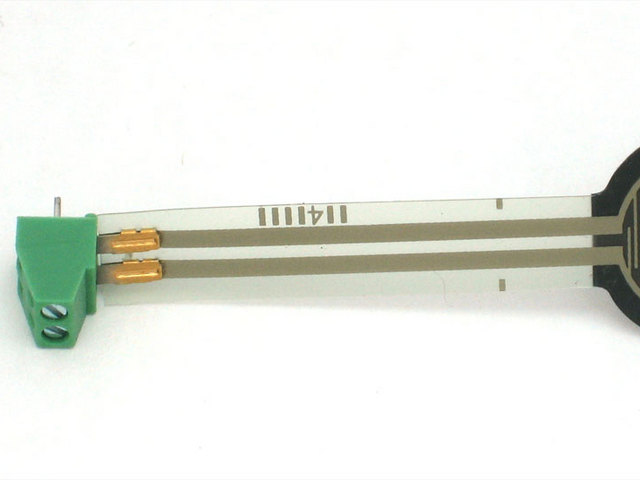
or a terminal block such as Phoenix #1881448
Utiliser un FSR
Méthode par lecture Analogique de la tension
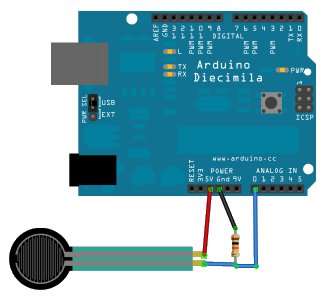
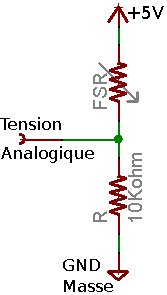
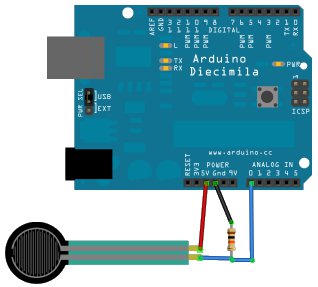
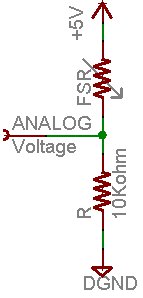
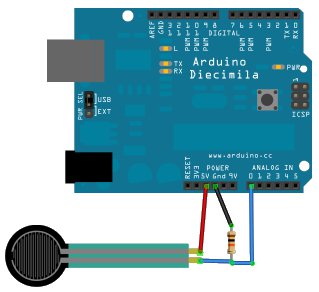
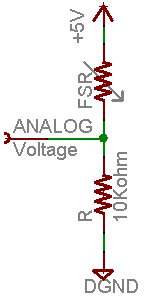
The easiest way to measure a resistive sensor is to connect one end to Power and the other to a pull-down resistor to ground. Then the point between the fixed pulldown resistor and the variable FSR resistor is connected to the analog input of a microcontroller such as an Arduino (shown).
For this example I'm showing it with a 5V supply but note that you can use this with a 3.3v supply just as easily. In this configuration the analog voltage reading ranges from 0V (ground) to about 5V (or about the same as the power supply voltage).
The way this works is that as the resistance of the FSR decreases, the total resistance of the FSR and the pulldown resistor decreases from about 100Kohm to 10Kohm. That means that the current flowing through both resistors increases which in turn causes the voltage across the fixed 10K resistor to increase. Its quite a trick!
| Force (Kg) | Force (N) | Résistance FSR | (FSR + R) Ohms | Courant dans FSR+R | Tension aux bornes de R |
| None | None | Infini | Infini! | 0 mA | 0V |
| 0.02 Kg | 0.2 N | 30 Kohm | 40 Kohm | 0.13 mA | 1.3 V |
| 0.11 Kg | 1 N | 6 Kohm | 16 Kohm | 0.31 mA | 3.1 V |
| 1.1 Kg | 10 N | 1 Kohm | 11 Kohm | 0.45 mA | 4.5 V |
| 11 Kg | 100 N | 250 ohm | 10.25 Kohm | 0.49 mA | 4.9 V |
This table indicates the approximate analog voltage based on the sensor force/resistance w/a 5V supply and 10K pulldown resistor.
Note that our method takes the somewhat linear resistivity but does not provide linear voltage! That's because the voltage equasion is:
Vo = Vcc ( R / (R + FSR) )
That is, the voltage is proportional to the inverse of the FSR resistance.
Exemple simple
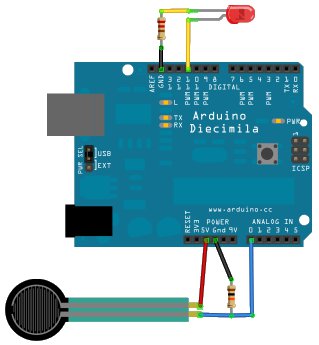
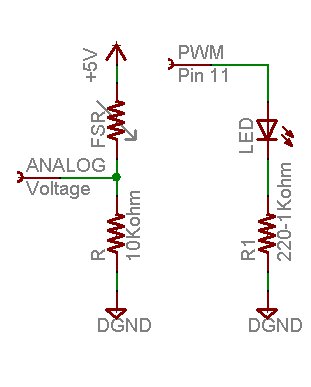
Wire the FSR as same as the above example, but this time lets add an LED to pin 11.
This sketch will take the analog voltage reading and use that to determine how bright the red LED is. The harder you press on the FSR, the brighter the LED will be! Remember that the LED has to be connected to a PWM pin for this to work, I use pin 11 in this example.
These examples assume you know some basic Arduino programming.
  /* FSR testing sketch.
    Connect one end of FSR to 5V, the other end to Analog 0.
    Then connect one end of a 10K resistor from Analog 0 to ground
    Connect LED from pin 11 through a resistor to ground
    For more information see www.ladyada.net/learn/sensors/fsr.html */

  int fsrAnalogPin = 0; // FSR is connected to analog 0
  int LEDpin = 11; // connect Red LED to pin 11 (PWM pin)
  int fsrReading; // the analog reading from the FSR resistor divider
  int LEDbrightness;

  void setup(void) {
    Serial.begin(9600); // We'll send debugging information via the Serial monitor
    pinMode(LEDpin, OUTPUT);
  }

  void loop(void) {
    fsrReading = analogRead(fsrAnalogPin);
    Serial.print("Analog reading = ");
    Serial.println(fsrReading);
    // we'll need to change the range from the analog reading (0-1023) down to the range
    // used by analogWrite (0-255) with map!
    LEDbrightness = map(fsrReading, 0, 1023, 0, 255);
    // LED gets brighter the harder you press
    analogWrite(LEDpin, LEDbrightness);
    delay(100);
  }
Mesures FSR analogique (code simple)
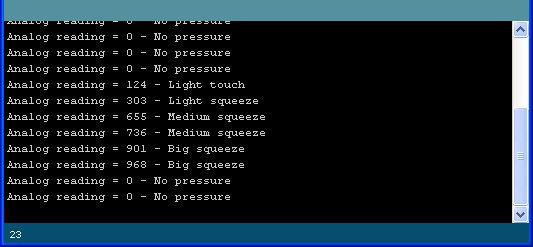
Here is a code example for measuring the FSR on an analog pin.
This code doesn't do any calculations, it just prints out what it interprets as the amount of pressure in a qualitative manner. For most projects, this is pretty much all thats needed!
  /* FSR simple testing sketch.
    Connect one end of FSR to power, the other end to Analog 0.
    Then connect one end of a 10K resistor from Analog 0 to ground
    For more information see www.ladyada.net/learn/sensors/fsr.html */

  int fsrPin = 0; // the FSR and 10K pulldown are connected to a0
  int fsrReading; // the analog reading from the FSR resistor divider

  void setup(void) {
    // We'll send debugging information via the Serial monitor
    Serial.begin(9600);
  }

  void loop(void) {
    fsrReading = analogRead(fsrPin);
    Serial.print("Analog reading = ");
    Serial.print(fsrReading); // the raw analog reading
    // We'll have a few threshholds, qualitatively determined
    if (fsrReading < 10) {
    Serial.println(" - No pressure");
    } else if (fsrReading < 200) {
    Serial.println(" - Light touch");
    } else if (fsrReading < 500) {
    Serial.println(" - Light squeeze");
    } else if (fsrReading < 800) {
    Serial.println(" - Medium squeeze");
    } else {
    Serial.println(" - Big squeeze");
    }
    delay(1000);
  }
Mesures FSR analogique (code avancé)
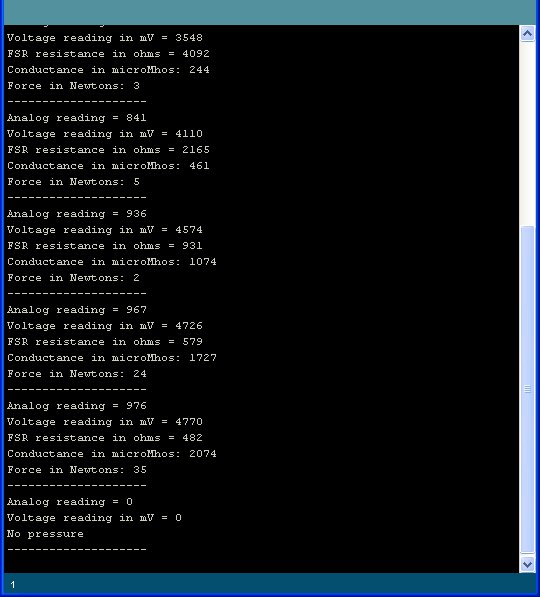
This Arduino sketch that assumes you have the FSR wired up as above, with a 10K? pull down resistor and the sensor is read on Analog 0 pin. It is pretty advanced and will measure the approximate Newton force measured by the FSR. This can be pretty useful for calibrating what forces you think the FSR will experience.
/* FSR testing sketch.
  Connect one end of FSR to power, the other end to Analog 0.
  Then connect one end of a 10K resistor from Analog 0 to ground
  For more information see www.ladyada.net/learn/sensors/fsr.html */

int fsrPin = 0; // the FSR and 10K pulldown are connected to a0
int fsrReading; // the analog reading from the FSR resistor divider
int fsrVoltage; // the analog reading converted to voltage
unsigned long fsrResistance; // The voltage converted to resistance, can be very big so make "long"
unsigned long fsrConductance;
long fsrForce; // Finally, the resistance converted to force

void setup(void) {
    Serial.begin(9600); // We'll send debugging information via the Serial monitor
}

void loop(void) {
    fsrReading = analogRead(fsrPin);
    Serial.print("Analog reading = ");
    Serial.println(fsrReading);
    // analog voltage reading ranges from about 0 to 1023 which maps to 0V to 5V (= 5000mV)
    fsrVoltage = map(fsrReading, 0, 1023, 0, 5000);
    Serial.print("Voltage reading in mV = ");
    Serial.println(fsrVoltage);
    if (fsrVoltage == 0) {
    Serial.println("No pressure");
    } else {
    // The voltage = Vcc * R / (R + FSR) where R = 10K and Vcc = 5V
    // so FSR = ((Vcc - V) * R) / V yay math!
    fsrResistance = 5000 - fsrVoltage; // fsrVoltage is in millivolts so 5V = 5000mV
    fsrResistance *= 10000; // 10K resistor
    fsrResistance /= fsrVoltage;
    Serial.print("FSR resistance in ohms = ");
    Serial.println(fsrResistance);
    fsrConductance = 1000000; // we measure in micromhos so
    fsrConductance /= fsrResistance;
    Serial.print("Conductance in microMhos: ");
    Serial.println(fsrConductance);
    // Use the two FSR guide graphs to approximate the force
    if (fsrConductance <= 1000) {
    fsrForce = fsrConductance / 80;
    Serial.print("Force in Newtons: ");
    Serial.println(fsrForce);
    } else {
    fsrForce = fsrConductance - 1000;
    fsrForce /= 30;
    Serial.print("Force in Newtons: ");
    Serial.println(fsrForce);
    }
    }
    Serial.println("--------------------");
    delay(1000);
}
Source
- Ce tutoriel d'AdaFruit (en anglais)
- Source des images LadyAda (ici chez AdaFruit). Licence Attribution-ShareAlike Creative Commons
Où Acheter
|
|
Ajouter lien |
- Le Senseur FSR est disponible chez MCHobby
- Le senseur Flex est également disponible chez MCHobby.
- MC Hobby vous propose également des borniers et breadboard visible sur cette page.
Toute référence, mention ou extrait de cette traduction doit être explicitement accompagné du texte suivant : « Traduction par MCHobby (www.MCHobby.be) - Vente de kit et composants » avec un lien vers la source (donc cette page) et ce quelque soit le média utilisé.
L'utilisation commercial de la traduction (texte) et/ou réalisation, même partielle, pourrait être soumis à redevance. Dans tous les cas de figures, vous devez également obtenir l'accord du(des) détenteur initial des droits. Celui de MC Hobby s'arrêtant au travail de traduction proprement dit.
Traduit avec l'autorisation d'AdaFruit Industries - Translated with the permission from Adafruit Industries - www.adafruit.com
