Différences entre versions de « FEATHER-CHARGER-MICROPYTHON-ESP8266-EN »
| (22 versions intermédiaires par le même utilisateur non affichées) | |||
| Ligne 1 : | Ligne 1 : | ||
| − | |||
| − | |||
== Pre-requisites == | == Pre-requisites == | ||
Note: [[FEATHER-CHARGER-MICROPYTHON-ESP8266|This page also exists in French]] | Note: [[FEATHER-CHARGER-MICROPYTHON-ESP8266|This page also exists in French]] | ||
| Ligne 28 : | Ligne 26 : | ||
== Download MicroPython == | == Download MicroPython == | ||
| − | + | Next, [http://micropython.org/download/esp8266/ download the last binary version of the MicroPython firmware for ESP8266]. Such are also compiled everyday from the GitHub souce code but we do not recommend to use them unless you know what you are doing. | |
| + | |||
| + | The following screen capture shows the list of links, we just click on the most recent version to download it on the computer. | ||
{{ADFImage|FEATHER-CHARGER-MICROPYTHON-ESP8266-21.png}} | {{ADFImage|FEATHER-CHARGER-MICROPYTHON-ESP8266-21.png}} | ||
== Wiring + activates Flash mode on ESP8266 == | == Wiring + activates Flash mode on ESP8266 == | ||
| − | + | Now, we need to wire our ESP8266 on a computer and make it ready to receive the new firmware (called "Flash" mode). | |
| + | |||
| + | Some board do already have USB connector, some not. | ||
| + | |||
| + | Some board do automagically start the flash mode, some not. | ||
| − | + | Here are the "Wiring + Flash mode" operation for many of the ESP8266 plateforms. | |
=== Common use case === | === Common use case === | ||
| + | You have a RAW ESP8266 without serial-to-usb interface. In most common-case, they offer a FTDI pin-out to attach a FTDI Friend (an USB-to-Serial adapter). | ||
| + | |||
[[Fichier:ESP8266-HUZZA.png|400px]] | [[Fichier:ESP8266-HUZZA.png|400px]] | ||
| − | * ''' | + | * for the '''raw ESP8266''' or '''NodeMCU Lolin''' you will need to wire the GPIO0 to the GROUND with a push-button THEN do the same with the RESET line. |
| − | + | * Maintain the GPIO0 button down (to connect it to the Ground) THEN press and release the RESET button (while still maintaining GPIO0). | |
| + | * AFTER release the GPIO0 button. => you just activated the Flash mode. | ||
| + | |||
| + | On some board like {{pl|733|breakout HUZZAH ESP8266}} the GPIO0 and RESET button are already available on the board. This will ease the operation. | ||
=== Feather HUZZAH ESP8266, Wemos D1 === | === Feather HUZZAH ESP8266, Wemos D1 === | ||
| − | + | Such module can automatically start the Flash mode thank to an hardware trick. | |
| + | |||
| + | That will avoids additionnal handling to start the Flash mode. | ||
[[Fichier:FEATHER-ESP8266-02.jpg|240px]] [[Fichier:Wemos-D1-Mini-ESP8266.jpg|120px]] | [[Fichier:FEATHER-ESP8266-02.jpg|240px]] [[Fichier:Wemos-D1-Mini-ESP8266.jpg|120px]] | ||
| − | + | The {{pl|846|Feather HUZZAH ESP8266}}, {{pl|1221|Wemos D1 Mini}}, {{pl|1222|Wemos D1 Pro}} detects when the serial line is opened and automatically reset and start the Flash mode. | |
| − | * ''' | + | |
| − | * ''' | + | You just need to send the firmware to the ESP8266 module, it will be automagically programmed. |
| − | {{ambox|text= | + | * '''On Windows''': you will have to install the [https://www.silabs.com/products/mcu/Pages/USBtoUARTBridgeVCPDrivers.aspx CP210x SiLabs driver] to make the Serial-to-USB available on the board.<br />For Windows, it will be necessary to install the standard VCP driver (''normal VCP driver''), do not select the driver ''with Serial Enumeration'' (it will not work). |
| + | * '''On MacOS X''': the driver should already be supported. | ||
| + | * '''On Linux''': no driver needed, it work out of the box. | ||
| + | |||
| + | {{ambox|text=The Wemos ESP8266 do use another Serial-to-USB chip based on '''CH340D'''. You will need to install the appropriate driver on Windows/Mac.}} | ||
=== ESP8266-DEV (only) === | === ESP8266-DEV (only) === | ||
| − | + | You can flash a {{pl|667|ESP8266-DEV}} module by using a {{pl|144|console cable (USB-Série-TTL)}} using 3V logic for RX/TX . | |
| − | + | Here how to wire the board. | |
[[Fichier:OLI-ESP8266-DEV-Wiring.jpg|453px]] | [[Fichier:OLI-ESP8266-DEV-Wiring.jpg|453px]] | ||
| − | + | To activates the Flash Mode on the {{pl|667|ESP8266-DEV}} (from Olimex): | |
| − | * | + | * Press the GPIO 0 button (the small user button on the board is wired to GPIO 0) |
| − | * | + | * Then power-up the module. |
| − | * | + | * Release the GPIO 0 button. |
| + | |||
| + | Voila, the ESP8266-DEV is set to Flash mode. | ||
=== ESP8266-EVB (evaluation board) === | === ESP8266-EVB (evaluation board) === | ||
[[Fichier:OLI-ESP8266-EVB.jpg|180px]] | [[Fichier:OLI-ESP8266-EVB.jpg|180px]] | ||
| − | + | To activate the Flash Mode on the {{pl|668|ESP8266-EVB}} (Evaluation Board from Olimex) (using a {{pl|667|ESP8266-DEV}}): | |
| − | * | + | * Presse the USER button on the board (this button is wired to the small push-button on the ESP8266-EVB, himself wired to the GPIO 0) |
| − | * | + | * Plug the power cord on the evaluation board (5V max) |
| − | * | + | * Then release the GPIO 0 button. |
| − | + | Please note that {{pl|668|ESP8266-EVB}} and {{pl|667|ESP8266-DEV}} do not have USB-to-Serial converter, you will have to use a {{pl|144|console cable (USB-Série-TTL)}} to communicates with the ESP8266 board. | |
[[Fichier:UEXT-SERIAL-wiring2.jpg|240px]] [[Fichier:UEXT-SERIAL-wiring.jpg|240px]] | [[Fichier:UEXT-SERIAL-wiring2.jpg|240px]] [[Fichier:UEXT-SERIAL-wiring.jpg|240px]] | ||
== Erase the Flash == | == Erase the Flash == | ||
| − | + | It is recommanded to completely erase the Flash memory of the ESP8266 board before to download the new FirmWare onto it. Execute the following code inside a terminal: | |
| − | <nowiki>esptool.py --port / | + | <nowiki>esptool.py --port /path/to/ESP8266 erase_flash</nowiki> |
| − | + | Where {{fname|/path/to/ESP8266}} is the path to the serial port attached on the ESP8266. The exact name of the peripheral depend of the USB-to-Serial converter used. List down the serial port before to connext you ESP module then repeat the operation with the serial port connected. The new port appearing is the one corresponding to the ESP8266. | |
{{ADFImage|FEATHER-CHARGER-MICROPYTHON-ESP8266-22.png}} | {{ADFImage|FEATHER-CHARGER-MICROPYTHON-ESP8266-22.png}} | ||
| Ligne 88 : | Ligne 105 : | ||
== Flashing MicroPython on ESP8266 == | == Flashing MicroPython on ESP8266 == | ||
=== ESP8266 from Adafruit Industries === | === ESP8266 from Adafruit Industries === | ||
| − | + | For the {{pl|733|breakout HUZZAH ESP8266}} and the {{pl|846|Feather HUZZAH ESP8266}} + {{pl|77|FTDI Friend}}: | |
[[Fichier:FEATHER-ESP8266-02.jpg|240px]] [[Fichier:ESP8266-HUZZA.png|400px]] | [[Fichier:FEATHER-ESP8266-02.jpg|240px]] [[Fichier:ESP8266-HUZZA.png|400px]] | ||
| − | + | Place our ESP8266 in "mode Flashage" and execute the following command to load the firmware (already downloaded): | |
<nowiki>esptool.py --port /chemin/vers/ESP8266 --baud 115200 write_flash --flash_size=detect -fm dio 0 firmware.bin</nowiki> | <nowiki>esptool.py --port /chemin/vers/ESP8266 --baud 115200 write_flash --flash_size=detect -fm dio 0 firmware.bin</nowiki> | ||
| − | {{ambox|text= | + | {{ambox|text=Since EspTool V1.3, you can use either 2.7 or Python 3.5. |
| + | |||
| + | From EspTool version 2.x, you can use the option --flash_size=detect to avoir error on flash size.}} | ||
| − | + | Once again, {{fname|/path/to/ESP8266}} is the path (identification) of the serial port connected to the ESP8266. Remplace {{fname|firmware.bin}} with the real name (and access path) to the firmware file to upload to the ESP8266. | |
| − | |||
{{ADFImage|FEATHER-CHARGER-MICROPYTHON-ESP8266-23.png}} | {{ADFImage|FEATHER-CHARGER-MICROPYTHON-ESP8266-23.png}} | ||
=== ESP8266 WEMOS D1 Mini === | === ESP8266 WEMOS D1 Mini === | ||
| − | + | The {{pl|1221|Wemos D1}} do have 4MB of Flash as many of ESP8266 available on the market. | |
[[Fichier:Wemos-D1-Mini-ESP8266.jpg|180px]] | [[Fichier:Wemos-D1-Mini-ESP8266.jpg|180px]] | ||
| − | + | Execute le following command to load the MicroPython firmware (already downloaded on the computer): | |
<nowiki>esptool.py --port /chemin/vers/ESP8266 --baud 115200 write_flash --flash_size=detect -fm dio 0 firmware.bin</nowiki> | <nowiki>esptool.py --port /chemin/vers/ESP8266 --baud 115200 write_flash --flash_size=detect -fm dio 0 firmware.bin</nowiki> | ||
=== ESP8266 WEMOS D1 PRO === | === ESP8266 WEMOS D1 PRO === | ||
| − | + | The {{pl|1222|Wemos D1 '''Pro'''}} do have 16MB of Flash, the command to execute: | |
[[Fichier:Wemos-D1-Pro-Mini-ESP8266.jpg|180px]] | [[Fichier:Wemos-D1-Pro-Mini-ESP8266.jpg|180px]] | ||
| − | + | Execute the following command to upload the MicroPython firmware: | |
<nowiki>esptool.py --port /chemin/vers/ESP8266 --baud 115200 write_flash --fm dio --fs=32m 0 firmware.bin</nowiki> | <nowiki>esptool.py --port /chemin/vers/ESP8266 --baud 115200 write_flash --fm dio --fs=32m 0 firmware.bin</nowiki> | ||
| − | {{ambox|text= | + | {{ambox|text=This module is fitted with 16MB but we have to stipulate a Flash Size of '''32m''' ! Flasher the module with 16m Flash Size did creates an unstable situation where the ESP8266 doesn't reboot.}} |
=== ESP8266-EVB & ESP8266-DEV === | === ESP8266-EVB & ESP8266-DEV === | ||
| − | + | For the {{pl|668|ESP8266-EVB}} evaluation board and the {{pl|667|ESP8266-DEV}} development board like following: | |
[[Fichier:OLI-ESP8266-EVB.jpg|180px]] [[Fichier:OLI-ESP8266-DEV.jpg|110px]] | [[Fichier:OLI-ESP8266-EVB.jpg|180px]] [[Fichier:OLI-ESP8266-DEV.jpg|110px]] | ||
| − | + | Please execute the following command to upload the MicroPython firmware (previously downloaded): | |
<nowiki>esptool.py --port /chemin/vers/ESP8266 --baud 115200 write_flash --flash_size=detect -fm dio 0 firmware.bin</nowiki> | <nowiki>esptool.py --port /chemin/vers/ESP8266 --baud 115200 write_flash --flash_size=detect -fm dio 0 firmware.bin</nowiki> | ||
| − | + | Do power cycle the plateform to properly restart the microcontroler. | |
== After Flash operation == | == After Flash operation == | ||
| − | + | Press tge RESET when available or power cycle the board. | |
| + | |||
| + | Voila, you just have you MicroPython firmware running on your ESP! | ||
| + | |||
| + | You can now establish a [[FEATHER-CHARGER-MICROPYTHON-SERIAL-REPL|serial REPL]] with a software like [https://www.putty.org/ Putty] (Freeware, running on Linux, Windows, Mac). | ||
| + | |||
| + | When started, just write mention the path to serial device attached to the ESP8266. | ||
| + | |||
| + | |||
| + | [[Fichier:FEATHER-CHARGER-MICROPYTHON-ESP8266-EN-10a.jpg]] | ||
| − | |||
| − | + | [[Fichier:FEATHER-CHARGER-MICROPYTHON-ESP8266-EN-11.jpg]] | |
== Ressources == | == Ressources == | ||
=== Error message === | === Error message === | ||
| − | ''' | + | '''I do have the following error message "read failed: device reports readiness to read but returned no data (device disconnected or multiple access on port?" !''' |
| − | + | We do meet that problem when the console cable (USB/Serial) where connected through an external USB HUB. Try to plug the console cable directly on the ESP8266. | |
=== EspTool Upgrade === | === EspTool Upgrade === | ||
| − | + | Recent version of the MicroPython firmwares do requires a more recent version of the EspTool to be flashed on the ESP8266. | |
| − | + | Since tghe release 1.8.x of MicroPython, the EspTool 1.0.1 doesn't make the job anymore. | |
| − | + | An upgrade to a more recent EspTool (version 2.0.1) will help to fix with --flash_size=detect . | |
| − | + | The following command line can be used to force the upgrade to a given version of EspTool : | |
sudo apt-get install esptool==2.0.1 | sudo apt-get install esptool==2.0.1 | ||
Version actuelle datée du 19 mai 2021 à 20:41
Pre-requisites
Note: This page also exists in French
Before using MicroPython on ESP8266, you will need to reflash the ESP8266 with the last version of the MicroPython firmware.
Here is a compact and afordable tutorial but you can also find the official instructions (micropython.org, english) to loads MicroPython on an ESP8266.
Firstly, you will need to install a Python environment. Previously, Python 2.7 was required but it should work with more recent 3.x version. If you are running under Windows, do not forget to add the PATH to the search path. Python is usually available out-of-the-box on Linux based machine.
Next, you will need to install the esptool.py software. It is used to send firmware to the ESP8266. A quick and easy is to use the pip (or pip3 for Python 3.x setups) Python Package Installer.
Key-in the following line into a terminal:
pip install esptool
Note for Mac OSX & Linux: you may need to run this command as root with sudo for the software to be installed property:
sudo pip install esptool

Crédit: AdaFruit Industries www.adafruit.com
Tricky note from the past days:
If pip informs you that esptool.py doesn't work with Python x.x then you may also try to install it with the pip2 command instead of regular pip (if Python 3.x is the default interpreter then the pip command should be link to pip3... this may be confusing and leading to strange situation). It should no more exists in 2021.
Download MicroPython
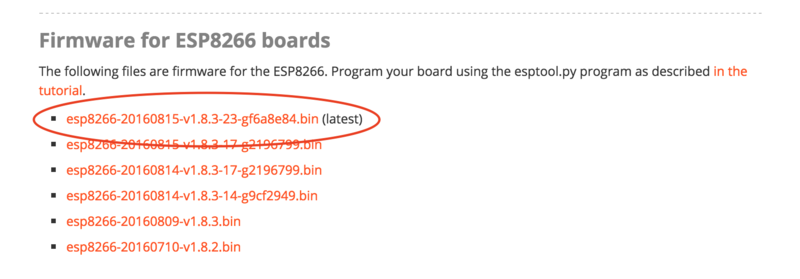
Next, download the last binary version of the MicroPython firmware for ESP8266. Such are also compiled everyday from the GitHub souce code but we do not recommend to use them unless you know what you are doing.
The following screen capture shows the list of links, we just click on the most recent version to download it on the computer.
Crédit: AdaFruit Industries www.adafruit.com
Wiring + activates Flash mode on ESP8266
Now, we need to wire our ESP8266 on a computer and make it ready to receive the new firmware (called "Flash" mode).
Some board do already have USB connector, some not.
Some board do automagically start the flash mode, some not.
Here are the "Wiring + Flash mode" operation for many of the ESP8266 plateforms.
Common use case
You have a RAW ESP8266 without serial-to-usb interface. In most common-case, they offer a FTDI pin-out to attach a FTDI Friend (an USB-to-Serial adapter).
- for the raw ESP8266 or NodeMCU Lolin you will need to wire the GPIO0 to the GROUND with a push-button THEN do the same with the RESET line.
- Maintain the GPIO0 button down (to connect it to the Ground) THEN press and release the RESET button (while still maintaining GPIO0).
- AFTER release the GPIO0 button. => you just activated the Flash mode.
On some board like breakout HUZZAH ESP8266 the GPIO0 and RESET button are already available on the board. This will ease the operation.
Feather HUZZAH ESP8266, Wemos D1
Such module can automatically start the Flash mode thank to an hardware trick.
That will avoids additionnal handling to start the Flash mode.
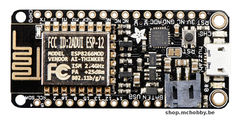
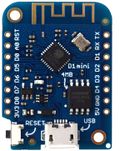
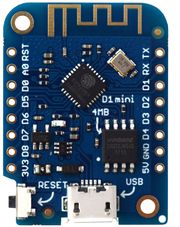
The Feather HUZZAH ESP8266, Wemos D1 Mini, Wemos D1 Pro detects when the serial line is opened and automatically reset and start the Flash mode.
You just need to send the firmware to the ESP8266 module, it will be automagically programmed.
- On Windows: you will have to install the CP210x SiLabs driver to make the Serial-to-USB available on the board.
For Windows, it will be necessary to install the standard VCP driver (normal VCP driver), do not select the driver with Serial Enumeration (it will not work). - On MacOS X: the driver should already be supported.
- On Linux: no driver needed, it work out of the box.
| The Wemos ESP8266 do use another Serial-to-USB chip based on CH340D. You will need to install the appropriate driver on Windows/Mac. |
ESP8266-DEV (only)
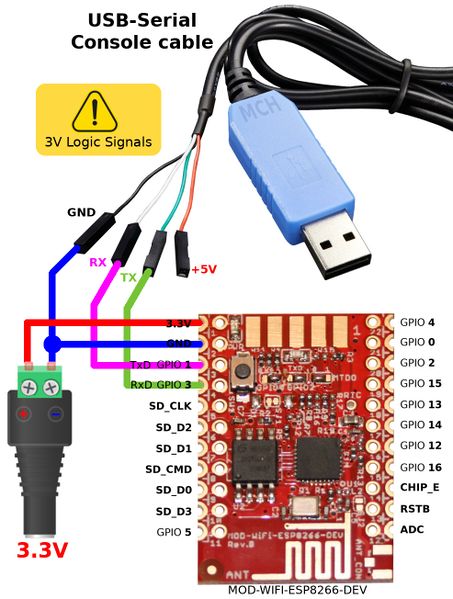
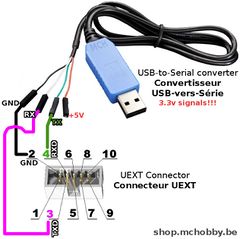
You can flash a ESP8266-DEV module by using a console cable (USB-Série-TTL) using 3V logic for RX/TX .
Here how to wire the board.
To activates the Flash Mode on the ESP8266-DEV (from Olimex):
- Press the GPIO 0 button (the small user button on the board is wired to GPIO 0)
- Then power-up the module.
- Release the GPIO 0 button.
Voila, the ESP8266-DEV is set to Flash mode.
ESP8266-EVB (evaluation board)
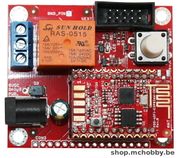
To activate the Flash Mode on the ESP8266-EVB (Evaluation Board from Olimex) (using a ESP8266-DEV):
- Presse the USER button on the board (this button is wired to the small push-button on the ESP8266-EVB, himself wired to the GPIO 0)
- Plug the power cord on the evaluation board (5V max)
- Then release the GPIO 0 button.
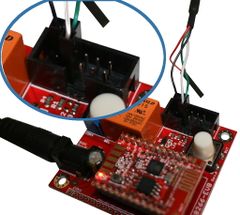
Please note that ESP8266-EVB and ESP8266-DEV do not have USB-to-Serial converter, you will have to use a console cable (USB-Série-TTL) to communicates with the ESP8266 board.
Erase the Flash
It is recommanded to completely erase the Flash memory of the ESP8266 board before to download the new FirmWare onto it. Execute the following code inside a terminal:
esptool.py --port /path/to/ESP8266 erase_flash
Where /path/to/ESP8266 is the path to the serial port attached on the ESP8266. The exact name of the peripheral depend of the USB-to-Serial converter used. List down the serial port before to connext you ESP module then repeat the operation with the serial port connected. The new port appearing is the one corresponding to the ESP8266.

Crédit: AdaFruit Industries www.adafruit.com
Flashing MicroPython on ESP8266
ESP8266 from Adafruit Industries
For the breakout HUZZAH ESP8266 and the Feather HUZZAH ESP8266 + FTDI Friend:
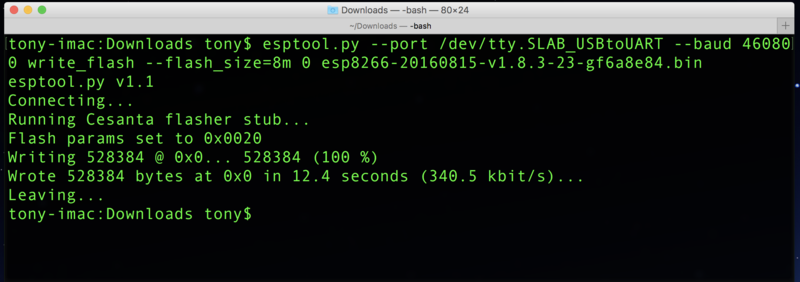
Place our ESP8266 in "mode Flashage" and execute the following command to load the firmware (already downloaded):
esptool.py --port /chemin/vers/ESP8266 --baud 115200 write_flash --flash_size=detect -fm dio 0 firmware.bin
| Since EspTool V1.3, you can use either 2.7 or Python 3.5. From EspTool version 2.x, you can use the option --flash_size=detect to avoir error on flash size. |
Once again, /path/to/ESP8266 is the path (identification) of the serial port connected to the ESP8266. Remplace firmware.bin with the real name (and access path) to the firmware file to upload to the ESP8266.
Crédit: AdaFruit Industries www.adafruit.com
ESP8266 WEMOS D1 Mini
The Wemos D1 do have 4MB of Flash as many of ESP8266 available on the market.
Execute le following command to load the MicroPython firmware (already downloaded on the computer):
esptool.py --port /chemin/vers/ESP8266 --baud 115200 write_flash --flash_size=detect -fm dio 0 firmware.bin
ESP8266 WEMOS D1 PRO
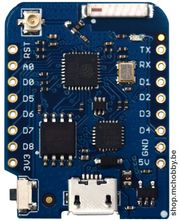
The Wemos D1 Pro do have 16MB of Flash, the command to execute:
Execute the following command to upload the MicroPython firmware:
esptool.py --port /chemin/vers/ESP8266 --baud 115200 write_flash --fm dio --fs=32m 0 firmware.bin
| This module is fitted with 16MB but we have to stipulate a Flash Size of 32m ! Flasher the module with 16m Flash Size did creates an unstable situation where the ESP8266 doesn't reboot. |
ESP8266-EVB & ESP8266-DEV
For the ESP8266-EVB evaluation board and the ESP8266-DEV development board like following:
Please execute the following command to upload the MicroPython firmware (previously downloaded):
esptool.py --port /chemin/vers/ESP8266 --baud 115200 write_flash --flash_size=detect -fm dio 0 firmware.bin
Do power cycle the plateform to properly restart the microcontroler.
After Flash operation
Press tge RESET when available or power cycle the board.
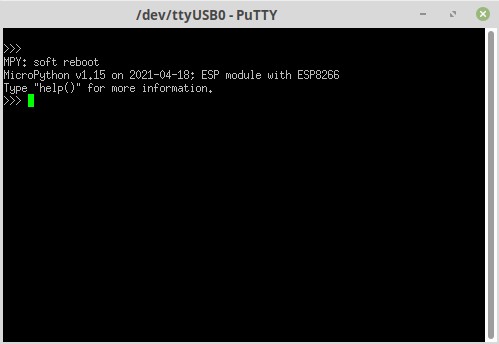
Voila, you just have you MicroPython firmware running on your ESP!
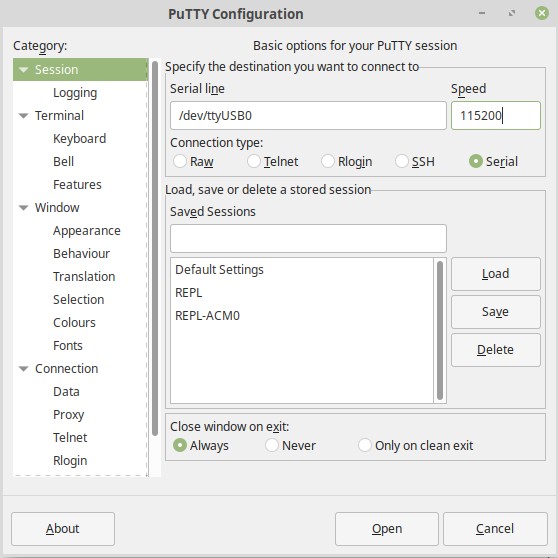
You can now establish a serial REPL with a software like Putty (Freeware, running on Linux, Windows, Mac).
When started, just write mention the path to serial device attached to the ESP8266.
Ressources
Error message
I do have the following error message "read failed: device reports readiness to read but returned no data (device disconnected or multiple access on port?" !
We do meet that problem when the console cable (USB/Serial) where connected through an external USB HUB. Try to plug the console cable directly on the ESP8266.
EspTool Upgrade
Recent version of the MicroPython firmwares do requires a more recent version of the EspTool to be flashed on the ESP8266.
Since tghe release 1.8.x of MicroPython, the EspTool 1.0.1 doesn't make the job anymore.
An upgrade to a more recent EspTool (version 2.0.1) will help to fix with --flash_size=detect .
The following command line can be used to force the upgrade to a given version of EspTool :
sudo apt-get install esptool==2.0.1
More information
Voyez la page "MicroPython ESP8266 tutorial - deploying".

