Différences entre versions de « Guide démarrage Esplora »
| Ligne 60 : | Ligne 60 : | ||
=== Instructions for Mac OS X === | === Instructions for Mac OS X === | ||
| + | The first time you plug an Esplora into a Mac, the "Keyboard Setup Assistant" will launch. There's nothing to configure with the Esplora, so you can close this dialogue by clicking the red button in the top left of the window. | ||
| − | + | [[Fichier:Ard-Esplora-Demarrer-Install-10.jpg]] | |
| + | |||
| + | == Instructions for Windows == | ||
| + | |||
| + | The following instructions are for Windows 7. They are valid also for Windows XP, with small differences in the dialog windows. | ||
| + | |||
| + | * Plug in your board and wait for Windows to begin its driver installation process. If the installer does not launch automatically, navigate to the Windows Device Manager (Start>Control Panel>Hardware) and find the Arduino Esplora listing. Right click and choose '''Update driver'''. | ||
| + | |||
| + | [[Fichier:Ard-Esplora-Demarrer-Install-20.jpg]] | ||
| + | |||
| + | * At the next screen, choose "Browse my computer for driver software", and click '''Next'''. | ||
| + | |||
| + | [[Fichier:Ard-Esplora-Demarrer-Install-21.jpg]] | ||
| + | |||
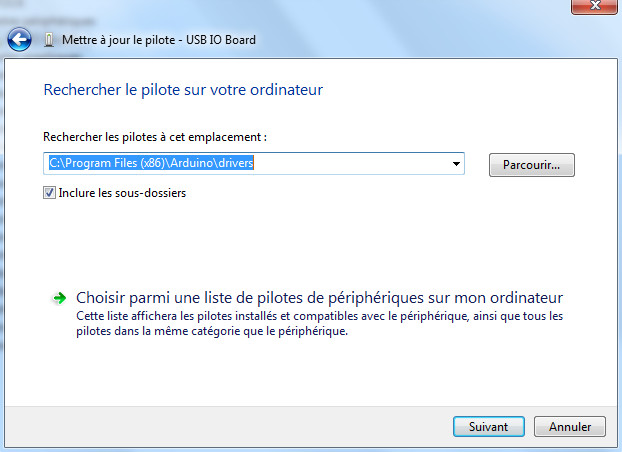
| + | * Click the '''Browse'''... button. Another dialog appears: navigate to the folder with the Arduino software that you just downloaded. Select the '''drivers''' folder an click '''OK''', then click '''Next'''. | ||
| + | |||
| + | [[Fichier:Ard-Esplora-Demarrer-Install-22.jpg]] | ||
| + | |||
| + | * You will receive a notification that the board has not passed Windows Logo testing. Click on the button '''Continue Anyway'''. | ||
| + | |||
| + | [[Fichier:Ard-Esplora-Demarrer-Install-23.jpg]] | ||
| + | |||
| + | * After a few moments, a window will tell you the wizard has finished installing software for Arduino Esplora. Press the '''Close''' button. | ||
| + | |||
| + | === Instructions for Linux === | ||
| + | |||
| + | There is no need to install drivers for Ubuntu 12.04. | ||
| + | |||
| + | == Programming the board == | ||
| + | |||
| + | === Démarrer l'environnement === | ||
| + | Double-click the Arduino application. (Note: if the Arduino software loads in the wrong language, you can change it in the preferences dialog. See the [http://arduino.cc/en/Guide/Environment environment page] sur Arduino.cc for details.) | ||
| + | |||
| + | === Open the Esplora Blink example === | ||
| + | |||
| + | Open the LED Blink example sketch: File > Examples > Esplora > Beginners > EsploraBlink. | ||
| + | |||
| + | '''Note: If you do not see the EsploraBlink example, you may need to update the Esplora library'''. To do this, quit the Arduino IDE and download this [http://arduino.cc/en/uploads/Guide/Esplora.zip .zip file]. Look in your Documents folder (on OSX or Ubuntu) or My Documents folder (on Windows) for the Arduino sketches folder. It will be called "Arduino" and there should be a folder inside called "libraries". If not, create a libraries folder inside the sketches folder. Move the Esplora folder into the libraries folder. Then re-start the Arduino IDE. Now you should be able to open the EsploraBlink sketch as described above. | ||
| + | |||
| + | === Configure Arduino for Esplora === | ||
| + | |||
| + | Since the Arduino IDE is used for many different Arduino boards, you need to tell it that you're working with the Esplora. Open the '''Tools > Board''' menu and choose '''Arduino Esplora'''. | ||
| + | |||
| + | === Select the right USB port === | ||
| + | |||
| + | The Arduino IDE needs to know which of your USB ports the Esplora is connected to. The '''Tools > Serial''' menu lists the available ports: | ||
| + | |||
| + | * if only one item is shown, click on that one; | ||
| + | |||
| + | * if two or more are shown, you can disconnect the Esplora and re-open the menu; the entry that disappears should be the Esplora board. Reconnect the board and select that serial port. | ||
| + | |||
| + | === Upload the program === | ||
| + | |||
| + | Now, simply click the "Upload" button in the environment. Wait a few seconds - you should see the RX and TX leds on the board flashing. If the upload is successful, the message "Done uploading." will appear in the status bar of the software. | ||
| + | |||
| + | A few seconds after the upload finishes, you should see the yellow RGB LED on the board start to blink, changing color from red to green to blue to yellow to cyan to magenta to white. If it does, congratulations! You've gotten Esplora up and running. | ||
| + | |||
| + | == Change the RGB LED == | ||
| + | |||
| + | Now that you've verified that the Esplora can connect to your computer and you can upload code, it's time to try a few of its functions. The Esplora has input sensors, which you get information from using read commands, and output actuators, which you control using write commands. The RGB LED and the buzzer are the two main output actuators. The joystick, linear potentiometer slider, microphone, accelerometer, temperature sensor, and pushbuttons are the input sensors. You can also add your own inputs and outputs using the TinkerKit input and output connectors. | ||
| + | |||
| + | In this example, you'll get the RGB LED to blink each of its colors once, then all three at the same time. The Esplora library, included at the beginning of the sketch, has a number of methods that will simplify the code you need to use. | ||
| + | |||
| + | The sketch below is similar to the EsploraBlink example, but controls the LED in a slightly different way. You can either use the Esplora.writeRGB() command, and give it red, green, and blue values like so: | ||
| + | |||
| + | <nowiki>Esplora.writeRGB(255, 255, 255); // sets red, green and blue all to full brightness</nowiki> | ||
== Où acheter == | == Où acheter == | ||
Version du 11 juillet 2013 à 10:46
Voici une traduction augmentée des informations disponible dans le Getting Started with Arduino Esplora, information disponible sur Arduino.CC.
Obtenir une carte Esplora
Pour ce tutoriel, nous partons du principe que vous allez utiliser un authentique Arduino Esplora. Il est fourni avec un câble USB... ne reste plus qu'a se lancer dans l'aventure.
Petite présentation
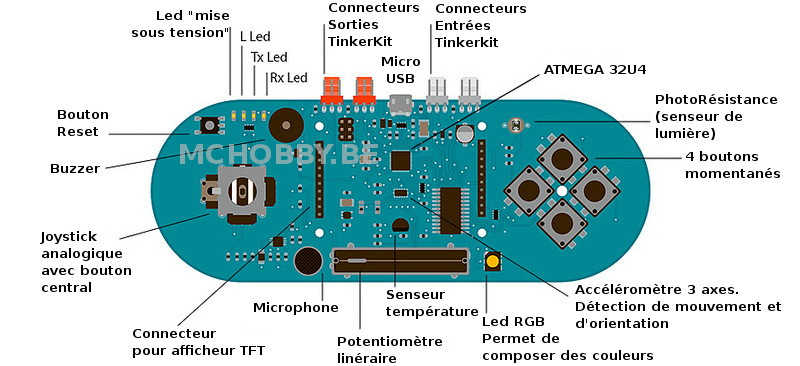
Arduino Esplora est un dispositif qui ressemble à un petit ordinateur appelé microcontroleur et disposant d'un certain nombre d'entrées et sorties. Pour les entrées, il y a un joystick, quatre boutons, un senseur de lumière, un slider, un microphone, un senseur de température et un accéléromètre. Comme sorties, il y a un buzzer et une LED à 3 couleurs (dite RGB). De surcroit, il ressemble à une manette de jeu.
Avec Esplora, vous pouvez écrire des programmes qui prennent des informations depuis les entrées et les utilisent pour contrôler les sorties de la carte, ou contrôler votre ordinateur (comme le ferait n'importe quel clavier ou souris).
Esplora est différent des autres cartes Arduino car il dispose déjà d'entrées/sorties directement branché sur la carte. Cela signifie que vous n'avez pas besoin de savoir comment connecter des senseurs électroniques, des actuateurs (relais, solénoïdes, etc) pour obtenir vos premiers résultats. Du coup il se programme aussi un peu différemment des autres cartes Arduino... en fait, il se programme encore plus facilement. Esplora dispose de ses propres librairies qui rend facile la lecture ("read" en anglais) des senseurs branchés sur les entrées et l'activation des actuateurs (soit les opérations d'écritures, "write" en anglais, pour activer des sorties).
Ce guide montre comment utiliser les librairies d'Esplora. Le guide de référence des librairies Esplora vous fournira également de nombreuses informations.
Finalement, lorsque vous aurez terminé ce guide, vous saurez connecter une carte Esplora et charger (téléverser) un programme Arduino sur la carte. Ces programmes s'appellent des "sketch".
Esplora en image
Nous allons commencer par présenter les différents éléments d'un Esplora.
Esplora se programme à l'aide de l'environnement Arduino IDE. C'est une environnement facile à maîtriser, il est Open-Source et donc librement accessible sur le Net.
Arduino IDE s'installe facilement et fonctionne sous les plateformes Windows, Mac et Linux :-)
L'Esplora se programme à l'aide d'un langage C simplifier, ce qui le rend facilement accessible, même aux néophytes.
Esplora en quelques informations techniques pertinentes:
- Microcontrolleur: ATmega32u4
C'est la même famille qu'Arduino Uno, Mega, etc. - Tension de fonctionnement: 5V
Une tension de fonctionnement en 5V est très confortable pour commencer. Cette tension est compatible avec de nombreux senseurs disponible chez MCHobby) - Mémoire Flash: 32 KB
La mémoire Flash permet de stocker vos programmes. C'est le même type de mémoire que celle utilisée sur les clés USB. Avec 32Ko vous pouvez écrire de grands programmes). 4 KB sont réservés au Bootloader, petit programme spécifique de l'Esplora qui permet de charger vos propres logiciel sur cette plateforme. - Mémoire SRAM: 2.5 KB
C'est la mémoire de travail utilisée par vos programmes pour stocker l'état des différentes variables du programme. Elle est volatile, ce qui signifie que le contenu est perdu dès la mise hors tension de l'Esplora. - Mémoire EEPROM: 1 KB
Cette mémoire est permanente, elle est utilisée pour stocker des paramètres qui persistent après extinction de l'Esplora. Lorsque votre programme redémarre (après remise sous tension de l'Esplora), il peut aller lire les différentes valeurs stockées dans l'EEPROM. Cette mémoire est très pratique pour stocker des paramètres de configuration. - Vitesse d'horloge: 16 MHz
Même vitesse qu'un Arduino. A la taille de la plateforme, 16Mhz est très rapide... ce qui permet de créer des projets très réactifs.
Pour plus d'information sur l'Esplora:
- La fiche produit d'Esplora chez MCHobby (Français, contient de nombreuses informations).
- Page "Arduino Esplora" sur Arduino.cc (anglais).
Get an Arduino Esplora and USB cable
This tutorial is for the Arduino Esplora. If you have another board, read the corresponding Getting Started guide for that board.
You also need a proper Micro-USB cable ("A" plug to "Micro-B" plug type). Some mobile phones or portable music players use this kind of cable to transfer data to/from the PC, so you might already own one of them. This is different from a USB-Mini cable in that it's a slimmer connector. You can see the differences here (the connector you need is the one on the left in this photo.
Download the Arduino environment
Get the latest version of the Arduino IDE from the download page. You'll need version 1.0.3 or later of the Arduino IDE.
When the download finishes, unzip the downloaded file in any directory. Make sure to preserve the folder structure. Double-click the folder to open it. There should be a few files and sub-folders inside. If you're on a Mac, the zip folder contains just the application.
Connect the board
Connect the Arduino board to your computer using the USB cable. The green power LED (labelled ON) should go on, and the yellow LED marked "L" should start glowing. After about 8 seconds, the yellow LED should start blinking on and off.
Install the drivers
Instructions for Mac OS X
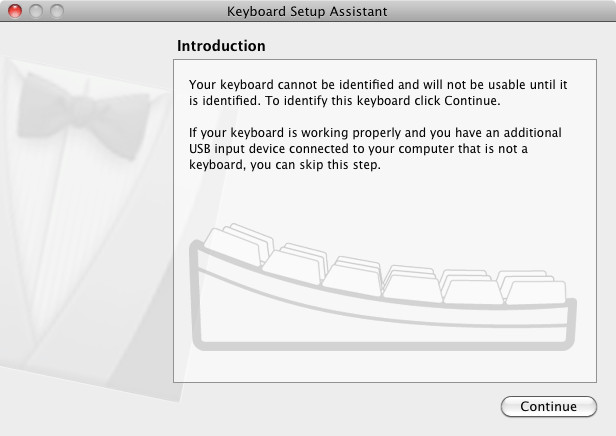
The first time you plug an Esplora into a Mac, the "Keyboard Setup Assistant" will launch. There's nothing to configure with the Esplora, so you can close this dialogue by clicking the red button in the top left of the window.
Instructions for Windows
The following instructions are for Windows 7. They are valid also for Windows XP, with small differences in the dialog windows.
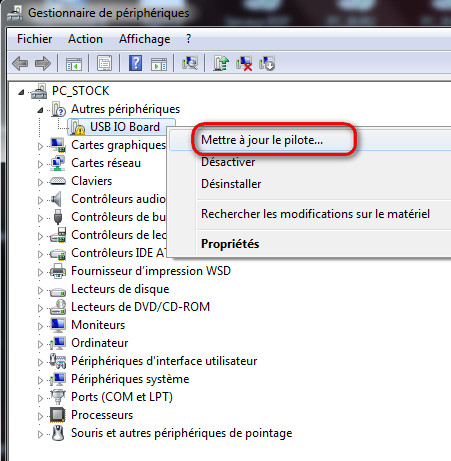
- Plug in your board and wait for Windows to begin its driver installation process. If the installer does not launch automatically, navigate to the Windows Device Manager (Start>Control Panel>Hardware) and find the Arduino Esplora listing. Right click and choose Update driver.
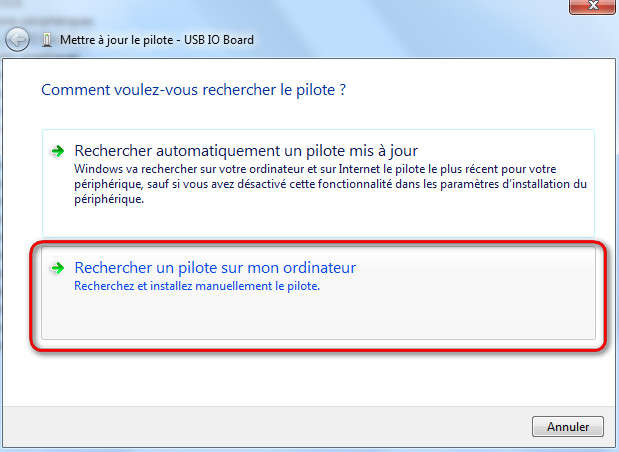
- At the next screen, choose "Browse my computer for driver software", and click Next.
- Click the Browse... button. Another dialog appears: navigate to the folder with the Arduino software that you just downloaded. Select the drivers folder an click OK, then click Next.
- You will receive a notification that the board has not passed Windows Logo testing. Click on the button Continue Anyway.
Fichier:Ard-Esplora-Demarrer-Install-23.jpg
- After a few moments, a window will tell you the wizard has finished installing software for Arduino Esplora. Press the Close button.
Instructions for Linux
There is no need to install drivers for Ubuntu 12.04.
Programming the board
Démarrer l'environnement
Double-click the Arduino application. (Note: if the Arduino software loads in the wrong language, you can change it in the preferences dialog. See the environment page sur Arduino.cc for details.)
Open the Esplora Blink example
Open the LED Blink example sketch: File > Examples > Esplora > Beginners > EsploraBlink.
Note: If you do not see the EsploraBlink example, you may need to update the Esplora library. To do this, quit the Arduino IDE and download this .zip file. Look in your Documents folder (on OSX or Ubuntu) or My Documents folder (on Windows) for the Arduino sketches folder. It will be called "Arduino" and there should be a folder inside called "libraries". If not, create a libraries folder inside the sketches folder. Move the Esplora folder into the libraries folder. Then re-start the Arduino IDE. Now you should be able to open the EsploraBlink sketch as described above.
Configure Arduino for Esplora
Since the Arduino IDE is used for many different Arduino boards, you need to tell it that you're working with the Esplora. Open the Tools > Board menu and choose Arduino Esplora.
Select the right USB port
The Arduino IDE needs to know which of your USB ports the Esplora is connected to. The Tools > Serial menu lists the available ports:
- if only one item is shown, click on that one;
- if two or more are shown, you can disconnect the Esplora and re-open the menu; the entry that disappears should be the Esplora board. Reconnect the board and select that serial port.
Upload the program
Now, simply click the "Upload" button in the environment. Wait a few seconds - you should see the RX and TX leds on the board flashing. If the upload is successful, the message "Done uploading." will appear in the status bar of the software.
A few seconds after the upload finishes, you should see the yellow RGB LED on the board start to blink, changing color from red to green to blue to yellow to cyan to magenta to white. If it does, congratulations! You've gotten Esplora up and running.
Change the RGB LED
Now that you've verified that the Esplora can connect to your computer and you can upload code, it's time to try a few of its functions. The Esplora has input sensors, which you get information from using read commands, and output actuators, which you control using write commands. The RGB LED and the buzzer are the two main output actuators. The joystick, linear potentiometer slider, microphone, accelerometer, temperature sensor, and pushbuttons are the input sensors. You can also add your own inputs and outputs using the TinkerKit input and output connectors.
In this example, you'll get the RGB LED to blink each of its colors once, then all three at the same time. The Esplora library, included at the beginning of the sketch, has a number of methods that will simplify the code you need to use.
The sketch below is similar to the EsploraBlink example, but controls the LED in a slightly different way. You can either use the Esplora.writeRGB() command, and give it red, green, and blue values like so:
Esplora.writeRGB(255, 255, 255); // sets red, green and blue all to full brightness
Où acheter
- Un Arduino Esplora est disponible chez MCHobby (Belgique et France).
- MCHobby La gamme Arduino et de nombreux senseurs sont disponibles chez MCHobby (Belgique et France).
Source: Getting Started with Arduino Esplora sur Arduino.cc.
Traduit "at the best" et contenu augmenté par Meurisse D. pour MCHobby.be.
Source de cet article (tout ou en partie) issue de Arduino.CC, voir article d'origine pour licence applicable (habituellement Creative Commons Attribution-ShareAlike 3.0). Crédit arduino.cc dont MCHobby est distributeur officiel des produits.
Toute référence, mention ou extrait de cette traduction doit être explicitement accompagné du texte suivant : « Traduction par MCHobby (www.MCHobby.be) - Vente de kit et composants » avec un lien vers la source (donc cette page) et ce quelque soit le média utilisé.
L'utilisation commercial de la traduction (texte) et/ou réalisation, même partielle, pourrait être soumis à redevance. Dans tous les cas de figures, vous devez également obtenir l'accord du(des) détenteur initial des droits. Celui de MC Hobby s'arrêtant au travail de traduction proprement dit.
