Différences entre versions de « Spark-Core-TMP36 »
| Ligne 23 : | Ligne 23 : | ||
Notice how we are powering the sensor from 3.3V* pin instead of the regular 3.3V. This is because the 3.3V* pin gives out a (LC) clean filtered voltage, ideal for analog applications like these. If the readings you get are noisy or inconsistent, add a 0.01uF (10nF) ceramic capacitor between the analog input pin (in this case, A7) and GND as shown in the set up. Ideally, the sensor should be placed away from the Core so that the heat dissipated by the Core does not affect the temperature readings. | Notice how we are powering the sensor from 3.3V* pin instead of the regular 3.3V. This is because the 3.3V* pin gives out a (LC) clean filtered voltage, ideal for analog applications like these. If the readings you get are noisy or inconsistent, add a 0.01uF (10nF) ceramic capacitor between the analog input pin (in this case, A7) and GND as shown in the set up. Ideally, the sensor should be placed away from the Core so that the heat dissipated by the Core does not affect the temperature readings. | ||
| + | == Le code == | ||
| + | Voici le code proposé par Spark que nous avons traduit pour faciliter la compréhension. | ||
| + | |||
| + | <nowiki>// ----------------- | ||
| + | // Read temperature | ||
| + | // ----------------- | ||
| + | |||
| + | // Create a variable that will store the temperature value | ||
| + | double temperature = 0.0; | ||
| + | |||
| + | void setup() | ||
| + | { | ||
| + | // Register a Spark variable here | ||
| + | Spark.variable("temperature", &temperature, DOUBLE); | ||
| + | |||
| + | // Connect the temperature sensor to A7 and configure it | ||
| + | // to be an input | ||
| + | pinMode(A7, INPUT); | ||
| + | } | ||
| + | |||
| + | void loop() | ||
| + | { | ||
| + | int reading = 0; | ||
| + | double voltage = 0.0; | ||
| + | |||
| + | // Keep reading the sensor value so when we make an API | ||
| + | // call to read its value, we have the latest one | ||
| + | reading = analogRead(A7); | ||
| + | |||
| + | // The returned value from the Core is going to be in the range from 0 to 4095 | ||
| + | // Calculate the voltage from the sensor reading | ||
| + | voltage = (reading * 3.3) / 4095; | ||
| + | |||
| + | // Calculate the temperature and update our static variable | ||
| + | temperature = (voltage - 0.5) * 100; | ||
| + | }</nowiki> | ||
| − | |||
{{Spark-Core-Hacking-TRAILER}} | {{Spark-Core-Hacking-TRAILER}} | ||
| + | |||
| + | <small>Source: [http://docs.spark.io/examples/#measuring-the-temperature docs.spark.io/examples/#measuring-the-temperature]</small> | ||
Version du 30 novembre 2014 à 19:31
Mesurer la température
We have now learned how to send custom commands to the Core and control the hardware. But how about reading data back from the Core?
In this example, we will hook up a temperature sensor to the Core and read the values over the internet with a web browser.
Cette fois-ci, la valeur sera lisible en utilisant une simple requête WEB (de type GET).
Montage

Crédit: Particle.IO www.particle.io
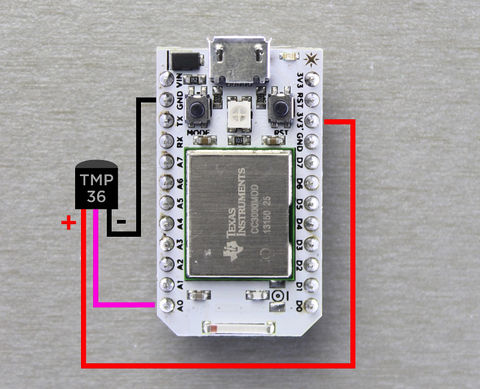
We have used a widely available analog temperature sensor called TMP36 from Analog Devices, and is the temperature sensor that comes with your Spark Core Maker Kit!
You can télécharger la fiche technique ici.

Crédit: Particle.IO www.particle.io
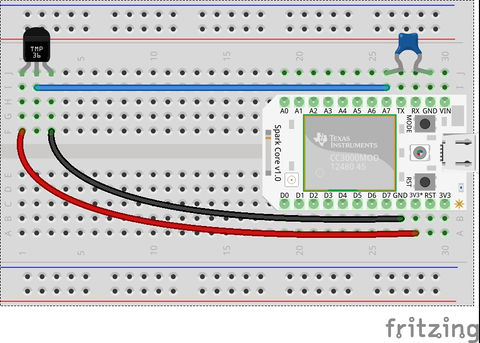
Notice how we are powering the sensor from 3.3V* pin instead of the regular 3.3V. This is because the 3.3V* pin gives out a (LC) clean filtered voltage, ideal for analog applications like these. If the readings you get are noisy or inconsistent, add a 0.01uF (10nF) ceramic capacitor between the analog input pin (in this case, A7) and GND as shown in the set up. Ideally, the sensor should be placed away from the Core so that the heat dissipated by the Core does not affect the temperature readings.
Le code
Voici le code proposé par Spark que nous avons traduit pour faciliter la compréhension.
// -----------------
// Read temperature
// -----------------

// Create a variable that will store the temperature value
double temperature = 0.0;

void setup()
{
  // Register a Spark variable here
  Spark.variable("temperature", &temperature, DOUBLE);

  // Connect the temperature sensor to A7 and configure it
  // to be an input
  pinMode(A7, INPUT);
}

void loop()
{
  int reading = 0;
  double voltage = 0.0;

  // Keep reading the sensor value so when we make an API
  // call to read its value, we have the latest one
  reading = analogRead(A7);

  // The returned value from the Core is going to be in the range from 0 to 4095
  // Calculate the voltage from the sensor reading
  voltage = (reading * 3.3) / 4095;

  // Calculate the temperature and update our static variable
  temperature = (voltage - 0.5) * 100;
}
Source: Particle Core Examples créé par Particle.IO.
Traduction (et augmentation de contenu) réalisée par Meurisse D pour MCHobby.be - Translated (and enhanced) by Meurisse D. for MCHobby.be
Traduit avec l'autorisation de Particle.IO - Translated with the permission from Particle.IO - Particle.IO
Toute référence, mention ou extrait de cette traduction doit être explicitement accompagné du texte suivant : « Traduction par MCHobby (www.MCHobby.be) - Vente de kit et composants » avec un lien vers la source (donc cette page) et ce quelque soit le média utilisé.
L'utilisation commercial de la traduction (texte) et/ou réalisation, même partielle, pourrait être soumis à redevance. Dans tous les cas de figures, vous devez également obtenir l'accord du(des) détenteur initial des droits. Celui de MC Hobby s'arrêtant au travail de traduction proprement dit.
