Différences entre versions de « Micropython-neotrellis-wiring »
Sauter à la navigation
Sauter à la recherche
| Ligne 11 : | Ligne 11 : | ||
[[Fichier:Micropython-neotrellis-wiring-01.jpg]] | [[Fichier:Micropython-neotrellis-wiring-01.jpg]] | ||
| − | + | Il sera nécessaire de créer une instance du bus I2C pour communiquer avec NeoTrellis. | |
| − | + | Conformément au schéma ci-dessus, nous utiliserons: | |
<syntaxhighlight lang="python"> | <syntaxhighlight lang="python"> | ||
from machine import I2C, Pin | from machine import I2C, Pin | ||
| − | |||
i2c = I2C( 1, sda=Pin.board.GP6, scl=Pin.board.GP7 ) | i2c = I2C( 1, sda=Pin.board.GP6, scl=Pin.board.GP7 ) | ||
</syntaxhighlight> | </syntaxhighlight> | ||
Version du 7 mars 2025 à 15:40
NeoTrellis et Pico
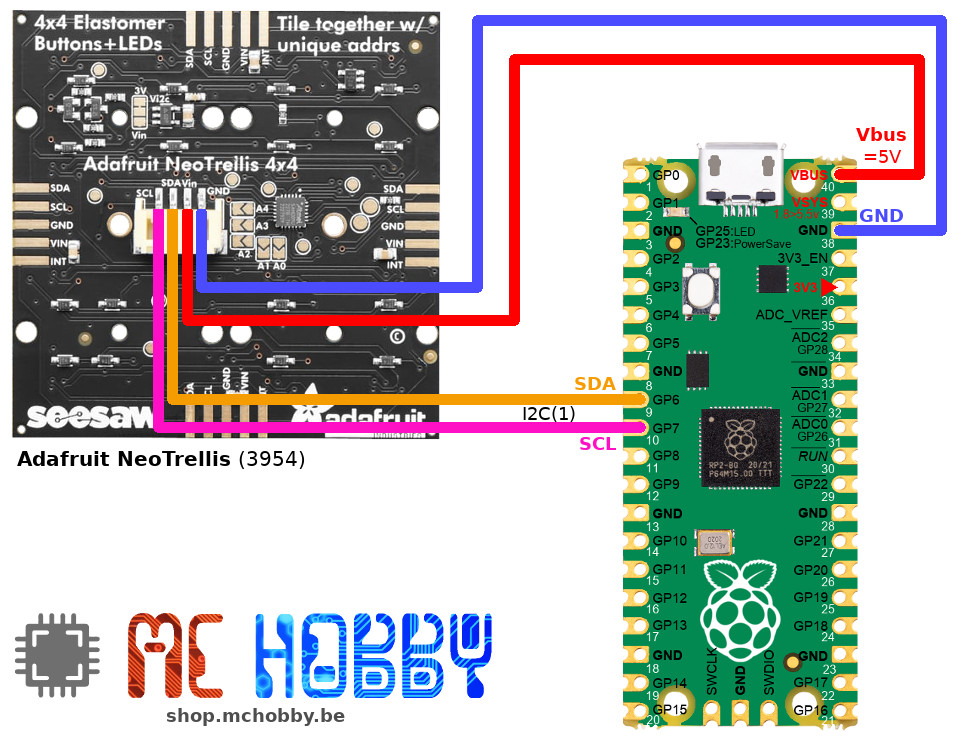
Voici comment brancher un NéoTrellis sur un Raspberry-Pi Pico.
Le brochage indique comment réaliser le raccordement à partir d'un connecteur JST-PH4 .
Vous pouvez également utiliser votre fer à souder et les connexions en bordure de carte pour réaliser vos raccordements.
Il sera nécessaire de créer une instance du bus I2C pour communiquer avec NeoTrellis.
Conformément au schéma ci-dessus, nous utiliserons:
from machine import I2C, Pin
i2c = I2C( 1, sda=Pin.board.GP6, scl=Pin.board.GP7 )
