Photo-résistance
What is a photocell?
Photocells are sensors that allow you to detect light. They are small, inexpensive, low-power, easy to use and don't wear out. For that reason they often appear in toys, gadgets and appliances. Theys are are often referred to as CdS cells (they are made of Cadmium-Sulfide), light-dependent resistors (LDR), and photoresistors.
Photocells are basically a resistor that changes its resistive value (in ohms Ω) depending on how much light is shining onto the squiggly face. They are very low cost, easy to get in many sizes and specifications, but are very innacurate. Each photocell sensor will act a little differently than the other, even if they are from the same batch. The variations can be really large, 50% or higher! For this reason, they shouldn't be used to try to determine precise light levels in lux or millicandela. Instead, you can expect to only be able to determine basic light changes
For most light-sentsitive applications like "is it light or dark out", "is there something in front of the sensor (that would block light)", "is there something interrupting a laser beam" (break-beam sensors), or "which of multiple sensors has the most light hitting it", photocells can be a good choice!
Quelques données techniques
- Resistance range: 200K Ω (dark) to 10KΩ (10 lux brightness)
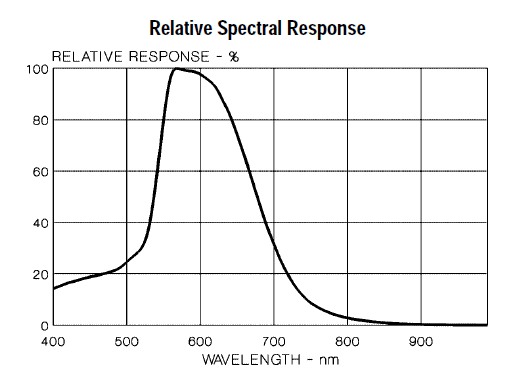
- Sensitivity range: CdS cells respond to light between 400nm (violet) and 600nm (orange) wavelengths, peaking at about 520nm (green).
- Power supply: pretty much anything up to 100V, uses less than 1mA of current on average (depends on power supply voltage)
Problems you may encounter with multiple sensors...
If, when adding more sensors, you find that the temperature is inconsistant, this indicates that the sensors are interfering with each other when switching the analog reading circuit from one pin to the other. You can fix this by doing two delayed readings and tossing out the first one
See this post for more information
How to measure light using a photocell
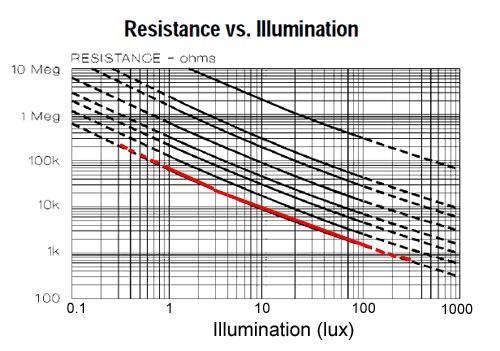
As we've said, a photocell's resistance changes as the face is exposed to more light. When its dark, the sensor looks like an large resistor up to 10MΩ, as the light level increases, the resistance goes down. This graph indicates approximately the resistance of the sensor at different light levels. Remember each photocell will be a little different so use this as a guide only!
Note that the graph is not linear, its a log-log graph!
Photocells, particularly the common CdS cells that you're likely to find, are not sensitive to all light. In particular they tend to be sensitive to light between 700nm (red) and 500nm (green) light.
Basically, blue light wont be nearly as effective at triggering the sensor as green/yellow light!
What the heck is lux?
Most datasheets use lux to indicate the resistance at certain light levels. But what is lux ? Its not a method we tend to use to describe brightness so its tough to gauge. Here is a table adapted from a Wikipedia article on the topic!
| Illuminance | Example |
| 0.002 lux | Moonless clear night sky |
| 0.2 lux | Design minimum for emergency lighting (AS2293). |
| 0.27 - 1 lux | Full moon on a clear night |
| 3.4 lux | Dark limit of civil twilight under a clear sky |
| 50 lux | Family living room |
| 80 lux | Hallway/toilet |
| 100 lux | Very dark overcast day |
| 300 - 500 lux | Sunrise or sunset on a clear day. Well-lit office area. |
| 1,000 lux | Overcast day; typical TV studio lighting |
| 10,000 - 25,000 lux | Full daylight (not direct sun) |
| 32,000 - 130,000 lux | Direct sunlight |
Connecting to your photocell
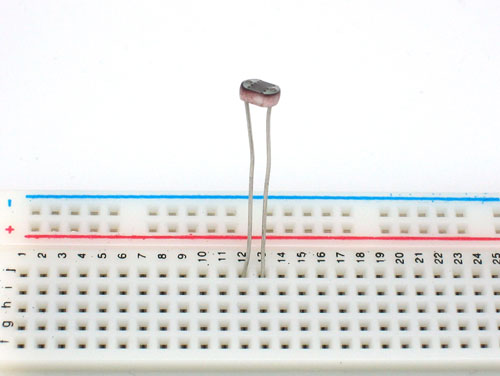
Because photocells are basically resistors, they are non-polarized. That means you can connect them up 'either way' and they'll work just fine!
Photocells are pretty hardy, you can easily solder to them, clip the leads, plug them into breadboards, use alligator clips, etc. The only care you should take is to avoid bending the leads right at the epoxied sensor, as they could break off if flexed too often.
Analog voltage reading method
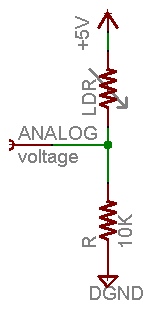
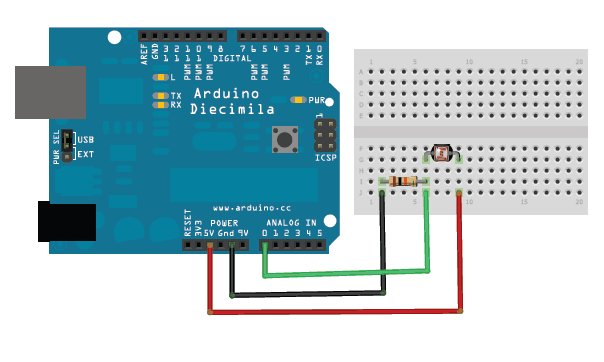
The easiest way to measure a resistive sensor is to connect one end to Power and the other to a pull-down resistor to ground. Then the point between the fixed pulldown resistor and the variable photocell resistor is connected to the analog input of a microcontroller such as an Arduino (shown)
For this example I'm showing it with a 5V supply but note that you can use this with a 3.3v supply just as easily. In this configuration the analog voltage reading ranges from 0V (ground) to about 5V (or about the same as the power supply voltage).
The way this works is that as the resistance of the photocell decreases, the total resistance of the photocell and the pulldown resistor decreases from over 600KΩ to 10KΩ. That means that the current flowing through both resistors increases which in turn causes the voltage across the fixed 10KΩ resistor to increase. Its quite a trick!
(Ω) (Ω)
Moonlit night 1 lux 70 KΩ 80 KΩ 0.07 mA 0.6 V Dark room 10 lux 10 KΩ 20 KΩ 0.25 mA 2.5 V Dark overcast day / Bright room 100 lux 1.5 KΩ 11.5 KΩ 0.43 mA 4.3 V Overcast day 1000 lux 300 Ω 10.03 KΩ 0.5 mA 5V
| Ambient light like... | Ambient light (lux) | Photocell resistance (Ohms) | LDR + R (Ohms) | Current thru LDR +R | Voltage across R |
| Dim hallway | 0.1 lux | 600 KOhms | 610 KOhms | 0.008 mA | 0.1 V |
Source: cds
Traduit avec l'autorisation d'AdaFruit Industries - Translated with the permission from Adafruit Industries - www.adafruit.com
Toute référence, mention ou extrait de cette traduction doit être explicitement accompagné du texte suivant : « Traduction par MCHobby (www.MCHobby.be) - Vente de kit et composants » avec un lien vers la source (donc cette page) et ce quelque soit le média utilisé.
L'utilisation commercial de la traduction (texte) et/ou réalisation, même partielle, pourrait être soumis à redevance. Dans tous les cas de figures, vous devez également obtenir l'accord du(des) détenteur initial des droits. Celui de MC Hobby s'arrêtant au travail de traduction proprement dit.
