Différences entre versions de « Arduino-ATTiny-85-brancher »
| Ligne 8 : | Ligne 8 : | ||
== Brancher == | == Brancher == | ||
| − | + | Nous allons connecter notre carte Arduino sur l'ATTiny comme indiqué que le diagramme ci-dessous. | |
| + | |||
| + | Utilisez le poinr dans le coin de l'ATTiny pour l'orienter correctement. Nous allons également connecter une capacité de 10 µF entre la broche reset et la masse (capacitor between reset and ground on the Arduino board as shown in the diagram (the stripe on the capacitor that’s marked with a negative sign (-) should go to ground). The capacitor prevents the Arduino board from resetting (which starts the bootloader), thus ensuring that the Arduino IDE talks to the ArduinoISP (not the bootloader) during the upload of sketches. (The capacitor is needed if you’re using an Arduino Uno, and might also be necessary for an Arduino Duemilanove.) | ||
[[Fichier:Arduino-ATTiny-85-brancher-00.png]] | [[Fichier:Arduino-ATTiny-85-brancher-00.png]] | ||
Version du 7 mars 2016 à 16:40
Matériel
- ATtiny45 or ATtiny85 (8-pin DIP package)
- Une capacité de 10 µF
- Un breadboard
- Fils pour breadboard
Brancher
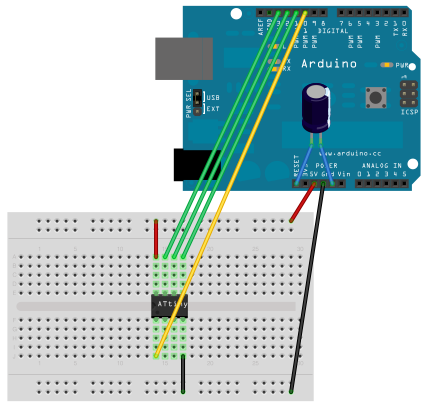
Nous allons connecter notre carte Arduino sur l'ATTiny comme indiqué que le diagramme ci-dessous.
Utilisez le poinr dans le coin de l'ATTiny pour l'orienter correctement. Nous allons également connecter une capacité de 10 µF entre la broche reset et la masse (capacitor between reset and ground on the Arduino board as shown in the diagram (the stripe on the capacitor that’s marked with a negative sign (-) should go to ground). The capacitor prevents the Arduino board from resetting (which starts the bootloader), thus ensuring that the Arduino IDE talks to the ArduinoISP (not the bootloader) during the upload of sketches. (The capacitor is needed if you’re using an Arduino Uno, and might also be necessary for an Arduino Duemilanove.)
Connexions:
- ATtiny Pin 2 to Arduino Pin 13 (or SCK of another programmer)
- ATtiny Pin 1 to Arduino Pin 12 (or MISO of another programmer)
- ATtiny Pin 0 to Arduino Pin 11 (or MOSI of another programmer)
- ATtiny Reset Pin to Arduino Pin 10 (or RESET of another programmer)
Tutoriel Arduino board as ATtiny programmer et Programming an ATtiny w/ Arduino 1.6 (or 1.0) créé par High-Low Tech Group :: MIT Media Lab.
Tutoriel traduit par Meurisse D. pour MCHobby.be
Toute référence, mention ou extrait de cette traduction doit être explicitement accompagné du texte suivant : « Traduction par MCHobby (www.MCHobby.be) - Vente de kit et composants » avec un lien vers la source (donc cette page) et ce quelque soit le média utilisé.
L'utilisation commercial de la traduction (texte) et/ou réalisation, même partielle, pourrait être soumis à redevance. Dans tous les cas de figures, vous devez également obtenir l'accord du(des) détenteur initial des droits. Celui de MC Hobby s'arrêtant au travail de traduction proprement dit.
