Arduino Wireless Shield
Description
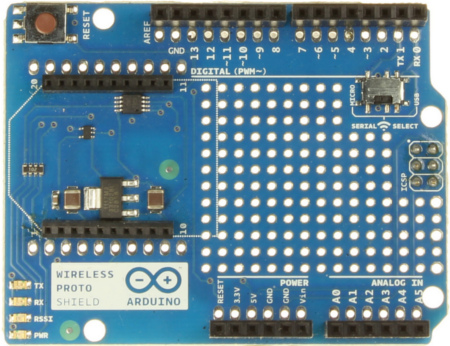
Le shield Wireless shield permet à un Arduino d'établir une communication sans fil en utilisant un module "Wireless". Il est basé sur les célèbres modules Xbee de Digi (également disponible chez MCHobby) mais peut également être utilisé avec d'autre module disposant d'une interface compatible.
Le module sais communiquer sur une distance de 30m en exterieur et jusqu'a une distance de 90m en intérieur (en ligne directe sans obstacle).
Le shield peut être utilisé comme remplacement de la connexion série/usb ou vous pouvez le placer en mode de commande pour configurer le module pour configurer les nombreuses options de diffusions (broadcast) de maillage réseau (Mesh).
Le shield permet un accès direct au brochage du module XBee par l'intermédiaire de points de contact (procédé communément appelée "breaks out" en anglais). Il dispose également d'un régulateur de tension et de toute l'électronique nécessaire pour un fonctionnement optimal du module XBee/ZigBee.
Pour ne pas perdre d'espace inutilement, la surface restée libre est garnie comme une plaque de prototypage standard (c'est le "+ proto"). Finalement, les différents broches d'Arduino sont montées en Stacking Header (pour ajouter un autre shield au dessus du Wireless Shield) et accessible via des pastilles de prototypage (pour un raccordement facile sur la zone de prototypage)
Le shield dispose d'un interrupteur permettant au module Wireless (sans-fil) de communiquer avec le module de conversion usb-serie d'Arduino ou directement avec le microcontroleur Arduino.
schémas
Fichiers EAGLE: arduino_WirelessShield_Proto_v3-reference-design.zip
Schemas: arduino_WirelessShield_Proto_v3-schematic.pdf
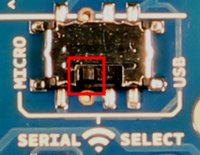
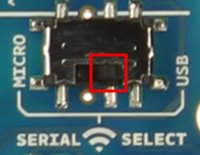
Interrupteur USB / Série
Position Micro
When in the Micro position, the DOUT pin of the wireless module is connected to the RX pin of the microcontroller; and DIN is connected to TX. The wireless module will then communicate with the microcontroller. Note that the RX and TX pins of the microcontroller are still connected to the TX and RX pins (respectively) of the USB-to-serial converter. Data sent from the microcontroller will be transmitted to the computer via USB as well as being sent wirelessly by the wireless module. The microcontroller will not be programmable via USB in this mode.
Position USB
With the switch in the USB position, the DOUT pin the wireless module is connected to the RX pin of the USB-to-serial converter, and DIN on the wireless module is connected to the TX pin of the USB-to-serial converter. This means that the module can communicate directly with the computer. The microcontroller on the board will be bypassed. To use the shield in this mode, you must program the microcontroller with an empty sketch (shown below), or remove it from the board.
Mise en réseau
The Wireless Proto shield can be used with different modules with the same footprint as the XBee modules. The instructions below are for the XBee 802.15.4 modules (sometimes called "Series 1" to distinguish them from the Series 2 modules, although "Series 1" doesn't appear in the official name or product description) and also for the XBee ZNet 2.5 or XBee ZB modules, both known as "Series 2" modules. All the modules, basically have the same type of configuration parameters, but differ by the function that they implement and the topologies of networks that they can create. Can communicate with each other only modules of the same family.
Adressage
There are multiple parameters that need to be configured correctly for two modules to talk to each other (although with the default settings, all modules should be able to talk to each other). They need to be on the same network, as set by the ID parameter (see "Configuration" below for more details on the parameters). The modules need to be on the same channel, as set by the CH parameter. Finally, a module's destination address (DH and DL parameters) determine which modules on its network and channel will receive the data it transmits. This can happen in a few ways:
- If a module's DH is 0 and its DL is less than 0xFFFF (i.e. 16 bits), data transmitted by that module will be received by any module whose 16-bit address MY parameter equals DL.
- If DH is 0 and DL equals 0xFFFF, the module's transmissions will be received by all modules.
- If DH is non-zero or DL is greater than 0xFFFF, the transmission will only be received by the module whose serial number equals the transmitting module's destination address (i.e. whose SH equals the transmitting module's DH and whose SL equals its DL).
Again, this address matching will only happen between modules on the same network and channel. If two modules are on different networks or channels, they can't communicate regardless of their addresses.
For the "Series 2" modules you must chose which firmware put on the module to give it Coordinator, Router or End Device functionality. Series 2 use only serial low (SL) and serial high (SH) for addressing.
Configuration
Here are some of the more useful parameters for configuring your Xbee module. For step-by-step instructions on reading and writing them using AT commands, see the:
- Arduino Wireless Shield avec module XBee 802.15.4 traduction Française.
- guide to the Wireless shield with the 802.15.4 modules (Arduino.CC, en anglais).
- guide to the Wireless shield with the ZNet 2.5 modules.
Make sure to prepend AT to the parameter name when sending a command to the module (e.g. to read the ID parameter, you should send the command ATID).
| Command | Description | Valeurs valides | Valeur par défaut |
| ID | The network ID of the XBee module. | 0 - 0xFFFF | 3332 |
| CH | The channel of the XBee module. | 0x0B - 0x1A | 0X0C |
| SH and SL | The serial number of the XBee module (SH gives the high 32 bits, SL the low 32 bits).Read-only. | 0 - 0xFFFFFFFF (for both SH and SL) | different for each module |
| MY | The 16-bit address of the module. | 0 - 0xFFFF | 0 |
| DH and DL | The destination address for wireless communication (DH is the high 32 bits, DL the low 32). | 0 - 0xFFFFFFFF (for both DH and DL) | 0 (for both DH and DL) |
| BD | The baud rate used for serial communication with the Arduino board or computer. | 0 (1200 bps) 1 (2400 bps) 2 (4800 bps) 3 (9600 bps) 4 (19200 bps) 5 (38400 bps) 6 (57600 bps) 7 (115200 bps) |
3 (9600 baud) |
Note: although the valid and default values in the table above are written with a prefix of "0x" (to indicate that they are hexadecimal numbers), the module will not include the "0x" when reporting the value of a parameter, and you should omit it when setting values.
Here are a couple more useful commands for configuring the XBee module (you'll need to prepend AT to these too).
| Command | Description |
| RE | Restore factory default settings (note that like parameter changes, this is not permanent unless followed by the WR command). |
| WR | Write newly configured parameter values to non-volatile (long-term) storage. Otherwise, they will only last until the module loses power. |
| CN | Exit command mode now. (If you don't send any commands to the module for a few seconds, command mode will timeout and exit even without a CN command.) |
For more details on configuring the XBee module, see the 802.15.4 modules product manual or the ZB modules product manual from Digi International.
xxx
DOM, link vers article d'utilisation avec Arduino
Où Acheter
Le [Wireless Proto Shield] est disponible chez MCHobby.
MCHobby dispose également d'une gamme XBee.
source: Arduino.cc
Source de cet article (tout ou en partie) issue de Arduino.CC, voir article d'origine pour licence applicable (habituellement Creative Commons Attribution-ShareAlike 3.0). Crédit arduino.cc dont MCHobby est distributeur officiel des produits.
Toute référence, mention ou extrait de cette traduction doit être explicitement accompagné du texte suivant : « Traduction par MCHobby (www.MCHobby.be) - Vente de kit et composants » avec un lien vers la source (donc cette page) et ce quelque soit le média utilisé.
L'utilisation commercial de la traduction (texte) et/ou réalisation, même partielle, pourrait être soumis à redevance. Dans tous les cas de figures, vous devez également obtenir l'accord du(des) détenteur initial des droits. Celui de MC Hobby s'arrêtant au travail de traduction proprement dit.


