BME280-Brancher
|
|
En cours de traduction/élaboration. |
You can easily wire this breakout to any microcontroller, we'll be using an Arduino. For another kind of microcontroller, as long as you have 4 available pins it is possible to 'bit-bang SPI' or you can use two I2C pins, but usually those pins are fixed in hardware. Just check out the library, then port the code.
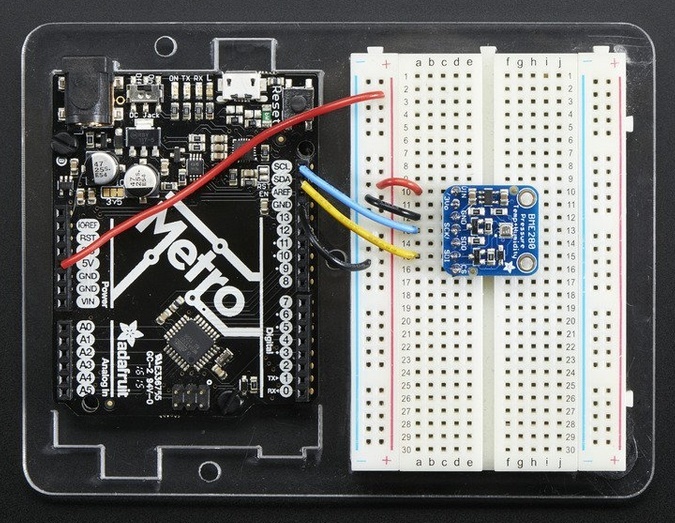
Brancher en I2C
Use this wiring if you want to connect via I2C interface
- Connect Vin to the power supply, 3-5V is fine. Use the same voltage that the microcontroller logic is based off of. For most Arduinos, that is 5V
- Connect GND to common power/data ground
- Connect the SCL pin to the I2C clock SCL pin on your Arduino. On an UNO & '328 based Arduino, this is also known as A5, on a Mega it is also known as digital 21 and on a Leonardo/Micro, digital 3
- Connect the SDA pin to the I2C data SDA pin on your Arduino. On an UNO & '328 based Arduino, this is also known as A4, on a Mega it is also known as digital 20 and on a Leonardo/Micro, digital 2
By default, the i2c address is 0x77. If you add a jumper from SDO to GND, the address will change to 0x76.

Crédit: AdaFruit Industries www.adafruit.com
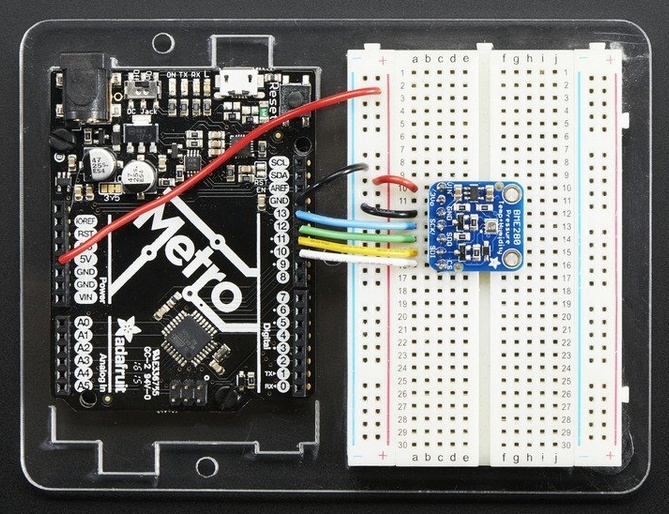
Brancher en SPI
Since this is a SPI-capable sensor, we can use hardware or 'software' SPI. To make wiring identical on all Arduinos, we'll begin with 'software' SPI. The following pins should be used:
- Connect Vin to the power supply, 3V or 5V is fine. Use the same voltage that the microcontroller logic is based off of. For most Arduinos, that is 5V
- Connect GND to common power/data ground
- Connect the SCK pin to Digital #13 but any pin can be used later
- Connect the SDO pin to Digital #12 but any pin can be used later
- Connect the SDI pin to Digital #11 but any pin can be used later
- Connect the CS pin Digital #10 but any pin can be used later
Later on, once we get it working, we can adjust the library to use hardware SPI if you desire, or change the pins to other

Crédit: AdaFruit Industries www.adafruit.com
Télécharger la bibliothèque
Source: "Adafruit BME280 Humidity + Barometric Pressure + Temperature Sensor Breakout" réalisé par LadyAda Pour AdaFruit Insdustries.
Traduit avec l'autorisation d'AdaFruit Industries - Translated with the permission from Adafruit Industries - www.adafruit.com
Toute référence, mention ou extrait de cette traduction doit être explicitement accompagné du texte suivant : « Traduction par MCHobby (www.MCHobby.be) - Vente de kit et composants » avec un lien vers la source (donc cette page) et ce quelque soit le média utilisé.
L'utilisation commercial de la traduction (texte) et/ou réalisation, même partielle, pourrait être soumis à redevance. Dans tous les cas de figures, vous devez également obtenir l'accord du(des) détenteur initial des droits. Celui de MC Hobby s'arrêtant au travail de traduction proprement dit.