BME280-Brancher
|
|
En cours de traduction/élaboration. |
préambule
Vous pouvez facilement brancher ce breakout sur votre microcontrôleur. Nous allons utiliser un Arduino dans ce tutoriel.
Pour tous les autres microcontrôleur il sera possible d'utiliser le bus I2C -OU- si vous disposez de 4 broches disponibles alors vous pourrez utiliser un 'bit-bang SPI' (SPI logiciel). Ceci dit, le bus SPI est généralement supporté matériellement par toutes les plateformes microcontrôleur. Prenez le temps de consulter la bibliothèque avant de faire un portage du code pour votre microcontrôleur.
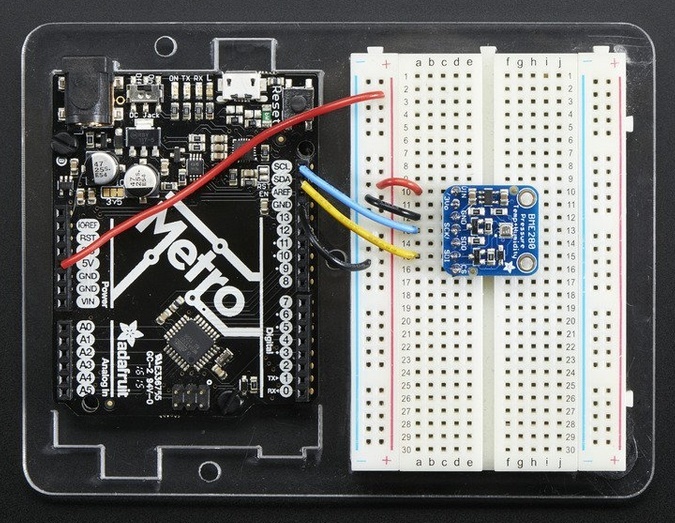
Brancher en I2C
Use this wiring if you want to connect via I2C interface
- Connect Vin to the power supply, 3-5V is fine. Use the same voltage that the microcontroller logic is based off of. For most Arduinos, that is 5V
- Connect GND to common power/data ground
- Connect the SCL pin to the I2C clock SCL pin on your Arduino. On an UNO & '328 based Arduino, this is also known as A5, on a Mega it is also known as digital 21 and on a Leonardo/Micro, digital 3
- Connect the SDA pin to the I2C data SDA pin on your Arduino. On an UNO & '328 based Arduino, this is also known as A4, on a Mega it is also known as digital 20 and on a Leonardo/Micro, digital 2
By default, the i2c address is 0x77. If you add a jumper from SDO to GND, the address will change to 0x76.
Crédit: AdaFruit Industries www.adafruit.com
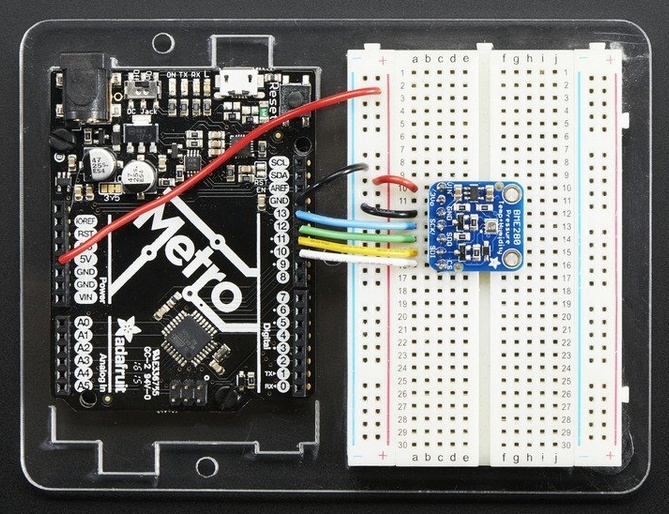
Brancher en SPI
Since this is a SPI-capable sensor, we can use hardware or 'software' SPI. To make wiring identical on all Arduinos, we'll begin with 'software' SPI. The following pins should be used:
- Connect Vin to the power supply, 3V or 5V is fine. Use the same voltage that the microcontroller logic is based off of. For most Arduinos, that is 5V
- Connect GND to common power/data ground
- Connect the SCK pin to Digital #13 but any pin can be used later
- Connect the SDO pin to Digital #12 but any pin can be used later
- Connect the SDI pin to Digital #11 but any pin can be used later
- Connect the CS pin Digital #10 but any pin can be used later
Later on, once we get it working, we can adjust the library to use hardware SPI if you desire, or change the pins to other
Crédit: AdaFruit Industries www.adafruit.com
Télécharger la bibliothèque
To begin reading sensor data, you will need to download Adafruit_BME280 from our github repository. You can do that by visiting the github repo and manually downloading or, easier, just click this button to download the zip
Rename the uncompressed folder Adafruit_BME280 and check that the Adafruit_BME280 folder contains Adafruit_BME280.cpp and Adafruit_BME280.h
Place the Adafruit_BME280 library folder your arduinosketchfolder/libraries/ folder. You may need to create the libraries subfolder if its your first library. Restart the IDE.
We also have a tutorial on Arduino library installation
Charger la démo
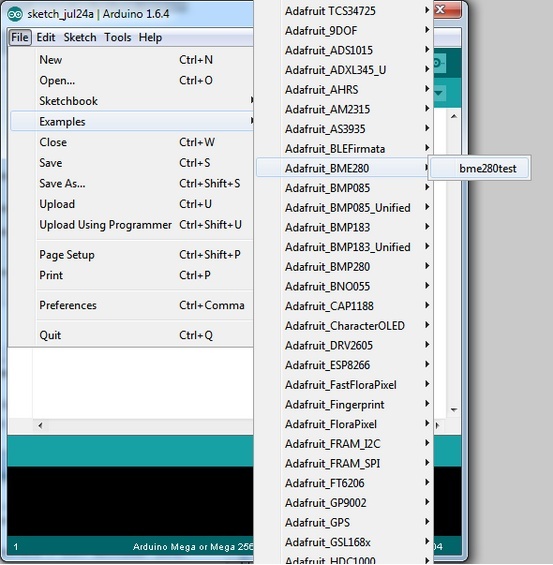
Open up File->Examples->Adafruit_BME280->bmp280test and upload to your Arduino wired up to the sensor
Crédit: AdaFruit Industries www.adafruit.com
Depending on whether you are using I2C or SPI, change the pin names and comment or uncomment the following lines.
#define BME_SCK 13
#define BME_MISO 12
#define BME_MOSI 11
#define BME_CS 10

Adafruit_BME280 bme; // I2C
//Adafruit_BME280 bme(BME_CS); // hardware SPI
//Adafruit_BME280 bme(BME_CS, BME_MOSI, BME_MISO,  BME_SCK);
Once uploaded to your Arduino, open up the serial console at 9600 baud speed to see data being printed out
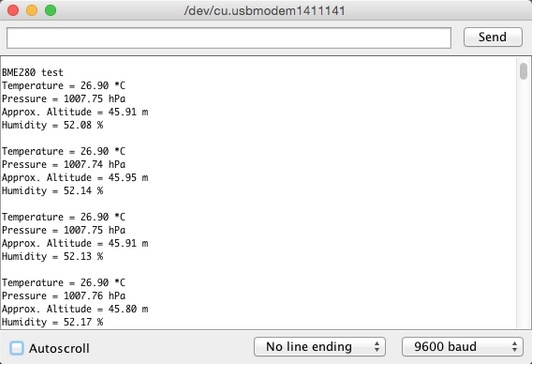
Crédit: AdaFruit Industries www.adafruit.com
Temperature is calculated in degrees C, you can convert this to F by using the classic F = C * 9/5 + 32 equation.
Pressure is returned in the SI units of Pascals. 100 Pascals = 1 hPa = 1 millibar. Often times barometric pressure is reported in millibar or inches-mercury. For future reference 1 pascal =0.000295333727 inches of mercury, or 1 inch Hg = 3386.39 Pascal. So if you take the pascal value of say 100734 and divide by 3389.39 you'll get 29.72 inches-Hg.
You can also calculate Altitude. However, you can only really do a good accurate job of calculating altitude if you know the hPa pressure at sea level for your location and day! The sensor is quite precise but if you do not have the data updated for the current day then it can be difficult to get more accurate than 10 meters.
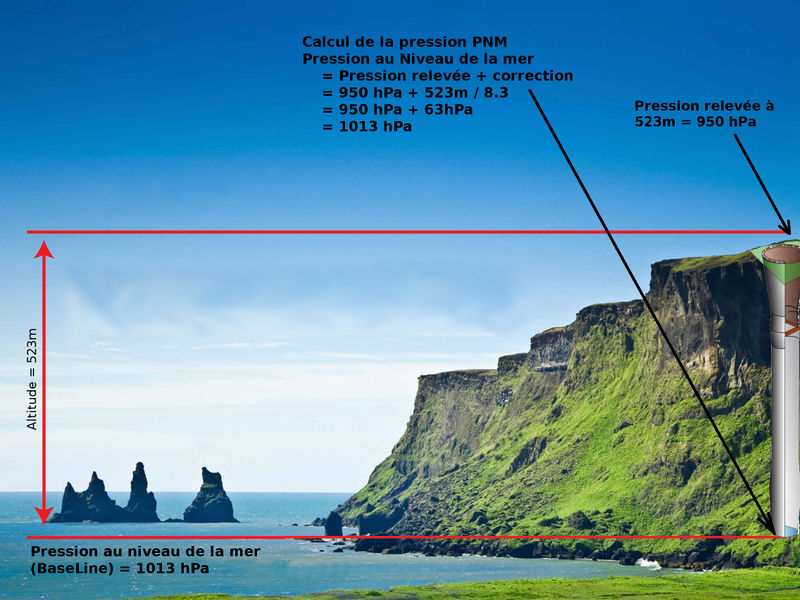
La pression PNM
Les stations météo professionnelles affichent des pressions dites "PNM" (PNM: Pression Niveau Mer ou SLP: Sea Level Pressure).
Il est utile de savoir ce que c'est et comment calculer une telle pression.
Voyez cette section de notre autre tutoriel détaillant le principe et le calcul avec un BMP180 (un autre senseur de pression).
Référence de la bibliothèque
You can start out by creating a BME280 object with either software SPI (where all four pins can be any I/O) using
Adafruit_BME280 bme(BME_CS, BME_MOSI, BME_MISO, BME_SCK);
Or you can use hardware SPI. With hardware SPI you must use the hardware SPI pins for your Arduino - and each arduino type has different pins! Check the SPI reference to see what pins to use. In this case, you can use any CS pin, but the other three pins are fixed
Adafruit_BME280 bme(BME_CS); // hardware SPI
or I2C using the default I2C bus, no pins are assigned
Adafruit_BME280 bme; // I2C
Once started, you can initialize the sensor with
  if (!bme.begin()) {
    Serial.println("Could not find a valid BME280 sensor, check wiring!");
    while (1);
  }
begin() will return True if the sensor was found, and False if not. If you get a False value back, check your wiring!
Reading humidity, temperature and pressure is easy, just call:
bme.readTemperature()
bme.readPressure()
bme.readHumidity()
Temperature is always a floating point, in Centigrade. Pressure is a 32 bit integer with the pressure in Pascals. You may need to convert to a different value to match it with your weather report. Humidity is in % Relative Humidity
It's also possible to turn the BME280 into an altimeter. If you know the pressure at sea level, the library can calculate the current barometric pressure into altitude
bmp.readAltitude(pression_au_niveau_de_la_mer)
However, you can only really do a good accurate job of calculating altitude if you know the hPa pressure at sea level for your location and day! The sensor is quite precise but if you do not have the data updated for the current day then it can be difficult to get more accurate than 10 meters.
Pass in the current sea level pressure in hPa - so the value will be somewhere around ~1000. You can also test with the generic 1013.25 value.
Source: "Adafruit BME280 Humidity + Barometric Pressure + Temperature Sensor Breakout" réalisé par LadyAda Pour AdaFruit Insdustries.
Traduit avec l'autorisation d'AdaFruit Industries - Translated with the permission from Adafruit Industries - www.adafruit.com
Toute référence, mention ou extrait de cette traduction doit être explicitement accompagné du texte suivant : « Traduction par MCHobby (www.MCHobby.be) - Vente de kit et composants » avec un lien vers la source (donc cette page) et ce quelque soit le média utilisé.
L'utilisation commercial de la traduction (texte) et/ou réalisation, même partielle, pourrait être soumis à redevance. Dans tous les cas de figures, vous devez également obtenir l'accord du(des) détenteur initial des droits. Celui de MC Hobby s'arrêtant au travail de traduction proprement dit.
