Différences entre versions de « FEATHER-M0-Alimentation »
(Page créée avec « {{FEATHER-M0-NAV}} {{traduction}} {{FEATHER-M0-TRAILER}} ») |
|||
| Ligne 2 : | Ligne 2 : | ||
{{traduction}} | {{traduction}} | ||
| + | |||
| + | {{ADFImage|FEATHER-M0-Alimentation-00.jpg|640px}} | ||
| + | |||
| + | == Alimentation Accu + USB == | ||
| + | |||
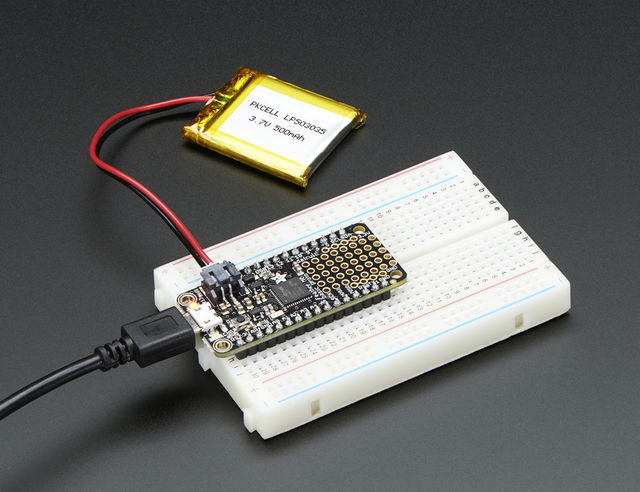
| + | We wanted to make the Feather easy to power both when connected to a computer as well as via battery. There's two ways to power a Feather. You can connect with a MicroUSB cable (just plug into the jack) and the Feather will regulate the 5V USB down to 3.3V. You can also connect a 4.2/3.7V Lithium Polymer (Lipo/Lipoly) or Lithium Ion (LiIon) battery to the JST jack. This will let the Feather run on a rechargable battery. '''When the USB power is powered, it will automatically switch over to USB for power, as well as start charging the battery (if attached) at 100mA'''. This happens 'hotswap' style so you can always keep the Lipoly connected as a 'backup' power that will only get used when USB power is lost. | ||
| + | |||
| + | {{ambox-stop|text=The JST connector polarity is matched to Adafruit LiPoly batteries. Using wrong polarity batteries can destroy your Feather}} | ||
| + | |||
| + | {{ADFImage|FEATHER-M0-Alimentation-10.jpg|640px}} | ||
| + | |||
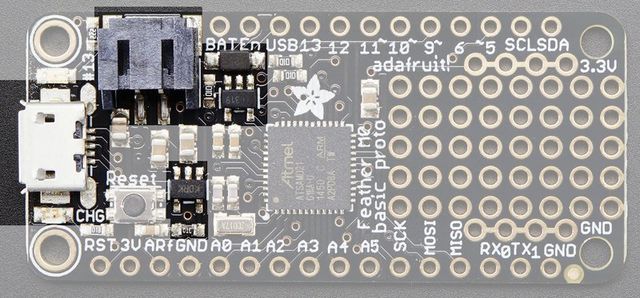
| + | The above shows the Micro USB jack (left), Lipoly JST jack (top left), as well as the 3.3V regulator and changeover diode (just to the right of the JST jack) and the Lipoly charging circuitry (to the right of the Reset button). There's also a '''CHG''' LED, which will light up while the battery is charging. This LED might also flicker if the battery is not connected. | ||
| + | |||
| + | == Source d'alimentation == | ||
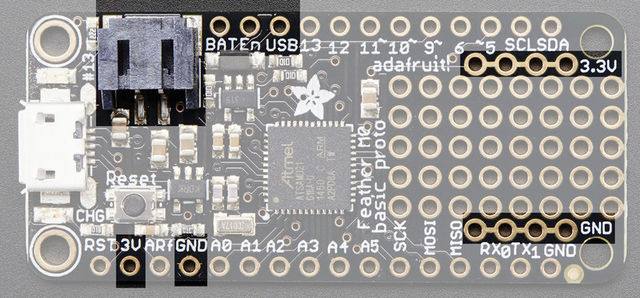
| + | You have a lot of power supply options here! We bring out the '''BAT''' pin, which is tied to the lipoly JST connector, as well as '''USB''' which is the +5V from USB if connected. We also have the '''3V''' pin which has the output from the 3.3V regulator. We use a 500mA peak regulator. While you can get 500mA from it, you can't do it continuously from 5V as it will overheat the regulator. It's fine for, say, powering an ESP8266 WiFi chip or XBee radio though, since the current draw is 'spikey' & sporadic. | ||
| + | |||
| + | {{ADFImage|FEATHER-M0-Alimentation-20.jpg|640px}} | ||
{{FEATHER-M0-TRAILER}} | {{FEATHER-M0-TRAILER}} | ||
Version du 25 avril 2016 à 20:17
|
|
En cours de traduction/élaboration. |

Crédit: AdaFruit Industries www.adafruit.com
Alimentation Accu + USB
We wanted to make the Feather easy to power both when connected to a computer as well as via battery. There's two ways to power a Feather. You can connect with a MicroUSB cable (just plug into the jack) and the Feather will regulate the 5V USB down to 3.3V. You can also connect a 4.2/3.7V Lithium Polymer (Lipo/Lipoly) or Lithium Ion (LiIon) battery to the JST jack. This will let the Feather run on a rechargable battery. When the USB power is powered, it will automatically switch over to USB for power, as well as start charging the battery (if attached) at 100mA. This happens 'hotswap' style so you can always keep the Lipoly connected as a 'backup' power that will only get used when USB power is lost.
| The JST connector polarity is matched to Adafruit LiPoly batteries. Using wrong polarity batteries can destroy your Feather |

Crédit: AdaFruit Industries www.adafruit.com
The above shows the Micro USB jack (left), Lipoly JST jack (top left), as well as the 3.3V regulator and changeover diode (just to the right of the JST jack) and the Lipoly charging circuitry (to the right of the Reset button). There's also a CHG LED, which will light up while the battery is charging. This LED might also flicker if the battery is not connected.
Source d'alimentation
You have a lot of power supply options here! We bring out the BAT pin, which is tied to the lipoly JST connector, as well as USB which is the +5V from USB if connected. We also have the 3V pin which has the output from the 3.3V regulator. We use a 500mA peak regulator. While you can get 500mA from it, you can't do it continuously from 5V as it will overheat the regulator. It's fine for, say, powering an ESP8266 WiFi chip or XBee radio though, since the current draw is 'spikey' & sporadic.

Crédit: AdaFruit Industries www.adafruit.com
Source: Adafruit Feather M0 Basic Proto créé par LadyAda pour AdaFruit Industries. Crédit [www.adafruit.com AdaFruit Industries]
Traduit par Meurisse D. pour MCHobby.be
Traduit avec l'autorisation d'AdaFruit Industries - Translated with the permission from Adafruit Industries - www.adafruit.com
Toute référence, mention ou extrait de cette traduction doit être explicitement accompagné du texte suivant : « Traduction par MCHobby (www.MCHobby.be) - Vente de kit et composants » avec un lien vers la source (donc cette page) et ce quelque soit le média utilisé.
L'utilisation commercial de la traduction (texte) et/ou réalisation, même partielle, pourrait être soumis à redevance. Dans tous les cas de figures, vous devez également obtenir l'accord du(des) détenteur initial des droits. Celui de MC Hobby s'arrêtant au travail de traduction proprement dit.