Différences entre versions de « FEATHER-M0-Alimentation »
| Ligne 10 : | Ligne 10 : | ||
== Alimentation Accu + USB == | == Alimentation Accu + USB == | ||
| − | + | Adafruit à voulu que le Feather soit facile à alimenter soit via le PC (lorsqu'il y est connecté), soit via un accu. Il y a donc deux facon d'alimenter un Feather. | |
| + | * Vous pouvez connecter un câble microUSB (branché sur votre PC) et le régulateur de tension du Feather abaissera la tension d'alimentation USB (5V) à 3.3V. | ||
| + | * Vous pouvez également connecter un accu Lithium Polymère (Lipo/Lipoly) de 4.2/3.7V ou un accu Lithium Ion (LiIon) sur le connecteur JST. Cela permet au Feather de fonctionner sur un accu rechargeable. | ||
| − | {{ambox-stop|text= | + | '''Lorsque la prise USB est sous tension, le Feather utilise automatiquement cette source d'alimentation, et démarre également la charge de l'accu à 100mA (s'il est présent)'''. Ce type de 'basculement à chaud' (''hotswap'') vous permet de garder votre accu Lipo toujours connecté, accu qui servira d'alimentation de secours lorsque l'alimentation USB est perdue. L'accu est est uniquement utilisé lorsqu'il n'y a pas d''alimentation via USB. |
| + | |||
| + | {{ambox-stop|text=Le connecteur JST est polarisé avec {{cl|83|les accu Lipo}} que nous proposons sur notre WebShop. Faites attention si vous utilisez votre propres accu, une mauvaise polarisation peut détruire votre Feather}} | ||
{{ADFImage|FEATHER-M0-Alimentation-10.jpg|640px}} | {{ADFImage|FEATHER-M0-Alimentation-10.jpg|640px}} | ||
| + | |||
| + | {{traduction}} | ||
The above shows the Micro USB jack (left), Lipoly JST jack (top left), as well as the 3.3V regulator and changeover diode (just to the right of the JST jack) and the Lipoly charging circuitry (to the right of the Reset button). There's also a '''CHG''' LED, which will light up while the battery is charging. This LED might also flicker if the battery is not connected. | The above shows the Micro USB jack (left), Lipoly JST jack (top left), as well as the 3.3V regulator and changeover diode (just to the right of the JST jack) and the Lipoly charging circuitry (to the right of the Reset button). There's also a '''CHG''' LED, which will light up while the battery is charging. This LED might also flicker if the battery is not connected. | ||
Version du 28 avril 2016 à 11:01
|
|
En cours de traduction/élaboration. |
Alimenter votre Feather
Il y a plusieurs choses intéressante à savoir si l'on désire tirer parti des options d'alimentation du Feather.
Crédit: AdaFruit Industries www.adafruit.com
Alimentation Accu + USB
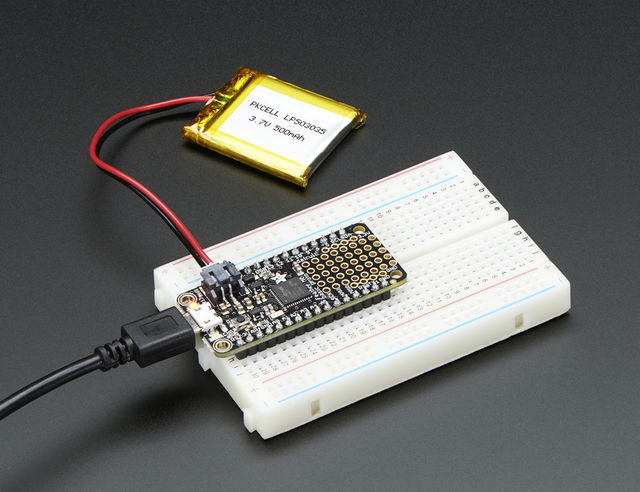
Adafruit à voulu que le Feather soit facile à alimenter soit via le PC (lorsqu'il y est connecté), soit via un accu. Il y a donc deux facon d'alimenter un Feather.
- Vous pouvez connecter un câble microUSB (branché sur votre PC) et le régulateur de tension du Feather abaissera la tension d'alimentation USB (5V) à 3.3V.
- Vous pouvez également connecter un accu Lithium Polymère (Lipo/Lipoly) de 4.2/3.7V ou un accu Lithium Ion (LiIon) sur le connecteur JST. Cela permet au Feather de fonctionner sur un accu rechargeable.
Lorsque la prise USB est sous tension, le Feather utilise automatiquement cette source d'alimentation, et démarre également la charge de l'accu à 100mA (s'il est présent). Ce type de 'basculement à chaud' (hotswap) vous permet de garder votre accu Lipo toujours connecté, accu qui servira d'alimentation de secours lorsque l'alimentation USB est perdue. L'accu est est uniquement utilisé lorsqu'il n'y a pas dalimentation via USB.
| Le connecteur JST est polarisé avec les accu Lipo que nous proposons sur notre WebShop. Faites attention si vous utilisez votre propres accu, une mauvaise polarisation peut détruire votre Feather |
Crédit: AdaFruit Industries www.adafruit.com
|
|
En cours de traduction/élaboration. |
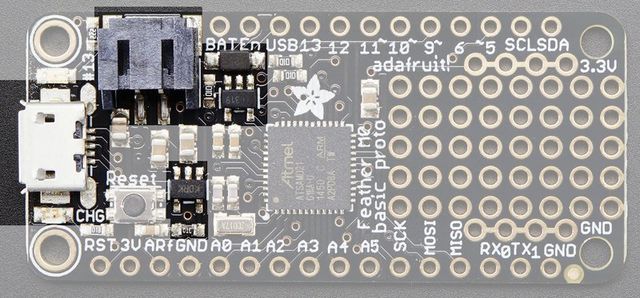
The above shows the Micro USB jack (left), Lipoly JST jack (top left), as well as the 3.3V regulator and changeover diode (just to the right of the JST jack) and the Lipoly charging circuitry (to the right of the Reset button). There's also a CHG LED, which will light up while the battery is charging. This LED might also flicker if the battery is not connected.
Source d'alimentation
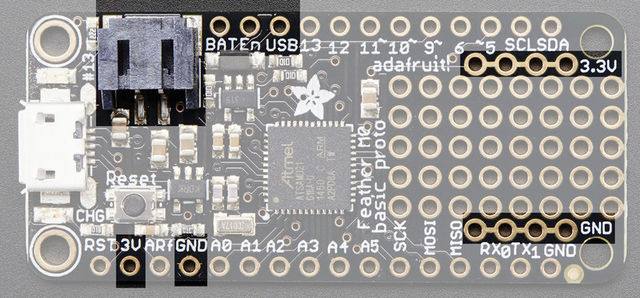
You have a lot of power supply options here! We bring out the BAT pin, which is tied to the lipoly JST connector, as well as USB which is the +5V from USB if connected. We also have the 3V pin which has the output from the 3.3V regulator. We use a 500mA peak regulator. While you can get 500mA from it, you can't do it continuously from 5V as it will overheat the regulator. It's fine for, say, powering an ESP8266 WiFi chip or XBee radio though, since the current draw is 'spikey' & sporadic.
Crédit: AdaFruit Industries www.adafruit.com
Mesurer l'accu
If you're running off of a battery, chances are you wanna know what the voltage is at! That way you can tell when the battery needs recharging. Lipoly batteries are 'maxed out' at 4.2V and stick around 3.7V for much of the battery life, then slowly sink down to 3.2V or so before the protection circuitry cuts it off. By measuring the voltage you can quickly tell when you're heading below 3.7V
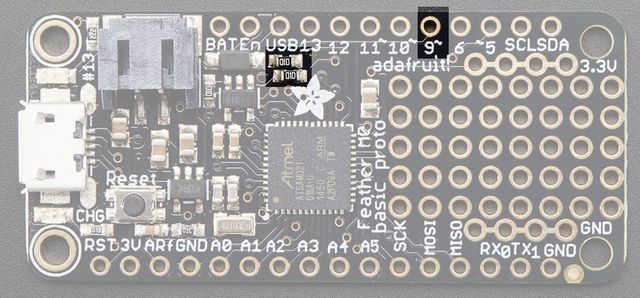
To make this easy we stuck a double-100K resistor divider on the BAT pin, and connected it to D9 (a.k.a analog #7 A7). You can read this pin's voltage, then double it, to get the battery voltage.
#define VBATPIN A7

float measuredvbat = analogRead(VBATPIN);
measuredvbat *= 2;    // we divided by 2, so multiply back
measuredvbat *= 3.3;  // Multiply by 3.3V, our reference voltage
measuredvbat /= 1024; // convert to voltage
Serial.print("VBat: " ); Serial.println(measuredvbat);
Crédit: AdaFruit Industries www.adafruit.com
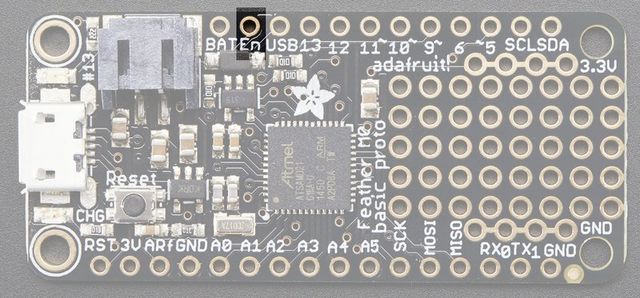
La broche Enable
If you'd like to turn off the 3.3V regulator, you can do that with the EN(able) pin. Simply tie this pin to Ground and it will disable the 3V regulator. The BAT and USB pins will still be powered
Crédit: AdaFruit Industries www.adafruit.com
Source: Adafruit Feather M0 Basic Proto créé par LadyAda pour AdaFruit Industries. Crédit [www.adafruit.com AdaFruit Industries]
Traduit par Meurisse D. pour MCHobby.be
Traduit avec l'autorisation d'AdaFruit Industries - Translated with the permission from Adafruit Industries - www.adafruit.com
Toute référence, mention ou extrait de cette traduction doit être explicitement accompagné du texte suivant : « Traduction par MCHobby (www.MCHobby.be) - Vente de kit et composants » avec un lien vers la source (donc cette page) et ce quelque soit le média utilisé.
L'utilisation commercial de la traduction (texte) et/ou réalisation, même partielle, pourrait être soumis à redevance. Dans tous les cas de figures, vous devez également obtenir l'accord du(des) détenteur initial des droits. Celui de MC Hobby s'arrêtant au travail de traduction proprement dit.