Hack-pycom-esp 32
|
|
En cours de traduction/élaboration. |
Un guide de démarrage rapide
Let’s start with a quick description of what to do after you unpack your brand new toy. Our aim is not to bug you with complex details about it, but instead get you as quick as possible to the point you can start doing useful things with your device.
It is strongly recommended to update the firmware on your device before coding, this is described in section 1.3 below
This chapter will get you unboxed and ready to code in no time.
- Unboxing and the expansion board
- Connecting over USB
- Firmware Upgrades
- Micropython introduction
- Connecting the board and coding using Pymakr
If anyting goes wrong, there is a Troubleshooting section (version anglaise ici) that addresses the most common issues. In case of any doubts you can always ask questions in our forum de la communauté (pycom.io, anglais).
Déballage et carte d'extension
The only way to learn how to use something new is by doing. First, we need to put together the basic pieces:
- Look for the reset button on your module (located at a corner of the board).
- Look for the USB connector on your expansion board.
- Insert the module on the expansion board with the reset button pointing in the same direction as the USB connector.
It’s that simple! If you want to confirm your work, here’s a picture showing how to place your board properly on the expansion board:


If you prefer video tutorials, here is a video showing these steps. It applies to all our modules.
| Some modules like the LoPy will be big enough to cover the USB connector. This is normal as long as you keep the orientation as shown. |
To extend the life of your expansion board, please be aware of the following:
- Be gentle when plugging/unplugging the USB cable. Whilst the USB connector is well soldered and is relatively strong, if it breaks off it can be very difficult to fix.
- Static electricity can shock the components on the device and destroy them. If you experience a lot of static electricity in your area (eg dry and cold climates), take extra care not to shock the device. If your device came in a ESD bag, then this bag is the best way to store and carry the device as it will protect it against static discharges.
Guide de la carte d'extension
The document explaining the hardware details of the expansion board can be found here (pdf, PyCom.io).
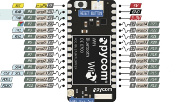
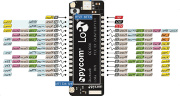
Brochage des cartes
Le brochage des cartes WiPy2 et Lopy sont décrit ici.
Connexion USB
Once you’re sure everything is in place, the fun begins. It is time to turn your device on. Just plug it into any powered USB cable (your computer or a battery charger).
In a few seconds, the LED should start blinking every 4 seconds. This means that everything is fine! If you cannot see the blinking, please disconnect the power supply and re-check the boards position on the expansion board.

Upgrade du FirmWare
We strongly recommend you to upgrade your firmware to the latest version as we are constantly making improvements and adding new features.
Here are the download links to the update tool. Please download the appropriate one for your OS and follow the instructions on the screen.
Previous versions of firmware are available for download on the Pycom website.

The instructions given by the updater tool should be followed carefully. The basic procedure is like this:
- Disconnect your device from the PC.
- Connect wire G23+GND using a jumper cable.
- Connect the board to the USB.
- Run the upgrader
- Remove the G23+GND wire.
- Reboot the device (button or powercycle)
Connecting G23 and GND puts the device in ‘update mode’. You won’t need this for any other task than using the firmware upgrader.
After you’re done with the upgrade, you can use Pymakr to upload and run programs in your device.
If you have your telnet connection or Pymakr already setup, the version can be with the following code:
import os
os.uname().release
| Make sure the TX jumper is present on your expansion board, as the jumpers sometimes come loose in the box during transport. Without this jumper, the updater will fail. |
Introduction à MicroPython
Les cartes PyCom boards work with Micropython; a Python 3 implementation that is optimised to run on micocontrollers. This allows for much faster and easier development than using C.
When booting, two files are executed automatically: first boot.py and then main.py. These are placed in the /flash folder on the board. Any other files or libraries can be placed here as well, and included or used from boot.py or main.py.
The folder structure in /flash looks like the picture below. The files can be managed either using FTP or using Pymakr.

Se connecter sur la carte avec Pymakr
To make it as easy as possible, we developed Pymakr, a tool that will allow you to connect to and program your Pycom devices. We’re going to use it in this section to give you a quick taste of how you can work with your device. You can download Pymakr from lien.
More extended info on pymakr like how to use the pycom console and the expert interface can be found under Pymakr
| If you have any trouble connecting over USB using pymakr, make sure you have the proper FTDI drivers installed |
Configuration initiale
After installing Pymakr, you need to take a few seconds to configure it for the first time. Please follow these steps:
- Connect your computer to the WiFi network named after your board (e.g. lopy-wlan-xxxx, wipy-wlan-xxxx). The password is www.pycom.io
- Open Pymakr.
- In the menu, go to Settings > Preferences (Pymakr > Preferences on macOS).
- In the left list look for Pycom Device.
- For device, type down 192.168.4.1. The default username and password are micro and python, respectively.
- Click OK
| Pymakr also supports wired connections. Instead of typing the IP address, you can click on the combo box arrow and select the proper serial port from the list. Our boards don’t require any username or password for the serial connection, so you can leave those fields empty. |

That’s it for the first time configuration. In the lower portion of the screen, you should see the console, with the connection process taking place. At the end of it, you’ll get a ‘connected’ message and a colored >>> prompt, indicating that you are connected:

There is also a video that explains these steps on macOS (it is similar for other operating systems).
Créer un projet
Pymakr has a feature to sync and run your code on your device. This is mostly done using projects. The following steps will get you started.
- In Pymakr, go to Project > New project.
- Give it a name and select a folder for your project, either a new of existing one.
- Create two files: main.py and boot.py, if you don’t already have those.
| You can also use FTP to download boot.py and main.py from the board to your project folder, after which you can right-click the project viewer and use the ‘add source files’ option to add them to your project. |
The boot.py file should always have the following code on the top, so we can run our python scripts over serial or telnet. All of our newer boards have this code already in the boot.py file.
from machine import UART
import os
uart = UART(0, 115200)
os.dupterm(uart)
Most users, especially WiPy users, would want a wifi script in the boot.py file. A basic wifi script but also more advanced WLAN examples, like fixed IP and multiple networks, can be found in the Wifi Examples chapter (PyCom, anglais). Nous avons également un tutoriel en Français sur le sujet (également applicable à Wipy2 et Lopy même s'il s'agit d'un tutoriel WiPy 1).
Besides the neccesary main.py and boot.py files, you can create any folders and python files or libraries that you want to include in your main file. Pymakr will synchronize all files in the project to the board when using the sync button.
Tutoriel PyCom Getting started (ESP_32) sous copyright de Damien George et contributeurs en ce qui concerne MicroPython et/ou PyCom en ce qui concerne les informations relatives a WiPy et LoPy.
Tutoriel traduit par Meurisse D. pour MCHobby.be
Traduit avec l'autorisation de micropython.org - Translated with the authorisation of micropython.org
Toute référence, mention ou extrait de cette traduction doit être explicitement accompagné du texte suivant : « Traduction par MCHobby (www.MCHobby.be) - Vente de kit et composants » avec un lien vers la source (donc cette page) et ce quelque soit le média utilisé.
L'utilisation commercial de la traduction (texte) et/ou réalisation, même partielle, pourrait être soumis à redevance. Dans tous les cas de figures, vous devez également obtenir l'accord du(des) détenteur initial des droits. Celui de MC Hobby s'arrêtant au travail de traduction proprement dit.