Différences entre versions de « Hack-pycom-lopy-Pymakr »
| Ligne 131 : | Ligne 131 : | ||
== Connectez pymakr sur vos cartes == | == Connectez pymakr sur vos cartes == | ||
| − | + | Après avoir installé Pymakr, vous aurez besoin de prendre quelques secondes pour le configurer la première fois. | |
| − | |||
| − | |||
| − | |||
| − | |||
| − | |||
| − | + | Suivez les étapes suivantes: | |
| + | # Connectez votre ordinateur sur le réseau WiFi de votre carte Pycom. Un réseau nommé comme ceci '''lopy-wlan-xxxx''' ou '''wipy-wlan-xxxx'''.<br />Le mot de passe est '''www.pycom.io''' | ||
| + | # Ouvrez Pymakr. | ||
| + | # Dans le menu, sélectionnez '''Settings > Preferences''' (''Configuration > Préférences'').<br />Sur MacOS, se sera ''Pymakr > Preferences''. | ||
| + | # La liste sur la gauche affiche une entrée '''Pycom Device''' (''carte Pycom''). | ||
| + | # Pour la carte, saisissez '''192.168.4.1'''.<br />Le nom-d-utilisation et mot-de-passe par défauts (''username'' et ''password'') sont respectivement '''micro''' et '''python'''. | ||
| + | # Cliquer sur le bouton "OK" | ||
| + | {{ambox|text=Pymakr supporte également la connexion filaire. A la place de saisir une adresse IP, vous pouvez cliquer sur le bouton de la liste déroulante et sélectionner le port série dans la liste. Dans ce cas, la connexion série ne nécessite pas de nom-d-utilisateur, ni de mot-de-passe, vous pourrez laisser ces champs vides.}} | ||
| + | [[Fichier:Hack-pycom-esp_32-50.png|800px]] | ||
| + | |||
| + | Cette opération de configuration ne sera nécessaire que la première fois. Dans la partie basse de l'écran, il y a une console où vous pouvez voir les informations du processus de connexion. | ||
| + | |||
| + | A la fin, vous trouverez le message "connected" (connecté) avec une invite de commande '''>>>'''. | ||
| + | |||
| + | [[Fichier:Hack-pycom-esp_32-51.png]] | ||
| + | |||
| + | [https://www.youtube.com/embed/bL5nn2lgaZE Il y a également une vidéo] qui explique les différentes étapes sur un macOS (étapes similaires aux autres systèmes d'exploitation). | ||
| + | |||
| + | == Interface expert == | ||
| + | By default, Pymakr is configured in ‘lite’ interface. In this mode, a lot of features are hidden and only the basic functionality remains. This makes it very user friendly, but after you become familiar with the software, you might want to switch to ‘expert’ interface to get the most out of Pymakr. | ||
| + | |||
| + | You can enable expert interface under Settings -> Switch to expert interface. After Pymakr restarts, you’ll get access to a few new options: | ||
| + | |||
| + | * Full interface control over tabs and layout | ||
| + | * Control over keyboard shortcuts | ||
| + | * Export/import of preferences | ||
| + | * Preferenes for the editor | ||
| + | * Extra tabs besides the Pycom Console: A local python shell, a task viewer and a basic number converter. | ||
| + | * Bookmarks | ||
| + | * Plugin controls | ||
| + | * Lots of other extra’s | ||
| + | |||
| + | To switch back to ‘lite’ mode, go back to Settings and choose Switch to Lite interface. | ||
| + | |||
| + | == Thème et couleur == | ||
| + | Pymakr has 2 default themes: Dark and Light. To change the basic style, go to Preferences (Pymakr -> Preferences on the left top, or shortkey cmd-,) and head to the Interface tab. There you’ll find a Style property with with both theme options. Press OK or Apply to change to the new theme. | ||
| + | |||
| + | If you are on the Expert interface, the properties screen will also contain an Editor tab. The second to last sub-tab is named Style and contains a lot of options regarding colors and fonts. | ||
| + | |||
| + | [https://docs.pycom.io/pycom_esp32/pycom_esp32/toolsandfeatures.html#themes-and-colors Vous trouverez plus d'information concernant ce point sur la page de Pymakr] | ||
{{LOPY-TRAILER}} | {{LOPY-TRAILER}} | ||
Version du 13 mars 2017 à 15:16
|
|
En cours de traduction/élaboration. |
Pymakr - présentation
Pymarkr est un Environnement de développement (IDE) pour LoPy, WiPys et autres plateformes. Cet environnement est disponible sous Windows, Linux Debian, Linux Red Hat et MAC OS X.
Si vous n'avez pas encore eu l'occasion de faire du hacking électronique avec les cartes Pycom, vous devriez télécharger la dernière version de l'IDE pour découvrir les fonctionnalités offertes par Pymark.
Parmi les fonctionnalités, vous retrouverez:
- Synchronisation de projets.
- Téléversement automatique du code sur votre carte.
- Détection des nouveaux Firmware & mise-à-jour de la carte.
- Clique pour exécution (Run) d'un fichier.
Pymark c'est...
Un environnement de développement complet qui se connecte automatiquement sur vos cartes Pycom via Telnet (ou le port série), exécute du code à la volée, gère le système de fichier interne, synchronise votre code instantanément et l'exécute à l'aide d'un simple clique.
Il prend soin de vérifier que le firmware de la carte Pycom soit bien à jour et propose une console qui s'interface avec le mode REPL de MicroPython.
Pymakr est également une plateforme développée pour supporter les développements avec LoPy (Carte pour réseau Lora).
N'hésitez à rejoindre les Forums Pycom pour en apprendre plus sur le Pymakr et le plateformes PyCom.
Ressources
Liens de téléchargement:
Vous pouvez également trouver le code source sur Github:
- Code source de Pymakr.
- Pymakr-kitchen build tool (Outil de compilation maison pour Pymakr).
Pymakr dispose d'une système de greffons (plugin) et dispose déjà d'un premier greffons pour Pymaker.
Créer un projet
Pymakr has a feature to sync and run your code on your device. This is mostly done using projects. The following steps will get you started.
- In Pymakr, go to Project > New project.
- Give it a name and select a folder for your project, either a new of existing one.
- Create two files: main.py and boot.py, if you don’t already have those.
| You can also use FTP to download boot.py and main.py from the board to your project folder, after which you can right-click the project viewer and use the ‘add source files’ option to add them to your project. |
The boot.py file should always have the following code on the top, so we can run our python scripts over serial or telnet:
from machine import UART
import os
uart = UART(0, 115200)
os.dupterm(uart)
Most users, especially WiPy users, would want a wifi script in the boot.py file. A basic wifi script but also more advanced WLAN examples, like fixed IP and multiple networks, can be found in the Wifi Examples chapter.
Besides the neccesary main.py and boot.py files, you can create any folders and python files or libraries that you want to include in your main file. Pymakr will synchronize all files in the project to the board when using the sync button.
Ajouter des fichiers
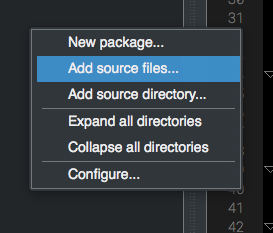
If you create any files (and folder) to your project directory from outside of pymakr, they won’t appear in your project files. To add them, right-click on the left sidebar in the Project-Viewer when you have your project open, and click ‘Add source files’.
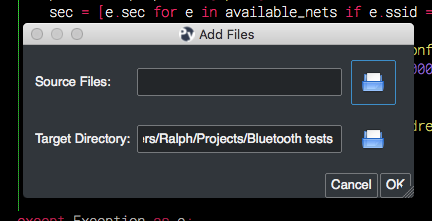
In the popup that appears, click the folder icon next to the ‘Source files’ input and select one or more files to be included.
Adding a folder works in the exact same way, using the ‘Add source directory’ after right-clicking in the project sidebar. All files inside the chosen directories will be added as well.
Sans créer de projet
If you just want to test some code on the module without creating a Project, you can create a new file or open an existing one and press the ‘run’ button.
Note that the changes you make to your file won’t be automatically saved to the device on execution.
Un exemple simple
For fun, lets try to build a traffic light. Add the following code to the main.py file:
import pycom
import time
pycom.heartbeat(False)
for cycles in range(10): # stop after 10 cycles
    pycom.rgbled(0x007f00) # green
    time.sleep(5)
    pycom.rgbled(0x7f7f00) # yellow
    time.sleep(1.5)
    pycom.rgbled(0x7f0000) # red
    time.sleep(4)
- Make sure the connection to your board is open in the Pycom Console
- Press the sync button on the top toolbar. Any progress will be shown in the console.
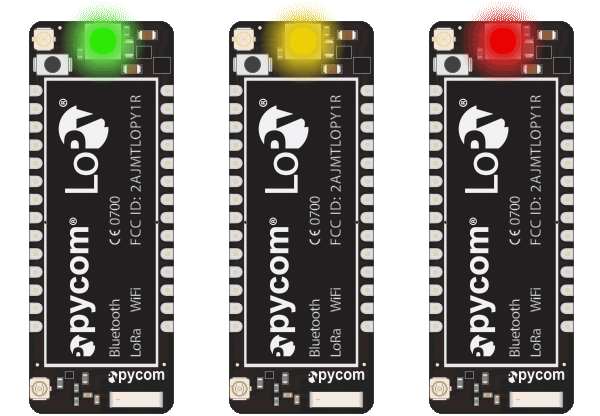
Here is the expected result:
You now have a traffic light in your hands. To stop a running program, use ctrl-c or do a right click on the console and press Reset. You can also reboot the board by pressing the physical reset button.
| If your board is running code at boot time, you might need to boot it in safe mode. |
Console Pycom
To start coding, simply go to the Pycom Console and type your code. Lets try to make the LED light up.
import pycom # we need this module to control the LED
pycom.heartbeat(False) # disable the blue blinking
pycom.rgbled(0x00ff00) # make the LED light up in green color
Change the color by adjusting the hex RGB value
pycom.rgbled(0xff0000) # now make the LED light up in red color
The console can be used to run any python code, also functions or loops. Simply copy-paste it into the console or type it manually. Note that after writing or pasting any indented code like a function or a while loop, you’ll have to press enter up to three times to tell MicroPython that you’re closing the code (this is standard MicroPython behavior).
Use print() to output contents of variables to the console for you to read. Returned values from functions will also be displayed if they are not caught in a variable. This will not happen for code running from the main or boot files. Here you need to use print() to output to the console.
A few pycom-console features you can use:
- Input history: use arrow up and arrow down to scroll through the history
- Tab completion: press tab to auto-complete variables or module names
- Stop any running code: with ctrl-c
- Copy/paste code or output: ctrl-c and ctrl-v (cmd-c and cmd-v for mac)
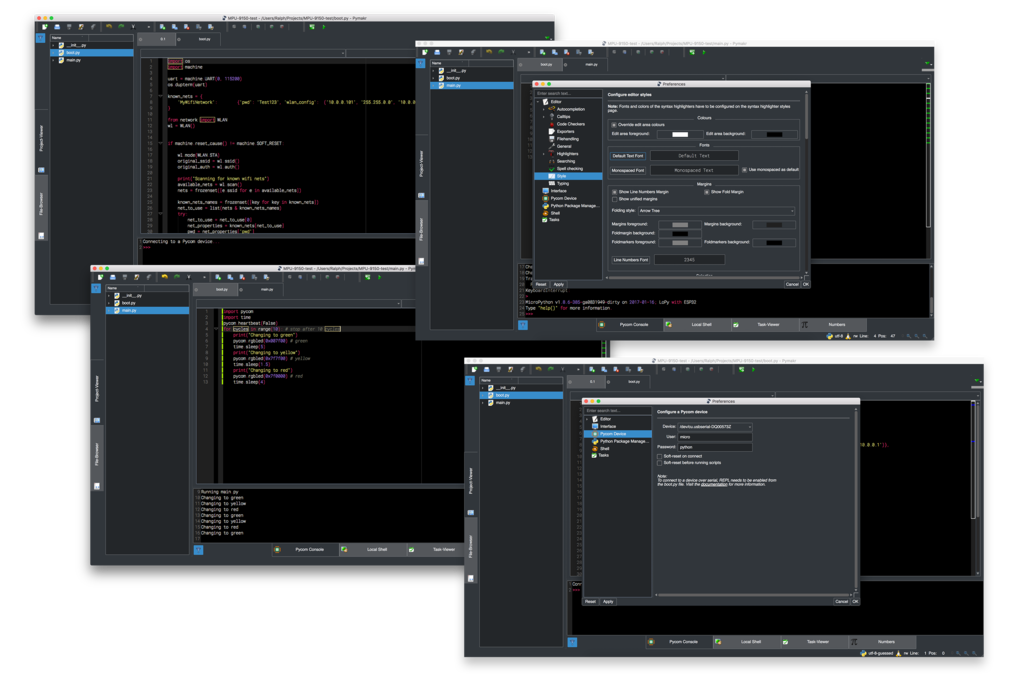
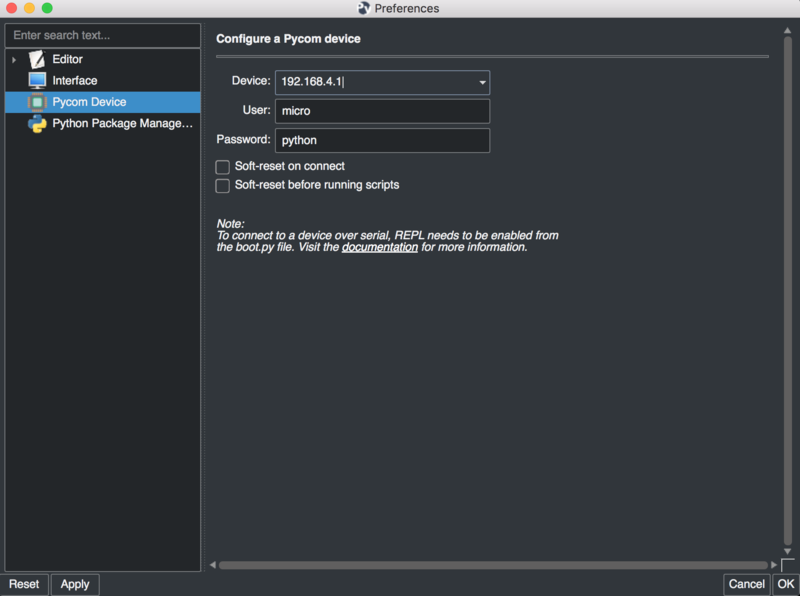
Connectez pymakr sur vos cartes
Après avoir installé Pymakr, vous aurez besoin de prendre quelques secondes pour le configurer la première fois.
Suivez les étapes suivantes:
- Connectez votre ordinateur sur le réseau WiFi de votre carte Pycom. Un réseau nommé comme ceci lopy-wlan-xxxx ou wipy-wlan-xxxx.
Le mot de passe est www.pycom.io - Ouvrez Pymakr.
- Dans le menu, sélectionnez Settings > Preferences (Configuration > Préférences).
Sur MacOS, se sera Pymakr > Preferences. - La liste sur la gauche affiche une entrée Pycom Device (carte Pycom).
- Pour la carte, saisissez 192.168.4.1.
Le nom-d-utilisation et mot-de-passe par défauts (username et password) sont respectivement micro et python. - Cliquer sur le bouton "OK"
| Pymakr supporte également la connexion filaire. A la place de saisir une adresse IP, vous pouvez cliquer sur le bouton de la liste déroulante et sélectionner le port série dans la liste. Dans ce cas, la connexion série ne nécessite pas de nom-d-utilisateur, ni de mot-de-passe, vous pourrez laisser ces champs vides. |
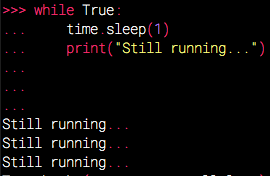
Cette opération de configuration ne sera nécessaire que la première fois. Dans la partie basse de l'écran, il y a une console où vous pouvez voir les informations du processus de connexion.
A la fin, vous trouverez le message "connected" (connecté) avec une invite de commande >>>.
Il y a également une vidéo qui explique les différentes étapes sur un macOS (étapes similaires aux autres systèmes d'exploitation).
Interface expert
By default, Pymakr is configured in ‘lite’ interface. In this mode, a lot of features are hidden and only the basic functionality remains. This makes it very user friendly, but after you become familiar with the software, you might want to switch to ‘expert’ interface to get the most out of Pymakr.
You can enable expert interface under Settings -> Switch to expert interface. After Pymakr restarts, you’ll get access to a few new options:
- Full interface control over tabs and layout
- Control over keyboard shortcuts
- Export/import of preferences
- Preferenes for the editor
- Extra tabs besides the Pycom Console: A local python shell, a task viewer and a basic number converter.
- Bookmarks
- Plugin controls
- Lots of other extra’s
To switch back to ‘lite’ mode, go back to Settings and choose Switch to Lite interface.
Thème et couleur
Pymakr has 2 default themes: Dark and Light. To change the basic style, go to Preferences (Pymakr -> Preferences on the left top, or shortkey cmd-,) and head to the Interface tab. There you’ll find a Style property with with both theme options. Press OK or Apply to change to the new theme.
If you are on the Expert interface, the properties screen will also contain an Editor tab. The second to last sub-tab is named Style and contains a lot of options regarding colors and fonts.
Vous trouverez plus d'information concernant ce point sur la page de Pymakr
Tutoriel PyCom Getting started (ESP_32) sous copyright de Damien George et contributeurs en ce qui concerne MicroPython et/ou PyCom en ce qui concerne les informations relatives a WiPy et LoPy.
Tutoriel traduit par Meurisse D. pour MCHobby.be
Traduit avec l'autorisation de micropython.org - Translated with the authorisation of micropython.org
Toute référence, mention ou extrait de cette traduction doit être explicitement accompagné du texte suivant : « Traduction par MCHobby (www.MCHobby.be) - Vente de kit et composants » avec un lien vers la source (donc cette page) et ce quelque soit le média utilisé.
L'utilisation commercial de la traduction (texte) et/ou réalisation, même partielle, pourrait être soumis à redevance. Dans tous les cas de figures, vous devez également obtenir l'accord du(des) détenteur initial des droits. Celui de MC Hobby s'arrêtant au travail de traduction proprement dit.
