Différences entre versions de « PiBrella-Scratch »
| Ligne 19 : | Ligne 19 : | ||
* d'un grand bouton poussoir rouge | * d'un grand bouton poussoir rouge | ||
* d'un ''haut-parleur'' Piezo. | * d'un ''haut-parleur'' Piezo. | ||
| + | |||
| + | == Pour commencer == | ||
[[Fichier:PiBrella-Scratch-HowTo-00.jpg]] | [[Fichier:PiBrella-Scratch-HowTo-00.jpg]] | ||
| + | |||
| + | To use it, launch ScratchGPIO5 Plus and create a variable called AddOn and set its value to Pibrella in your On Green Flag event. | ||
| + | |||
| + | |||
| + | |||
| + | You can then use the usual AllOn/Off broadcasts and well as individual broadcasts for Red/Amber/Green/OutputE/OutputF/OutputG and OutputH | ||
| + | |||
| + | |||
| + | |||
| + | Also there is a special broadcast BeepXX where XX is the equivalent Scratch note value (60 being Middle C) The sound quality from a piezo is not the same as a large speaker so expect to be able to compose a top ten hit :) | ||
| + | |||
| + | BeepXX,YY is also available where YY is note duration | ||
| + | |||
| + | |||
| + | |||
| + | The 4 inputs are recognised as sensor values InputA to D. These give “off” normally and “on” when activated. The switch is called “switch” and gives off and on. | ||
| + | |||
| + | == Les sorties === | ||
| + | |||
| + | [[Fichier:PiBrella-Scratch-HowTo-01.jpg]] | ||
| + | |||
| + | |||
| + | To control the brightness of the LEDs use PowerRed/PowerAmber/PowerGreen | ||
| + | |||
| + | |||
| + | To control the power settings of the outputs, use PowerOutE to H. | ||
| + | |||
| + | |||
| + | |||
| + | You can connect up a low-cost 5pin stepper and connect it to the outputs (Red to any left hand one, the other 4 to the 4 right hand ones) and use a variable called Stepper to make it turn. | ||
| + | |||
| + | |||
| + | |||
| + | Note new addition – MotorE..H variable | ||
| + | |||
| + | |||
| + | TOPTIP – set a variable called Bright from 1 to 100 and your can control the brightness of the VERY bright LEDs | ||
{{PiBrella-TRAILER}} | {{PiBrella-TRAILER}} | ||
Version du 17 août 2014 à 19:49
ScratchGPIO 5Plus
Pour utiliser votre Pibrella avec Scratch, vous devez démarrer le programme "ScratchGPIO 5Plus".
Une icône "ScratchGPIO 5Plus" a été sur le bureau lors de l'installation de ScratchGPIO.
Soyez attentif, c'est le programme "PLUS" qu'il faut démarrer.
Interface du PiBrella

Pibrella, un produit de Cyntech
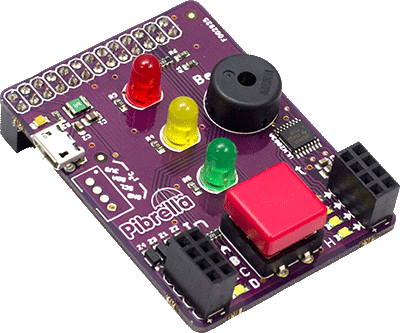
The Pibrella de Cyntech est une très chouette carte pour compléter votre Raspberry Pi.
La carte est équipée:
- de 3 LEDs 5mm (Red pour rouge/Amber pour jaune/Green pour verte),
- de 4 entrée digitale (A-D),
- de 4 sortie amplifée (E-F) avec des LEDs blanche indiquant leur état.
- d'un grand bouton poussoir rouge
- d'un haut-parleur Piezo.
Pour commencer
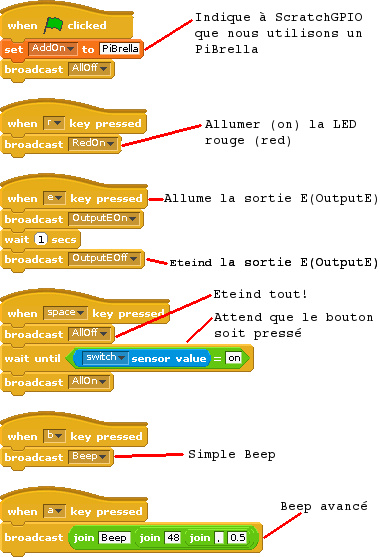
To use it, launch ScratchGPIO5 Plus and create a variable called AddOn and set its value to Pibrella in your On Green Flag event.
You can then use the usual AllOn/Off broadcasts and well as individual broadcasts for Red/Amber/Green/OutputE/OutputF/OutputG and OutputH
Also there is a special broadcast BeepXX where XX is the equivalent Scratch note value (60 being Middle C) The sound quality from a piezo is not the same as a large speaker so expect to be able to compose a top ten hit :)
BeepXX,YY is also available where YY is note duration
The 4 inputs are recognised as sensor values InputA to D. These give “off” normally and “on” when activated. The switch is called “switch” and gives off and on.
Les sorties =
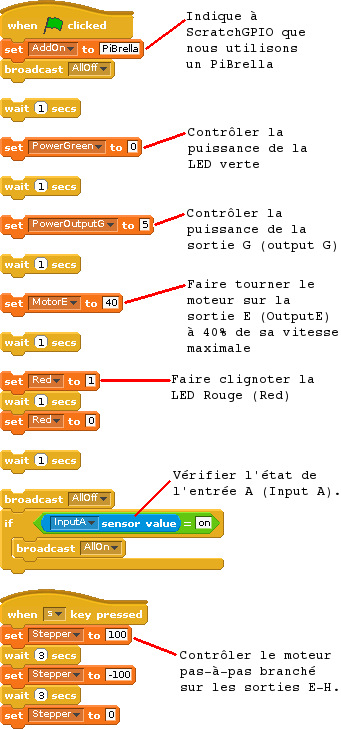
To control the brightness of the LEDs use PowerRed/PowerAmber/PowerGreen
To control the power settings of the outputs, use PowerOutE to H.
You can connect up a low-cost 5pin stepper and connect it to the outputs (Red to any left hand one, the other 4 to the 4 right hand ones) and use a variable called Stepper to make it turn.
Note new addition – MotorE..H variable
TOPTIP – set a variable called Bright from 1 to 100 and your can control the brightness of the VERY bright LEDs
Source: PiBrella.com, PiBrella est un produit de Cyntech Component Ltd.
Traduit avec autorisation de Cyntech. Traduction significativement augmenté par Meurisse D. pour MCHobby.be
Contient des informations relatives à ScratchCPIO en provenance de Cymplecy. Traduit par Meurisse D. avec l'autorisation de Cymplecy
Toute référence, mention ou extrait de cette traduction doit être explicitement accompagné du texte suivant : « Traduction par MCHobby (www.MCHobby.be) - Vente de kit et composants » avec un lien vers la source (donc cette page) et ce quelque soit le média utilisé.
L'utilisation commercial de la traduction (texte) et/ou réalisation, même partielle, pourrait être soumis à redevance. Dans tous les cas de figures, vous devez également obtenir l'accord du(des) détenteur initial des droits. Celui de MC Hobby s'arrêtant au travail de traduction proprement dit.

