RASP-PiOLED-Utiliser
|
|
En cours de traduction/élaboration. |
Introduction
Nous allons utiliser Python pour contrôler l'afficheur. En théorie, vous pouvez utiliser n'importe quel langage offrant un accès au bus I2C de l'ordinateur mais Adafruit ne fournit qu'une bibliothèque Python!
| Ce guide par du principe que vous disposez d'un Raspberry-Pi avec un système d'exploitation configuré, une connectivité réseau et SSH! |
Etape 1. Les dépendances
Avant d'utiliser la bibliothèque Adafruit, vous devez vous assurer d'avoir les différentes dépendances installées. Connectez vous en SSH sur votre Pi et suivez les étapes suivantes:
Installer la bibliothèque RPi.GPIO en exécutant la ligne de commande:
sudo apt-get update
sudo apt-get install build-essential python-dev python-pip

sudo pip install RPi.GPIO
Pour finir, installer la bibliothèque Python Imaging Library (PIL) et bibliothèque smbus en exécutant :
sudo apt-get install python-imaging python-smbus
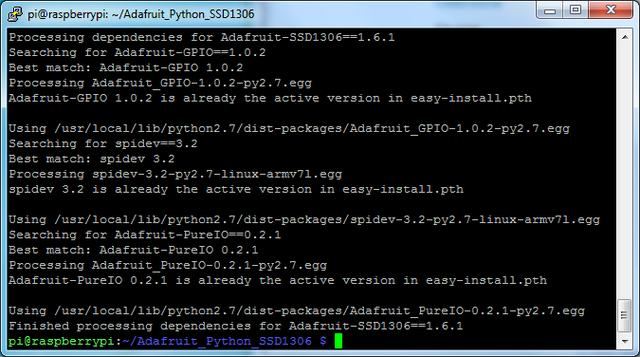
Vous pouvez maintenant instlaller la dernière version de la bibliothèque Python SSD1306 d'Adafruit (et les exemples). Exécutez les commandes suivantes:
sudo apt-get install git
git clone https://github.com/adafruit/Adafruit_Python_SSD1306.git

cd Adafruit_Python_SSD1306
sudo python setup.py install
Crédit: AdaFruit Industries www.adafruit.com
Etape 2. Activer I2C
Suivez ce guide pour activer le support I2C sur votre Raspberry-Pi.
Après avoir activer le support I2C, il sera nécessaire d'arrêter le Pi à l'aide de la commande sudo halt.
Une fois à l'arrêt, branchez le PiOled puis remettez le Pi sous tension.
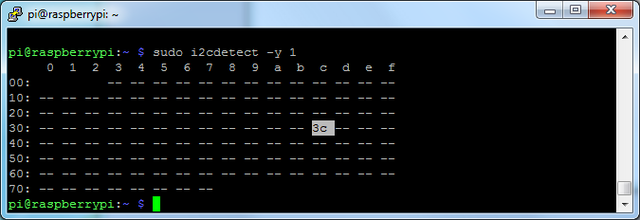
Connectez vous à nouveau sur votre Pi et exécutez la commande suivante dans un terminal pour scanner et détecter les périphériques I2C.
sudo i2cdetect -y 1
Vous devriez voir le résultat suivant indiquant que l'adresse 0x3c (l'afficheur OLED) à été trouvé.
Crédit: AdaFruit Industries www.adafruit.com
Etape 3. Vvérifier le périphérique I2C
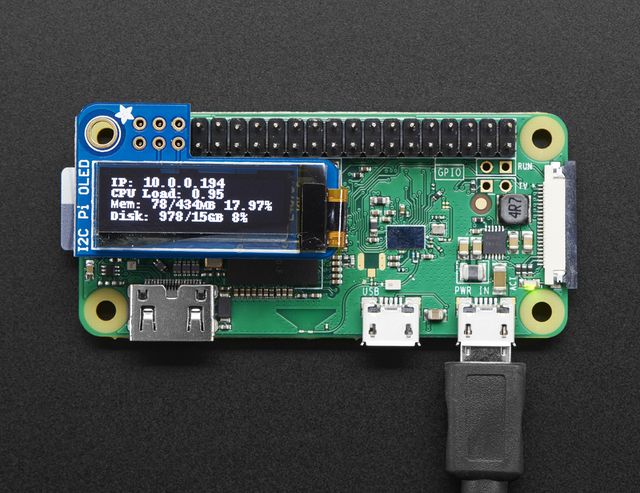
Une dois dans le répertoire Adafruit_Python_SSD1306, vous pouvez exécuter l'exemple stats d'Adafruit. Cet exemple extrait des données statistiques sur la charge CPU du Pi, l'espace disque, etc -ET- affiche ces informations sur l'OLED.
Exécutez sudo python examples/stats.py pour démarrer la démo, vous devriez vois quelque-chose comme ceci:

Crédit: AdaFruit Industries www.adafruit.com
Crédit: AdaFruit Industries www.adafruit.com
Running Stats on Boot
Raspbian Wheezy - avant SystemD
Il est très facile de démarrer le script à chaque au boot du Raspberry-Pi.
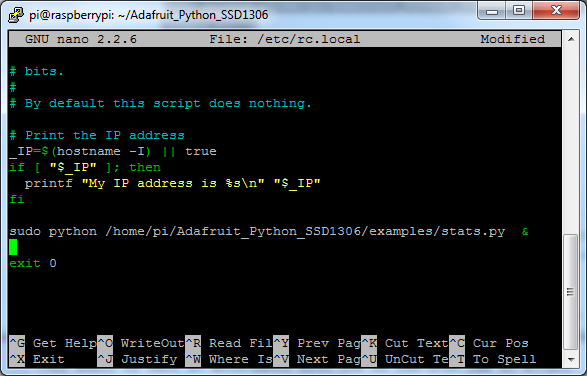
L'approche la plus simple est de le mettre dans /etc/rc.local
Exécuté sudo nano /etc/rc.local et ajouter la ligne
sudo python /home/pi/Adafruit_Python_SSD1306/examples/stats.py &
juste avant le exit 0
Puis sauver et quitter l'éditeur nano. Redémarrer le Pi afin de voir si l'information apparaît à l'écran!
Crédit: AdaFruit Industries www.adafruit.com
Raspbian Jessy - avec SystemD
Sur base des informations ci-dessus, vous pouvez adapter le démarrage pour SystemD.
Nous avons un tutoriel dévolu au démarrage de script Python avec SystemD.
Library Usage
Inside the examples subdirectory you'll find python scripts which demonstrate the usage of the library. <a href="../../../../ssd1306-oled-displays-with-raspberry-pi-and-beaglebone-black/">These are covered in more detail in our OLED guide here, so do check them out.</a>
To help you get started, I'll walk through the stats.py code below, that way you can use this file as the basis of a future project.
import time

import Adafruit_GPIO.SPI as SPI
import Adafruit_SSD1306

from PIL import Image
from PIL import ImageDraw
from PIL import ImageFont

import subprocess
First a few modules are imported, including the Adafruit_SSD1306 module which contains the OLED display driver classes. You can also see some of the Python Imaging Library modules like Image, ImageDraw, and ImageFont being imported. Those are, as you can imagine, are for drawing images, shapes and text/fonts!
# Raspberry Pi pin configuration:
RST = None
# Note the following are only used with SPI:
DC = 23
SPI_PORT = 0
SPI_DEVICE = 0

# 128x32 display with hardware I2C:
disp = Adafruit_SSD1306.SSD1306_128_32(rst=RST)

# 128x64 display with hardware I2C:
# disp = Adafruit_SSD1306.SSD1306_128_64(rst=RST)

# Alternatively you can specify an explicit I2C bus number, for example
# with the 128x32 display you would use:
# disp = Adafruit_SSD1306.SSD1306_128_32(rst=RST, i2c_bus=2)

# 128x32 display with hardware SPI:
# disp = Adafruit_SSD1306.SSD1306_128_32(rst=RST, dc=DC, spi=SPI.SpiDev(SPI_PORT, SPI_DEVICE, max_speed_hz=8000000))

# 128x64 display with hardware SPI:
# disp = Adafruit_SSD1306.SSD1306_128_64(rst=RST, dc=DC, spi=SPI.SpiDev(SPI_PORT, SPI_DEVICE, max_speed_hz=8000000))

# Alternatively you can specify a software SPI implementation by providing
# digital GPIO pin numbers for all the required display pins.  For example
# on a Raspberry Pi with the 128x32 display you might use:
# disp = Adafruit_SSD1306.SSD1306_128_32(rst=RST, dc=DC, sclk=18, din=25, cs=22)
Below the configuration values is the display class setup. There are 4 variants of OLED displays, with 128x32 pixels or 128x64 pixels, and with I2C or with SPI.
However since the PiOLED is a 128x32 I2C display only you should only use the
# 128x32 display with hardware I2C:disp = Adafruit_SSD1306.SSD1306_128_32(rst=RST)
variant for creating the display object! The rest can remain commented out.
Note that above, we initialize RST = None because the PiOLED does not require a reset pin.
# Initialize library.
disp.begin()

# Clear display.
disp.clear()
disp.display()

# Create blank image for drawing.
# Make sure to create image with mode '1' for 1-bit color.
width = disp.width
height = disp.height
image = Image.new('1', (width, height))

# Get drawing object to draw on image.
draw = ImageDraw.Draw(image)

# Draw a black filled box to clear the image.
draw.rectangle((0,0,width,height), outline=0, fill=0)
The next bit of code will initialize the display library with begin() and clear the display with clear()and display().
Then it will configure a PIL drawing class to prepare for drawing graphics. Notice that the image buffer is created in 1-bit mode with the '1' parameter, this is important because the display only supports black and white colors.
We then re-draw a large black rectangle to clear the screen. In theory we don't have to clear the screen again, but its a good example of how to draw a shape!
# Load default font.
font = ImageFont.load_default()

# Alternatively load a TTF font.
# Some other nice fonts to try: http://www.dafont.com/bitmap.php
#font = ImageFont.truetype('Minecraftia.ttf', 8)
Once the display is initialized and a drawing object is prepared, you can draw shapes, text and graphics using <a href="http://effbot.org/imagingbook/imagedraw.htm">PIL's drawing commands</a>. Here we are loading the default font, which works fine, but there's other fonts you can load.
Next the code loads a built-in default font and draws a few lines of text. You can also load your own TrueType font and use it to render fancy text in any style you like
while True:

    # Draw a black filled box to clear the image.
    draw.rectangle((0,0,width,height), outline=0, fill=0)

    # Shell scripts for system monitoring from here : https://unix.stackexchange.com/questions/119126/command-to-display-memory-usage-disk-usage-and-cpu-load
    cmd = "hostname -I | cut -d\' \' -f1"
    IP = subprocess.check_output(cmd, shell = True )
    cmd = "top -bn1 | grep load | awk '{printf \"CPU Load: %.2f\", $(NF-2)}'"
    CPU = subprocess.check_output(cmd, shell = True )
    cmd = "free -m | awk 'NR==2{printf \"Mem: %s/%sMB %.2f%%\", $3,$2,$3*100/$2 }'"
    MemUsage = subprocess.check_output(cmd, shell = True )
    cmd = "df -h | awk '$NF==\"/\"{printf \"Disk: %d/%dGB %s\", $3,$2,$5}'"
    Disk = subprocess.check_output(cmd, shell = True )

    # Write two lines of text.

    draw.text((x, top),       "IP: " + str(IP),  font=font, fill=255)
    draw.text((x, top+8),     str(CPU), font=font, fill=255)
    draw.text((x, top+16),    str(MemUsage),  font=font, fill=255)
    draw.text((x, top+25),    str(Disk),  font=font, fill=255)

    # Display image.
    disp.image(image)
    disp.display()
    time.sleep(.1)
Using the subprocess class, python can utilize linux commands to access the Pi's system information. This loop updates the screen at 10 times a second.
That's all there is to the stats.py code!
More Demos & Examples
You can check out our other examples in the example, just make sure to edit each one with nano animate.py for example, and find the line that says:
# Raspberry Pi pin configuration:
RST = 24
and change it to:
# Raspberry Pi pin configuration:
RST = None # PiOLED does not require reset pin
and make sure that the configuration section where you choose which type of display, looks like this
# 128x32 display with hardware I2C:
disp = Adafruit_SSD1306.SSD1306_128_32(rst=RST)

# 128x64 display with hardware I2C:
# disp = Adafruit_SSD1306.SSD1306_128_64(rst=RST)

# 128x32 display with hardware SPI:
# disp = Adafruit_SSD1306.SSD1306_128_32(rst=RST, dc=DC, spi=SPI.SpiDev(SPI_POR$

# 128x64 display with hardware SPI:
# disp = Adafruit_SSD1306.SSD1306_128_64(rst=RST, dc=DC, spi=SPI.SpiDev(SPI_POR$
That is, we'll be using I2C 128x32 display!
Speeding Up the Display
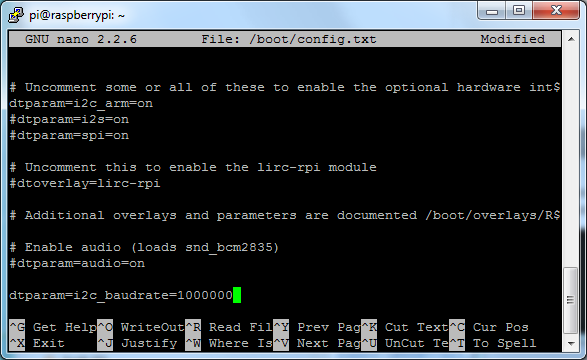
For the best performance, especially if you are doing fast animations, you'll want to tweak the I2C core to run at 1MHz. By default it may be 100KHz or 400KHz
To do this edit the config with sudo nano /boot/config.txt
and add to the end of the file
dtparam=i2c_baudrate=1000000
Crédit: AdaFruit Industries www.adafruit.com
reboot to 'set' the change.
Source: Adafruit PiOLED - 128x32 Mini OLED for Raspberry Pi
Créé par Lady Ada et Danny Nosonowitz pour AdaFruit Industries.
Traduction réalisée par Meurisse D. pour MCHobby.be.
Toute référence, mention ou extrait de cette traduction doit être explicitement accompagné du texte suivant : « Traduction par MCHobby (www.MCHobby.be) - Vente de kit et composants » avec un lien vers la source (donc cette page) et ce quelque soit le média utilisé.
L'utilisation commercial de la traduction (texte) et/ou réalisation, même partielle, pourrait être soumis à redevance. Dans tous les cas de figures, vous devez également obtenir l'accord du(des) détenteur initial des droits. Celui de MC Hobby s'arrêtant au travail de traduction proprement dit.
Traduit avec l'autorisation d'AdaFruit Industries - Translated with the permission from Adafruit Industries - www.adafruit.com
