RASP-SENSE-HAT-ASTRO-PI
Un guide pour Astro Pi
Cette collection de guides and feuilles de travail sont conçu pour vous familiariser avec le Sense Hat et ses possibilités. Ces informations peuvent être utilisé par des professeurs et des étudiant désirant se lancer dans la compétition Astro Pi réservé aux écoles secondaires, ou par quiconque désire exploiter au mieux son Sense Hat. Vous y trouverez des introductions sur ce qu'est la carte Sense Hat, comment l'assembler, comment écrire vos premiers programmes et comment utiliser les nombreuses fonctionnalités du Sense Hat.
Sense Hat: présentation de la carte
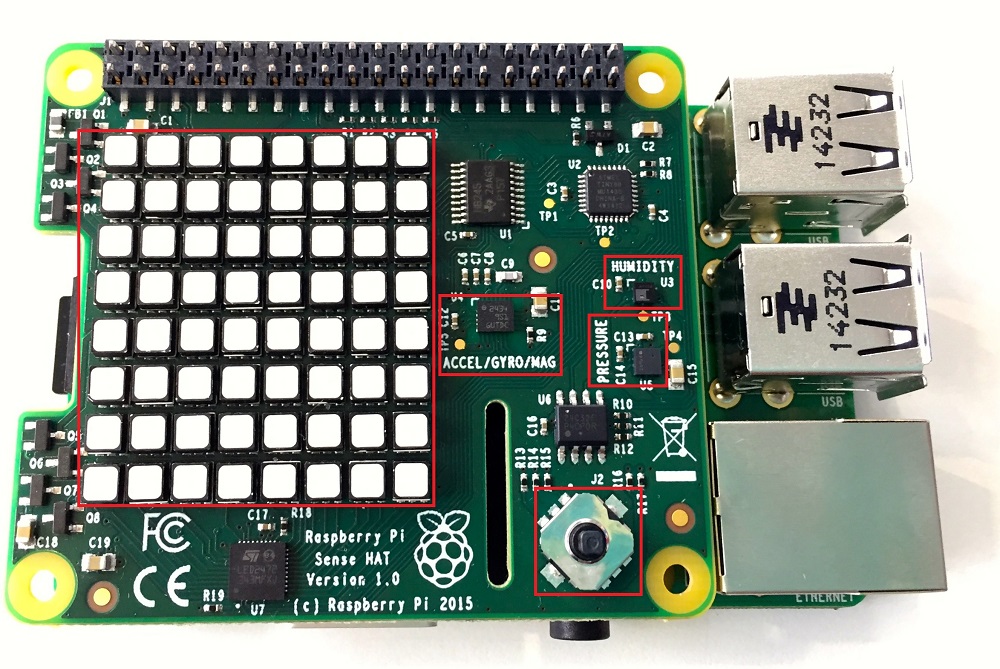
Let's take a tour of the main features of the Sense HAT board:
The main features are highlighted in red.
1. The LED matrix on the left has 64 light emitting diodes (LEDs) arranged in an 8 x 8 grid. On board the ISS the Raspberry Pi cannot be connected to a screen as the astronauts only have laptops, so the LEDs on the Sense HAT act as a display. They can be used to display shapes, icons and messages to the crew of the ISS. 2. Next is the inertial measurement unit (IMU). All spacecraft have these since they're very important for space flight. It's the small microchip just above the text ACCEL/GYRO/MAG on the Sense HAT. It's actually three sensors in one:
- An accelerometer to measure the force of acceleration (like in a Wiimote)
- A gyroscope to measure orientation (so you know which way you're pointing)
- A magnetometer to measure the Earth's magnetic field (like a compass) So this is basically a movement sensor and will allow you to measure how you're moving the Raspberry Pi in your hand or, in space, how the ISS itself is moving.
3. Next is a humidity sensor. This will allow you to measure air moisture. It's the small chip just below the text HUMIDITY. You can also use it to measure ambient temperature. 4. There is also a pressure sensor for measuring air pressure, something which is certainly important in space. It's the chip to the right of the text PRESSURE. 5. Last but not least is the joystick. The Raspberry Pi cannot be connected to a USB keyboard or mouse in space, so the Sense HAT has its own five button joystick. This is the silver rectangle in the bottom right corner with the small stick poking out of the top. It can move up, down, left, right, and allow middle-clicks.
Source: Getting Started with Astro PI et Astro-Pi Guide proposé par Raspberry Pi Learning Resource (www.raspberrypi.org)
Licence Creative Commons - CC-BY-SA
The learning resource is provided for free by the Raspberry Pi Foundation under a Creative Commons licence.
Find more at raspberrypi.org/resources and github.com/raspberrypilearning.
Crédit de traduction: Toute référence, mention ou extrait de cette traduction doit également être explicitement accompagné du crédit de traduction suivant : « Traduction par MCHobby (shop.MCHobby.be) » avec un lien vers la source (donc cette page) et ce quelque soit le média utilisé.

