Différences entre versions de « Spark.IO-Build-Contribuer »
| Ligne 3 : | Ligne 3 : | ||
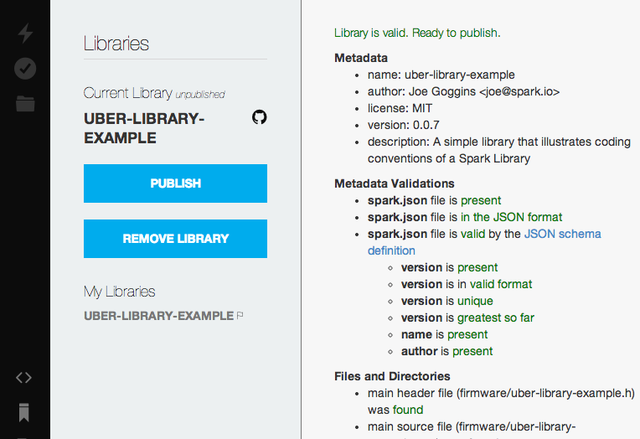
{{bloc-etroit|text=Adding a library to the IDE starts by creating an open source GitHub repository where your code will live. At minimum, this repository needs a <code>spark.json</code> file, some documentation, some example firmware files, and some Arduino/C++ files. The import and validation process is designed to be forgiving and easy to interpret, so don't be scared; the IDE will walk you through what is required to get your library set to go.}} | {{bloc-etroit|text=Adding a library to the IDE starts by creating an open source GitHub repository where your code will live. At minimum, this repository needs a <code>spark.json</code> file, some documentation, some example firmware files, and some Arduino/C++ files. The import and validation process is designed to be forgiving and easy to interpret, so don't be scared; the IDE will walk you through what is required to get your library set to go.}} | ||
| − | {{SPARKImage|Spark.IO-Build-60.png| | + | {{SPARKImage|Spark.IO-Build-60.png|640px}} |
The easiest way to generate library boilerplate code is to follow the instructions on the [https://github.com/spark/uber-library-example/#getting-started getting started section] of the <code>uber-library-example</code> (''Spark GitHub, anglais''), a project designed to illustrate and document what a library is supposed to look like. | The easiest way to generate library boilerplate code is to follow the instructions on the [https://github.com/spark/uber-library-example/#getting-started getting started section] of the <code>uber-library-example</code> (''Spark GitHub, anglais''), a project designed to illustrate and document what a library is supposed to look like. | ||
{{Spark.IO-Build-TRAILER}} | {{Spark.IO-Build-TRAILER}} | ||
Version du 17 décembre 2014 à 12:09
Adding a library to the IDE starts by creating an open source GitHub repository where your code will live. At minimum, this repository needs a spark.json file, some documentation, some example firmware files, and some Arduino/C++ files. The import and validation process is designed to be forgiving and easy to interpret, so don't be scared; the IDE will walk you through what is required to get your library set to go.

Crédit: Particle.IO www.particle.io
The easiest way to generate library boilerplate code is to follow the instructions on the getting started section of the uber-library-example (Spark GitHub, anglais), a project designed to illustrate and document what a library is supposed to look like.
Source: Spark WEB IDE (build) créé par Spark.IO.
Traduction réalisée par Meurisse D pour MCHobby.be - Translated by Meurisse D. for MCHobby.be
Traduit avec l'autorisation de Spark.IO - Translated with the permission from Spark.IO - Spark.IO
Toute référence, mention ou extrait de cette traduction doit être explicitement accompagné du texte suivant : « Traduction par MCHobby (www.MCHobby.be) - Vente de kit et composants » avec un lien vers la source (donc cette page) et ce quelque soit le média utilisé.
L'utilisation commercial de la traduction (texte) et/ou réalisation, même partielle, pourrait être soumis à redevance. Dans tous les cas de figures, vous devez également obtenir l'accord du(des) détenteur initial des droits. Celui de MC Hobby s'arrêtant au travail de traduction proprement dit.