Trinket-Pro-Bootloader
A propos du Bootloader
Un bootloader est un petit élément logiciel résident dans le microcontrôleur qui aide à charger votre propre code dans le restant de l'espace disponible.
L'un des défis du Trinket réside dans le fait qu'AdaFruit voulait intégrer un bootloader USB... cependant, l'ATmega328 ne dispose pas d'un support matériel USB natif!
A la place, Frank (un ingénieur AdaFruit) à créé une bootloader USB qui combine l'élégance d'un V-USB avec le support USBtinyISP (largement supporté et testé). Ce bootloader se comporte comme un USBtinyISP - et par conséquent, il dispose d'un VID/PID unique détenu par AdaFruit, VID/PID ajouté à avrdude il y a longtemps déjà, il fonctionne avec un minimum de modification dans la configuration. Pas besoin de recompiler quoi que ce soit, génial!
Ensuite, étant donné qu'il restait un peu de place dans la zone du bootloader, AdaFruit à ajouté un support OptiBoot. Vous pouvez soit utiliser le connecteur USB ou un câble FTDI de façon à se comporter comme un Arduino Uno (pour un maximum de flexibilité).
Le Trinket Pro est suffisamment intelligent pour auto-détecter le bootloader que vous essayez d'utiliser. Si vous branchez le port USB, le Trinket Pro sera énuméré comme un USBtinyISP pour le bootloader USB. Si vous branchez un FTDI et utilisez la procédure de programmation Arduino Uno alors le bootloader utilisera cette technique.
| Notez que vous ne pouvez pas utiliser le VID/PID USB d'AdaFruit dans vos produits Non-Trinket. Vous devez acheter votre propre VID USB sur http://www.usb.org/developers/vendor/ |
Pro Trinket USB Drivers for Windows
The cool thing about the bootloader on the Pro Trinket is it just looks like a classic USBtinyISP AVR programmer. This makes it easy to use with AVRdude or Arduino IDE with only minor configuration changes. Before you start, you may need to install the USBtinyISP USB drivers
Drivers are only required for Windows, if you are using a Mac or Linux, drivers are not required!
For details on installing the drivers for Windows XP, 7, 8 etc... please read this page!
If you're good at installing drivers, you can just download the Windows 8 drivers or Windows XP/7/Vista drivers by clicking on those links.
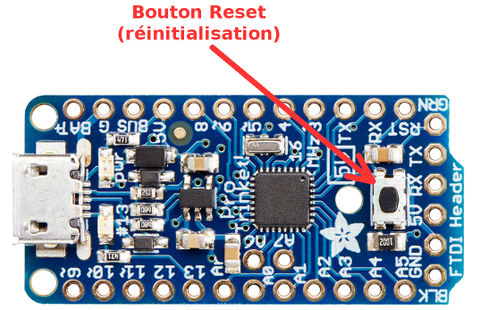
Don't forget to plug in the Pro Trinket via a known-good USB cable to start the process. You should see the green power LED lit and the red bootloading LED pulse indicating that the Trinket is ready to start bootloading. If you've programmed the Pro Trinket since getting it, you can always get it back to the bootloader state by pressing the small onboard reset button
Notes spéciales pour les utilisateurs Linux
Pro Trinket is not supported on Linux operating system at this time - try Mac OS or Windows! However, you can try the following - it does work for some computers
Linux is fairly picky about who can poke and prod at the USB port. You can always run avrdude or Arduino IDE as root, which will make sure you have the proper permissions. If you want to be super-cool you can add a udev rule which will let any user (who is not root) connect to the USBtiny driver. That way you don't have to be root all the time!
Voyez ce tutoriel sur avrdude pour Linux pour la ligne à ajouter au fichier udev.
Comment démarrer le Bootloader USB
Before you try to upload code to the Pro Trinket using the USB bootloader it must be in the Bootloader Mode. That means its listening for a sketch or program to be sent to it
| When the Pro Trinket is in bootloader mode, the red LED will be pulsing. Once the red LED stops pulsing, you must press the reset button to re-enter bootloader mode |
The Pro Trinket must be connected to a computer via a USB cable to enter bootloader mode. You can enter the bootloader mode by pressing the little button on the board with your fingernail. The bootloader will 'time out' after 10 seconds, so to re-enter the bootloader mode just re-press the button!
Don't press-and-hold the reset button, be sure to press-and-release!
See the video below for what it looks like to plug it in, have the LED pulse in bootloader mode, time out and then press reset to restart the bootloader
Voyez la vidéo de LadyAda (anglais) qui montre comment activer le bootloader.
{{#Widget:Iframe |url=http://www.youtube.com/embed/K95UL_3Qpg8 |width=420 |height=315 |border=0 }}
Source: Introducing Pro Trinket réalisé par Ladyada pour AdaFruit Industries. Crédit AdaFruit Industries
Traduit par Meurisse.D. pour MCHobby.be
Traduit avec l'autorisation d'AdaFruit Industries - Translated with the permission from Adafruit Industries - www.adafruit.com
Toute référence, mention ou extrait de cette traduction doit être explicitement accompagné du texte suivant : « Traduction par MCHobby (www.MCHobby.be) - Vente de kit et composants » avec un lien vers la source (donc cette page) et ce quelque soit le média utilisé.
L'utilisation commercial de la traduction (texte) et/ou réalisation, même partielle, pourrait être soumis à redevance. Dans tous les cas de figures, vous devez également obtenir l'accord du(des) détenteur initial des droits. Celui de MC Hobby s'arrêtant au travail de traduction proprement dit.
