Différences entre versions de « Pi-VNC-AutoStart-Server »
| Ligne 40 : | Ligne 40 : | ||
Edit the contents of the file with the following text. | Edit the contents of the file with the following text. | ||
| − | <nowiki>[Desktop Entry] | + | <nowiki>[Desktop Entry] |
Type=Application | Type=Application | ||
Name=TightVNC | Name=TightVNC | ||
Version du 30 mars 2013 à 11:45
|
|
En cours de traduction/élaboration. |
| This method will only work if you have set your Pi to automatically log into the desktop environment. |
Connecting to your Raspberry Pi remotely with VNC is fine as long as your Pi does not reboot. If it does, then you either have to connect with SSH and restart the VNC Server or arrange for the VNC Server to run automatically after the Raspberry Pi reboots.
There are several different methods of arranging for some code to be run as the Pi starts. The method described below is probably the easiest to use. You can adapt it to run other commands instead of starting the VNC server.
Etape 1
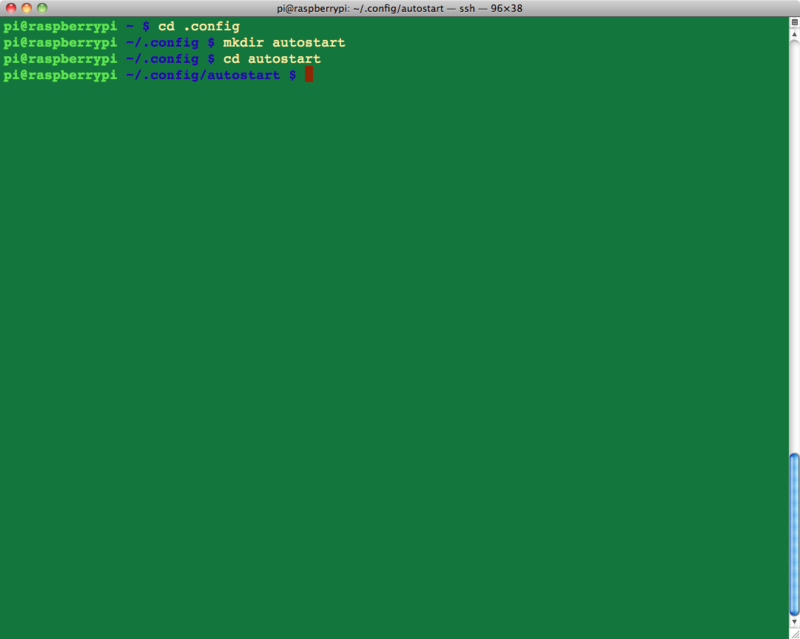
Open a Terminal session on the Pi, or connect using SSH. A new terminal or SSH session will automatically start you off in your home directory of /home/pi. If you are not in this directory, change to it by typing:
$ cd /home/pi
Then cd to the .config directory by typing:
$ cd .config
Note the '.' at the start of the folder name. This makes it a hidden folder that will not show up when you type 'ls'.
Etape 2
Issue the command below to create a new directory indide .config called 'autostart'.
$ mkdir autostart
cd into that new directory by typing:
$ cd autostart
Etape 3
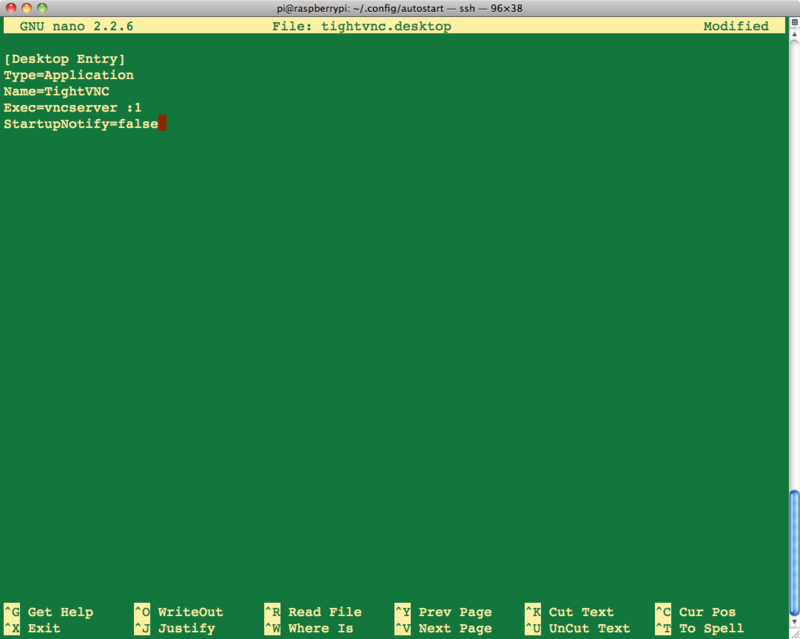
All that remains is to edit a new configuration file. So type the following command to open the nano editor on the new file:
$ nano tightvnc.desktop
Edit the contents of the file with the following text.
[Desktop Entry]
Type=Application
Name=TightVNC
Exec=vncserver :1
StartupNotify=false
Type ctrl-X and then Y to save the changes to the file.
Thats all there is to it. The next time you reboot the VNC server will restart automatically.
Source: [1]
Augmenté par Meurisse D pour MCHobby.
Tutoriel créé par Simon Monk pour AdaFruit Industries. Tutorial created by Simon Monk for AdaFruit Industries
Traduit avec l'autorisation d'AdaFruit Industries - Translated with the permission from Adafruit Industries - www.adafruit.com
Toute référence, mention ou extrait de cette traduction doit être explicitement accompagné du texte suivant : « Traduction par MCHobby (www.MCHobby.be) - Vente de kit et composants » avec un lien vers la source (donc cette page) et ce quelque soit le média utilisé.
L'utilisation commercial de la traduction (texte) et/ou réalisation, même partielle, pourrait être soumis à redevance. Dans tous les cas de figures, vous devez également obtenir l'accord du(des) détenteur initial des droits. Celui de MC Hobby s'arrêtant au travail de traduction proprement dit.

