Différences entre versions de « RASP-DRV8835-Assembler »
| Ligne 3 : | Ligne 3 : | ||
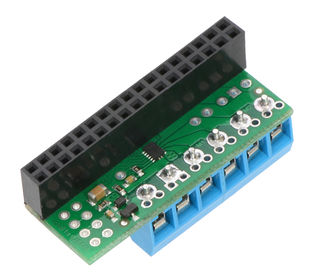
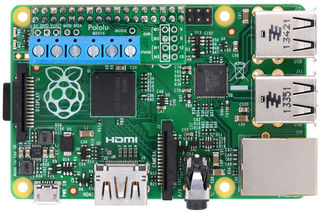
{{bloc-etroit|text=Before the motor driver board can be plugged into your Raspberry Pi, female headers must be soldered into the appropriate holes. The kit ships with two 17-pin 0.1″ female headers that should be mounted to the bottom of the board (the side with surface-mount components). Once the kit is assembled, it should be plugged into the leftmost position on the Model B+’s GPIO header, leaving six pins exposed on the right, as shown in the picture below.}} | {{bloc-etroit|text=Before the motor driver board can be plugged into your Raspberry Pi, female headers must be soldered into the appropriate holes. The kit ships with two 17-pin 0.1″ female headers that should be mounted to the bottom of the board (the side with surface-mount components). Once the kit is assembled, it should be plugged into the leftmost position on the Model B+’s GPIO header, leaving six pins exposed on the right, as shown in the picture below.}} | ||
| − | [[Fichier:RASP-DRV8835-04.jpg| | + | [[Fichier:RASP-DRV8835-04.jpg|320px]] |
| − | [[Fichier:RASP-DRV8835-05.jpg| | + | [[Fichier:RASP-DRV8835-05.jpg|320px]] |
Three 2-pin, 5 mm terminal blocks are included for making easy motor and power connections to the board once they have been slid together and soldered to the six large through-holes. Alternatively, you can solder 0.1″ male header pins to the smaller through-holes above the terminal block holes, or you can just solder wires directly to the board. | Three 2-pin, 5 mm terminal blocks are included for making easy motor and power connections to the board once they have been slid together and soldered to the six large through-holes. Alternatively, you can solder 0.1″ male header pins to the smaller through-holes above the terminal block holes, or you can just solder wires directly to the board. | ||
Version du 11 octobre 2014 à 20:06
Before the motor driver board can be plugged into your Raspberry Pi, female headers must be soldered into the appropriate holes. The kit ships with two 17-pin 0.1″ female headers that should be mounted to the bottom of the board (the side with surface-mount components). Once the kit is assembled, it should be plugged into the leftmost position on the Model B+’s GPIO header, leaving six pins exposed on the right, as shown in the picture below.
Three 2-pin, 5 mm terminal blocks are included for making easy motor and power connections to the board once they have been slid together and soldered to the six large through-holes. Alternatively, you can solder 0.1″ male header pins to the smaller through-holes above the terminal block holes, or you can just solder wires directly to the board.
Shorting blocks and 0.1″ male headers (not included) can be used to make some of the more advanced optional modifications to the board, such as remapping the control pins or paralleling the outputs.
Documentation réalisée par Meurisse. D pour MCHobby.be. En partie basé sur les informations disponible sur le site de Pololu
Traduit avec l'autorisation de Pololu - Translated with the permission from Pololu - www.pololu.com
Toute référence, mention ou extrait de cette traduction doit être explicitement accompagné du texte suivant : « Traduction par MCHobby (www.MCHobby.be) - Vente de kit et composants » avec un lien vers la source (donc cette page) et ce quelque soit le média utilisé.
L'utilisation commercial de la traduction (texte) et/ou réalisation, même partielle, pourrait être soumis à redevance. Dans tous les cas de figures, vous devez également obtenir l'accord du(des) détenteur initial des droits. Celui de MC Hobby s'arrêtant au travail de traduction proprement dit.


