Différences entre versions de « RASP-PYGAME-GUI-Analogique »
| Ligne 7 : | Ligne 7 : | ||
{{ADFImage|RASP-PYGAME-GUI-Analogique-00.jpg}} | {{ADFImage|RASP-PYGAME-GUI-Analogique-00.jpg}} | ||
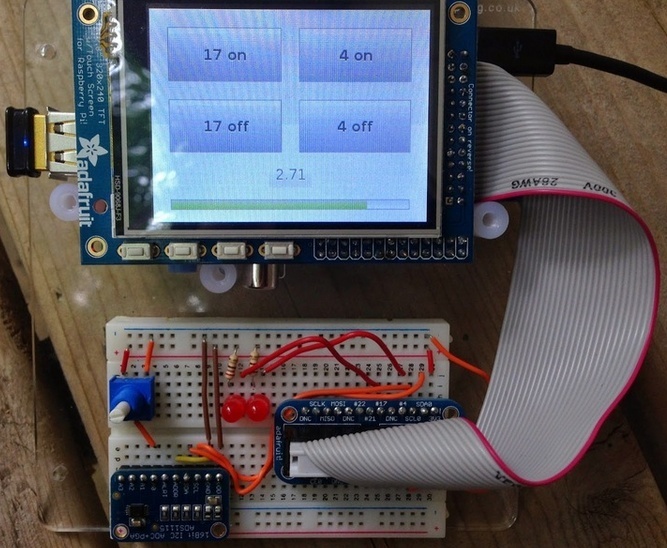
| − | + | Cet exemple utilise un potentiomètre de 10K pour fournir une tension variable. Pour la conversion analogique vers digital nous utilisons habituellement un [http://jeremyblythe.blogspot.co.uk/2012/09/raspberry-pi-hardware-spi-analog-inputs.html MCP3008 via SPI]. Mais cela n'est pas possible ici puisque le PiTFT utilise les deux canaux SPI disponibles sur le Pi. Par conséquant, nous optons pour un convertisseur ADC I2C: [http://www.adafruit.com/product/1085 ADC 16-Bit ADS1115 - 4 canaux avec un gain programmable]. | |
| − | + | Pour obtenir la bibliothèque Python Adafruit: | |
<syntaxhighlight lang="bash"> | <syntaxhighlight lang="bash"> | ||
| Ligne 16 : | Ligne 16 : | ||
</syntaxhighlight> | </syntaxhighlight> | ||
| − | + | Vous aurez besoin d'activer [[Rasp-Hack-GPIO_Configurer_I2C|le support I2C en suivant ce guide]] | |
{{ADFImage|RASP-PYGAME-GUI-Analogique-01.jpg}} | {{ADFImage|RASP-PYGAME-GUI-Analogique-01.jpg}} | ||
Version du 15 août 2016 à 14:51
Entrée Analogique

Crédit: AdaFruit Industries www.adafruit.com
Cet exemple utilise un potentiomètre de 10K pour fournir une tension variable. Pour la conversion analogique vers digital nous utilisons habituellement un MCP3008 via SPI. Mais cela n'est pas possible ici puisque le PiTFT utilise les deux canaux SPI disponibles sur le Pi. Par conséquant, nous optons pour un convertisseur ADC I2C: ADC 16-Bit ADS1115 - 4 canaux avec un gain programmable.
Pour obtenir la bibliothèque Python Adafruit:
cd /home/pi
git clone https://github.com/adafruit/Adafruit-Raspberry-Pi-Python-Code.git
Vous aurez besoin d'activer le support I2C en suivant ce guide

Crédit: AdaFruit Industries www.adafruit.com
Démarrage
At the top of this script now we have some more imports for the threading and ADC.
The gain and sample rate are configured and the ADC initialized.
import sys
sys.path.append('/home/pi/Adafruit-Raspberry-Pi-Python-Code/Adafruit_ADS1x15')

import pygame
import os
import pygameui as ui
import logging
import RPi.GPIO as GPIO
import signal
from Adafruit_ADS1x15 import ADS1x15
import threading
import time

ADS1015 = 0x00  # 12-bit ADC
ADS1115 = 0x01  # 16-bit ADC

# Select the gain
# gain = 6144  # +/- 6.144V
gain = 4096  # +/- 4.096V
# gain = 2048  # +/- 2.048V
# gain = 1024  # +/- 1.024V
# gain = 512   # +/- 0.512V
# gain = 256   # +/- 0.256V

# Select the sample rate
sps = 8    # 8 samples per second
# sps = 16   # 16 samples per second
# sps = 32   # 32 samples per second
# sps = 64   # 64 samples per second
# sps = 128  # 128 samples per second
# sps = 250  # 250 samples per second
# sps = 475  # 475 samples per second
# sps = 860  # 860 samples per second

# Initialise the ADC using the default mode (use default I2C address)
# Set this to ADS1015 or ADS1115 depending on the ADC you are using!
adc = ADS1x15(ic=ADS1115)

#Setup the GPIOs as outputs - only 4 and 17 are available
GPIO.setmode(GPIO.BCM)
GPIO.setup(4, GPIO.OUT)
GPIO.setup(17, GPIO.OUT)

log_format = '%(asctime)-6s: %(name)s - %(levelname)s - %(message)s'
console_handler = logging.StreamHandler()
console_handler.setFormatter(logging.Formatter(log_format))
logger = logging.getLogger()
logger.setLevel(logging.DEBUG)
logger.addHandler(console_handler)

os.putenv('SDL_FBDEV', '/dev/fb1')
os.putenv('SDL_MOUSEDRV', 'TSLIB')
os.putenv('SDL_MOUSEDEV', '/dev/input/touchscreen')

MARGIN = 20
Le thread du potentiomètre
A thread is used to constantly read the potentiometer. If you take the reading in-line in the scene update method then you'll slow down the screen refresh rate. This separate thread allows the screen to be redrawn in parallel with us reading a value from the ADC.
The class is defined as a callable - hence the Modèle:Đname method. It takes a reference to the pitft class so we can update values on it. There's a simple termination scheme used by checking a flag on every loop. Later on you'll see how we cleanly close the program by setting this flag.
So we simply read the voltage value from the ADC and set the label and progress bar position on the pitft.
class PotReader():
    def __init__(self, pitft):
        self.pitft = pitft
        self.terminated = False

    def terminate(self):
        self.terminated = True

    def __call__(self):
        while not self.terminated:
            # Read channel 0 in single-ended mode using the settings above
            volts = adc.readADCSingleEnded(0, gain, sps) / 1000
            self.pitft.set_volts_label(volts)
            self.pitft.set_progress(volts / 3.3)
Définition de l'interface utilisateur
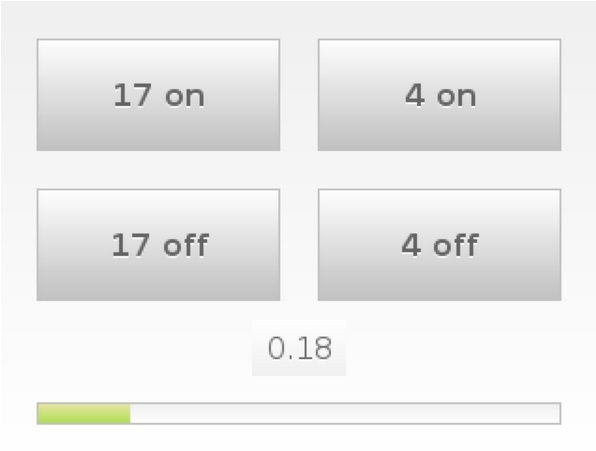
We've added a couple more widgets to the scene now and resized the buttons to accommodate them. We're showing the voltage on a label and a progress widget. The set_progress and set_volts_label methods are called from the PotReader thread to update the values in these widgets.
class PiTft(ui.Scene):
    def __init__(self):
        ui.Scene.__init__(self)

        self.on17_button = ui.Button(ui.Rect(MARGIN, MARGIN, 130, 60), '17 on')
        self.on17_button.on_clicked.connect(self.gpi_button)
        self.add_child(self.on17_button)

        self.on4_button = ui.Button(ui.Rect(170, MARGIN, 130, 60), '4 on')
        self.on4_button.on_clicked.connect(self.gpi_button)
        self.add_child(self.on4_button)

        self.off17_button = ui.Button(ui.Rect(MARGIN, 100, 130, 60), '17 off')
        self.off17_button.on_clicked.connect(self.gpi_button)
        self.add_child(self.off17_button)

        self.off4_button = ui.Button(ui.Rect(170, 100, 130, 60), '4 off')
        self.off4_button.on_clicked.connect(self.gpi_button)
        self.add_child(self.off4_button)

        self.progress_view = ui.ProgressView(ui.Rect(MARGIN, 200, 280, 40))
        self.add_child(self.progress_view)

        self.volts_value = ui.Label(ui.Rect(135, 170, 50, 30), '')
        self.add_child(self.volts_value)

    def gpi_button(self, btn, mbtn):
        logger.info(btn.text)

        if btn.text == '17 on':
            GPIO.output(17, False)
        elif btn.text == '4 on':
            GPIO.output(4, False)
        elif btn.text == '17 off':
            GPIO.output(17, True)
        elif btn.text == '4 off':
            GPIO.output(4, True)

    def set_progress(self, percent):
        self.progress_view.progress = percent

    def set_volts_label(self, volts):
        self.volts_value.text = '%.2f' % volts

    def update(self, dt):
        ui.Scene.update(self, dt)
Et pour finir...
To start everything going we initialise pygameui, construct the pitft class and then start the potreader thread with a reference to pitft.
Since we're running this extra thread we need a clean way to stop the program. A signal handler is used to trap ctrl+c and terminate the PotReader thread before calling sys.exit - otherwise the program will not close.
ui.init('Raspberry Pi UI', (320, 240))
pygame.mouse.set_visible(False)

pitft = PiTft()

# Start the thread running the callable
potreader = PotReader(pitft)
threading.Thread(target=potreader).start()

def signal_handler(signal, frame):
    print 'You pressed Ctrl+C!'
    potreader.terminate()
    sys.exit(0)

signal.signal(signal.SIGINT, signal_handler)

ui.scene.push(pitft)
ui.run()
You can run this final example from the pygamelcd project:
sudo python test5.py
Source: Raspberry Pi Pygame UI basics créé par by Jeremy Blythe pour www.adafruit.com
Traduit par Meurisse D. pour MCHobby SPRL Toute référence, mention ou extrait de cette traduction doit être explicitement accompagné du texte suivant : « Traduction par MCHobby (www.MCHobby.be) - Vente de kit et composants » avec un lien vers la source (donc cette page) et ce quelque soit le média utilisé.
L'utilisation commercial de la traduction (texte) et/ou réalisation, même partielle, pourrait être soumis à redevance. Dans tous les cas de figures, vous devez également obtenir l'accord du(des) détenteur initial des droits. Celui de MC Hobby s'arrêtant au travail de traduction proprement dit.
Traduit avec l'autorisation d'AdaFruit Industries - Translated with the permission from Adafruit Industries - www.adafruit.com
