Différences entre versions de « FEATHER-M0-EXPRESS-Brochage »
| Ligne 20 : | Ligne 20 : | ||
* '''3V''' : Sortie du régulateur 3.3V. Ce dernier est capable de fournir des pointes de 500mA | * '''3V''' : Sortie du régulateur 3.3V. Ce dernier est capable de fournir des pointes de 500mA | ||
| − | == | + | == Broches logiques == |
{{ADFImage|FEATHER-M0-EXPRESS-Brochage-04.jpg|640px}} | {{ADFImage|FEATHER-M0-EXPRESS-Brochage-04.jpg|640px}} | ||
| − | + | Il s'agit de l'ensemble des broches d'entrées/sorties du microcontrôleur. <br/>'''Toutes en logique 3.3V'''<br/>'''Presque toutes les broches peuvent produire un signal PWM'''<br />'''Toutes les broches peuvent être utilisées comme broche d'interruption.''' | |
| − | |||
| − | |||
| − | |||
| − | |||
| + | * '''#0 / RX''' - GPIO #0, également la broche de réception (entrée) pour le port série matériel '''Serial1''' (UART), également une entrée analogique | ||
| + | * '''#1 / TX''' - GPIO #1, également la broche de transmission (sortie) pour le port série matériel '''Serial1''', également un entrée analogique. | ||
* '''SDA '''- the I2C (Wire) data pin. There's no pull up on this pin by default so when using with I2C, you may need a 2.2K-10K pullup. | * '''SDA '''- the I2C (Wire) data pin. There's no pull up on this pin by default so when using with I2C, you may need a 2.2K-10K pullup. | ||
* '''SCL '''- the I2C (Wire) clock pin. There's no pull up on this pin by default so when using with I2C, you may need a 2.2K-10K pullup. | * '''SCL '''- the I2C (Wire) clock pin. There's no pull up on this pin by default so when using with I2C, you may need a 2.2K-10K pullup. | ||
Version du 14 octobre 2017 à 14:48
Introduction
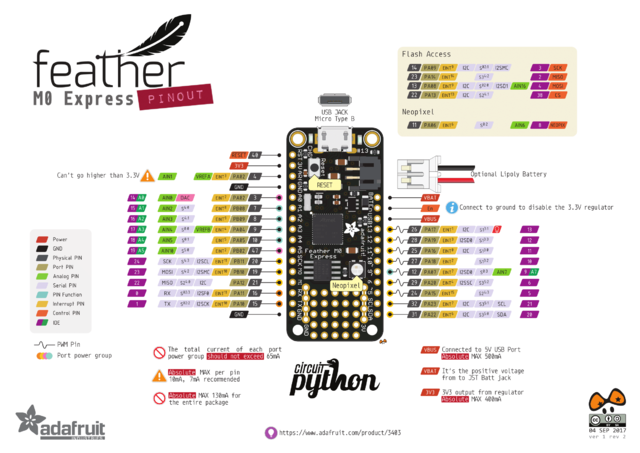
Crédit: AdaFruit Industries www.adafruit.com
Cliquer pour agrandir
(Il y a une faute de frappe, AREF est PA03 et non PA02)
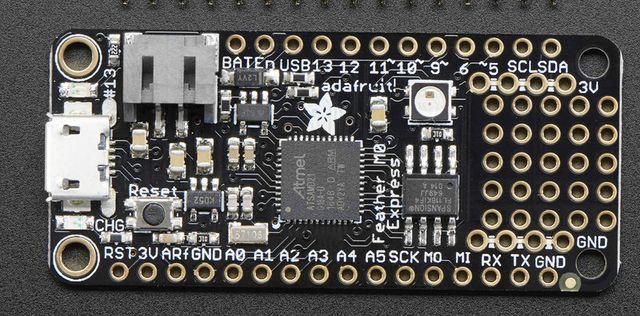
Crédit: AdaFruit Industries www.adafruit.com
Le Feather M0 profite des nombreux avantages du microcontrôleur Cortex M0. Il dispose également de nombreux ports et nombreuses broches. Faisons un petit tour de la plateforme pour les découvrir ensemble!
Broches d'alimentation
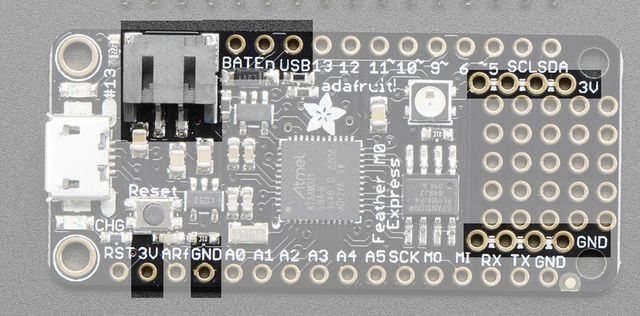
Crédit: AdaFruit Industries www.adafruit.com
- GND : Il s'agit de la masse commune. La référence de tension 0v pour toutes les alimentation et toute les signaux logique.
- BAT : Broche de tension positive du connecteur JST, celui sur lequel est branché l'accu Lipoly optionnel.
- USB : Broche de tension positive du connecteur USB. Permet de savoir lorsque la plateforme est connectée en USB).
- EN : Broche Enable du régulateur 3.3V. Cette broches est équipée d'une résistance Pull-Up. Brancher la sur la masse (GND) pour désactiver le régulateur 3.3V
- 3V : Sortie du régulateur 3.3V. Ce dernier est capable de fournir des pointes de 500mA
Broches logiques
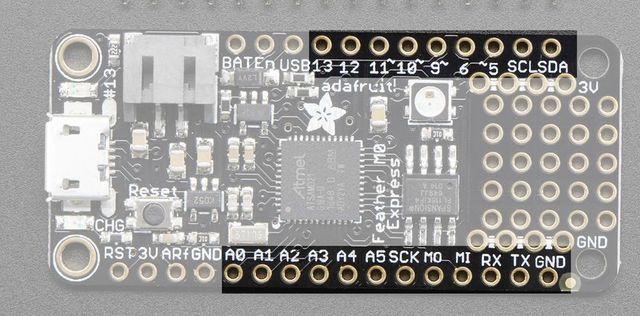
Crédit: AdaFruit Industries www.adafruit.com
Il s'agit de l'ensemble des broches d'entrées/sorties du microcontrôleur.
Toutes en logique 3.3V
Presque toutes les broches peuvent produire un signal PWM
Toutes les broches peuvent être utilisées comme broche d'interruption.
- #0 / RX - GPIO #0, également la broche de réception (entrée) pour le port série matériel Serial1 (UART), également une entrée analogique
- #1 / TX - GPIO #1, également la broche de transmission (sortie) pour le port série matériel Serial1, également un entrée analogique.
- SDA - the I2C (Wire) data pin. There's no pull up on this pin by default so when using with I2C, you may need a 2.2K-10K pullup.
- SCL - the I2C (Wire) clock pin. There's no pull up on this pin by default so when using with I2C, you may need a 2.2K-10K pullup.
- #5 - GPIO #5
- #6 - GPIO #6
- #9 - GPIO #9, also analog input A7. This analog input is connected to a voltage divider for the lipoly battery so be aware that this pin naturally 'sits' at around 2VDC due to the resistor divider
- #10 - GPIO #10
- #11 - GPIO #11
- #12 - GPIO #12
- #13 - GPIO #13 and is connected to the red LED next to the USB jack
- A0 - This pin is analog input A0 but is also an analog output due to having a DAC (digital-to-analog converter). You can set the raw voltage to anything from 0 to 3.3V, unlike PWM outputs this is a true analog output
- A1 thru A5 - These are each analog input as well as digital I/O pins.
- SCK/MOSI/MISO - These are the hardware SPI pins, you can use them as everyday GPIO pins (but recommend keeping them free as they are best used for hardware SPI connections for high speed.)
SPI Flash and NeoPixel
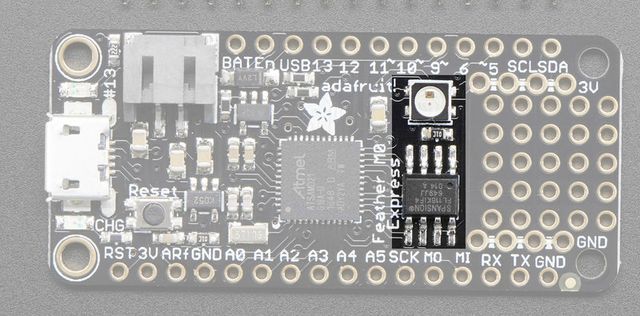
As part of the 'Express' series of boards, this Feather is designed for use with CircuitPython. To make that easy, we have added two extra parts to this Feather M0: a mini NeoPixel (RGB LED) and a 2 MB SPI Flash chip
Crédit: AdaFruit Industries www.adafruit.com
The NeoPixel is connected to pin #8 in Arduino, so <a href="../../../../adafruit-neopixel-uberguide">just use our NeoPixel library</a> and set it up as a single-LED strand on pin 8. The NeoPixel is powered by the 3.3V power supply but that hasn't shown to make a big difference in brightness or color. The NeoPixel is also used by the bootloader to let you know if the device has enumerated correctly (green) or USB failure (red). In CircuitPython, the LED is used to indicate the runtime status.
The SPI Flash is connected to 4 pins that are not brought out on the GPIO pads. This way you don't have to worry about the SPI flash colliding with other devices on the main SPI connection. Under Arduino, the FLASH SCK pin is #3, MISO is #2, MOSI is #4, and CS is #38. If you use Feather M0 Express as your board type, you'll be able to access the Flash SPI port under SPI1 - this is a fully new hardware SPI device separate from the GPIO pins on the outside edge of the Feather. In CircuitPython, the SPI flash is used natively by the interpretter and is read-only to user code, instead the Flash just shows up as the writeable disk drive!
Other Pins!
Crédit: AdaFruit Industries www.adafruit.com
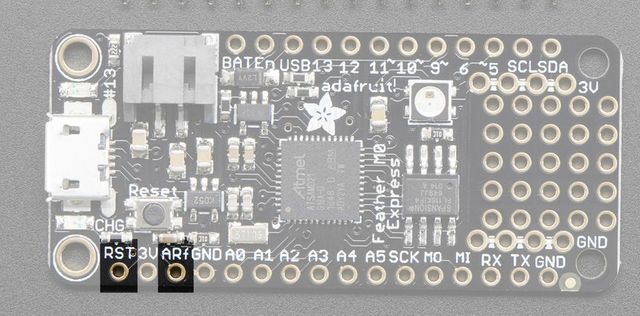
- RST - this is the Reset pin, tie to ground to manually reset the AVR, as well as launch the bootloader manually
- ARef - the analog reference pin. Normally the reference voltage is the same as the chip logic voltage (3.3V) but if you need an alternative analog reference, connect it to this pin and select the external AREF in your firmware. Can't go higher than 3.3V!
Debug Interface
Crédit: AdaFruit Industries www.adafruit.com
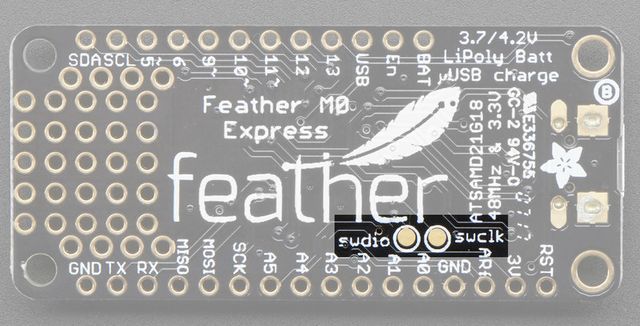
- SWCLK & SWDIO - These pads on the bottom are used to program the chip. They can also be connected to an SWD debugger.
Source: Adafruit Feather M0 Express - Designed for CircuitPython créé par LadyAda, Tony DiCola, Scorr Shawcroft, Dan Halbert pour AdaFruit Industries. Crédit AdaFruit Industries
Traduit par Meurisse D. pour MCHobby.be
Traduit avec l'autorisation d'AdaFruit Industries - Translated with the permission from Adafruit Industries - www.adafruit.com
Toute référence, mention ou extrait de cette traduction doit être explicitement accompagné du texte suivant : « Traduction par MCHobby (www.MCHobby.be) - Vente de kit et composants » avec un lien vers la source (donc cette page) et ce quelque soit le média utilisé.
L'utilisation commercial de la traduction (texte) et/ou réalisation, même partielle, pourrait être soumis à redevance. Dans tous les cas de figures, vous devez également obtenir l'accord du(des) détenteur initial des droits. Celui de MC Hobby s'arrêtant au travail de traduction proprement dit.
