Différences entre versions de « Pi-Zero-Headless-Editer-Fichier »
(Page créée avec « {{Pi-Zero-Headless-NAV}} x {{Pi-Zero-Headless-TRAILER}} ») |
|||
| Ligne 1 : | Ligne 1 : | ||
{{Pi-Zero-Headless-NAV}} | {{Pi-Zero-Headless-NAV}} | ||
| − | + | If you burned the OS image successfully, you should see a folder named '''boot''' appear on your main computer. If it doesn't, try removing and reinserting the SD card. If it still doesn't, try burning the image again. | |
| + | |||
| + | There are three text files we will create/edit in '''boot'''. | ||
| + | # '''wpa_supplicant.conf''' - wifi settings | ||
| + | # '''config.txt''' - global system settings | ||
| + | # '''ssh''' - an empty text file to enable ssh | ||
| + | |||
| + | We are going to edit these directly on the SD card before putting it in the Pi Zero. This way you can edit these files using your favorite graphical text editor on your main computer. Try to avoid using a word processor though. | ||
| + | |||
| + | == Configure WiFi == | ||
| + | The Pi Zero W has built in WiFi so nothing additional is required. If you are using the original Pi Zero, you will need some form of <a href="https://www.adafruit.com/product/814">WiFi Adapter</a> and a way to connect it: <a href="https://www.adafruit.com/product/1099">cable</a> or <a href="https://www.adafruit.com/product/2910">adapter</a>. | ||
| + | |||
| + | The WiFi configuration file does not exist and needs to be created. The name of the file should be '''wpa_supplicant.conf''' and its contents will get copied to the system folder at boot time. It will then be deleted. So this a one time only process. If you want to try again, you have to recreate the file and reboot. | ||
| + | |||
| + | The contents of the file should be as shown below. Replace '''YOURSSID''' and '''YOURPASSWORD''' with whatever is used for your network setup. | ||
| + | |||
| + | <syntaxhighlight lang="python"> | ||
| + | ctrl_interface=DIR=/var/run/wpa_supplicant GROUP=netdev | ||
| + | update_config=1 | ||
| + | |||
| + | network={ | ||
| + | ssid="YOURSSID" | ||
| + | psk="YOURPASSWORD" | ||
| + | scan_ssid=1 | ||
| + | } | ||
| + | </syntaxhighlight> | ||
| + | |||
| + | |||
| + | {{ambox|text= Don't put any spaces around the = in this file. It doesn't like that.}} | ||
| + | |||
| + | Like this: | ||
| + | |||
| + | {{ADFImage|Pi-Zero-Headless-Editer-Fichier-01.jpg|640px}} | ||
| + | |||
| + | Save file and move on to next step. (<a href="https://raspberrypi.stackexchange.com/a/37921">more details here</a>) | ||
| + | |||
| + | == Enable UART == | ||
| + | The file called '''config.txt''' already exists, we are just going to edit its contents. We will add some text to the bottom to enable the UART on the GPIO header pins. This allows a USB console cable to be attached later for troubleshooting. | ||
| + | |||
| + | {{ADFImage|Pi-Zero-Headless-Editer-Fichier-02.jpg|640px}} | ||
| + | |||
| + | Open the file in a text editor and add the following text to the bottom. | ||
| + | |||
| + | <syntaxhighlight lang="python"> | ||
| + | # Enable UART | ||
| + | enable_uart=1 | ||
| + | </syntaxhighlight> | ||
| + | |||
| + | Like this: | ||
| + | |||
| + | {{ADFImage|Pi-Zero-Headless-Editer-Fichier-03.jpg|640px}} | ||
| + | |||
| + | Save it and move on to next step. (<a href="https://www.raspberrypi.org/forums/viewtopic.php?f=28&t=141195">more details here</a>) | ||
| + | |||
| + | == Enable SSH == | ||
| + | SSH used to be enabled by default, but was then (Nov 2016) turned off by default. This was due to security concerns since the pi user id and password are well known. However, you'll likely want this enabled so you can remotely connect to the Pi Zero. | ||
| + | |||
| + | To do so, we simply create a file called '''ssh'''. This file does not exist and needs to be created. It can be empty. The system looks for it at boot time and will enable ssh if it is there. It is then deleted. So just create a new file and save it as '''ssh''' to the '''boot''' folder. | ||
| + | |||
| + | == Final Check == | ||
| + | After the above steps, you should have the following files on the SD card in the '''boot''' folder. | ||
| + | |||
| + | {{ADFImage|Pi-Zero-Headless-Editer-Fichier-04.jpg|640px}} | ||
| + | |||
| + | Safely remove the SD card from the main computer and install it in the Pi Zero. | ||
| + | |||
| + | {{ADFImage|Pi-Zero-Headless-Editer-Fichier-05.jpg|640px}} | ||
| + | |||
{{Pi-Zero-Headless-TRAILER}} | {{Pi-Zero-Headless-TRAILER}} | ||
Version du 22 janvier 2018 à 04:12
If you burned the OS image successfully, you should see a folder named boot appear on your main computer. If it doesn't, try removing and reinserting the SD card. If it still doesn't, try burning the image again.
There are three text files we will create/edit in boot.
- wpa_supplicant.conf - wifi settings
- config.txt - global system settings
- ssh - an empty text file to enable ssh
We are going to edit these directly on the SD card before putting it in the Pi Zero. This way you can edit these files using your favorite graphical text editor on your main computer. Try to avoid using a word processor though.
Configure WiFi
The Pi Zero W has built in WiFi so nothing additional is required. If you are using the original Pi Zero, you will need some form of <a href="https://www.adafruit.com/product/814">WiFi Adapter</a> and a way to connect it: <a href="https://www.adafruit.com/product/1099">cable</a> or <a href="https://www.adafruit.com/product/2910">adapter</a>.
The WiFi configuration file does not exist and needs to be created. The name of the file should be wpa_supplicant.conf and its contents will get copied to the system folder at boot time. It will then be deleted. So this a one time only process. If you want to try again, you have to recreate the file and reboot.
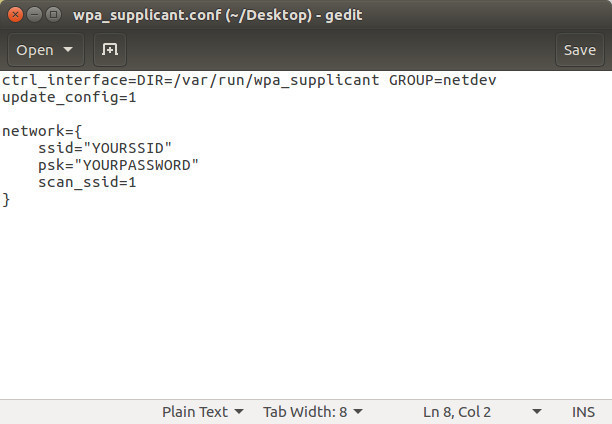
The contents of the file should be as shown below. Replace YOURSSID and YOURPASSWORD with whatever is used for your network setup.
ctrl_interface=DIR=/var/run/wpa_supplicant GROUP=netdev
update_config=1

network={
    ssid="YOURSSID"
    psk="YOURPASSWORD"
    scan_ssid=1
}
| Don't put any spaces around the = in this file. It doesn't like that. |
Like this:
Crédit: AdaFruit Industries www.adafruit.com
Save file and move on to next step. (<a href="https://raspberrypi.stackexchange.com/a/37921">more details here</a>)
Enable UART
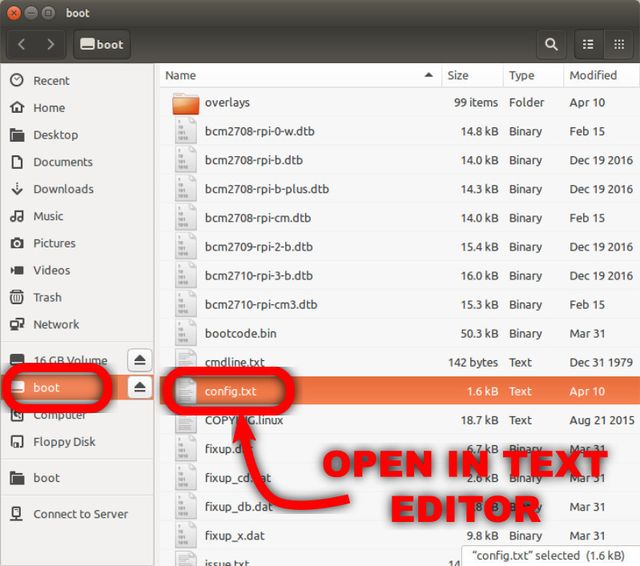
The file called config.txt already exists, we are just going to edit its contents. We will add some text to the bottom to enable the UART on the GPIO header pins. This allows a USB console cable to be attached later for troubleshooting.
Crédit: AdaFruit Industries www.adafruit.com
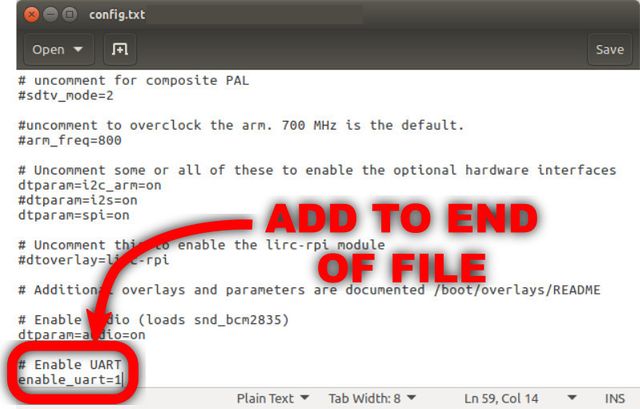
Open the file in a text editor and add the following text to the bottom.
# Enable UART
enable_uart=1
Like this:
Crédit: AdaFruit Industries www.adafruit.com
Save it and move on to next step. (<a href="https://www.raspberrypi.org/forums/viewtopic.php?f=28&t=141195">more details here</a>)
Enable SSH
SSH used to be enabled by default, but was then (Nov 2016) turned off by default. This was due to security concerns since the pi user id and password are well known. However, you'll likely want this enabled so you can remotely connect to the Pi Zero.
To do so, we simply create a file called ssh. This file does not exist and needs to be created. It can be empty. The system looks for it at boot time and will enable ssh if it is there. It is then deleted. So just create a new file and save it as ssh to the boot folder.
Final Check
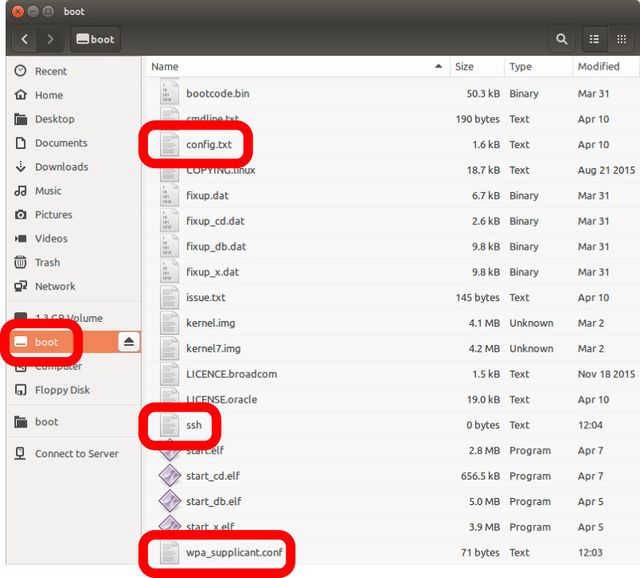
After the above steps, you should have the following files on the SD card in the boot folder.
Crédit: AdaFruit Industries www.adafruit.com
Safely remove the SD card from the main computer and install it in the Pi Zero.
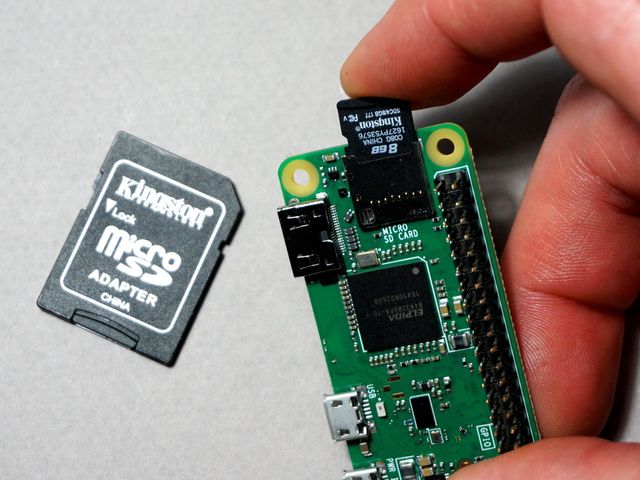
Crédit: AdaFruit Industries www.adafruit.com
Source: Raspberry Pi Zero Headless Quick Start
Tutoriel créé par Carter Nelson pour AdaFruit Industries. Tutorial created by Carter Nelson for AdaFruit Industries.
Toute référence, mention ou extrait de cette traduction doit être explicitement accompagné du texte suivant : « Traduction par MCHobby (www.MCHobby.be) - Vente de kit et composants » avec un lien vers la source (donc cette page) et ce quelque soit le média utilisé.
L'utilisation commercial de la traduction (texte) et/ou réalisation, même partielle, pourrait être soumis à redevance. Dans tous les cas de figures, vous devez également obtenir l'accord du(des) détenteur initial des droits. Celui de MC Hobby s'arrêtant au travail de traduction proprement dit.
Traduit avec l'autorisation d'AdaFruit Industries - Translated with the permission from Adafruit Industries - www.adafruit.com