Différences entre versions de « Rasp-Hack-Afficheur-LCD »
| Ligne 4 : | Ligne 4 : | ||
[[Fichier:Rasp-Hack-Afficheur-LCD-INTRO-1.JPG|500px]] | [[Fichier:Rasp-Hack-Afficheur-LCD-INTRO-1.JPG|500px]] | ||
| + | |||
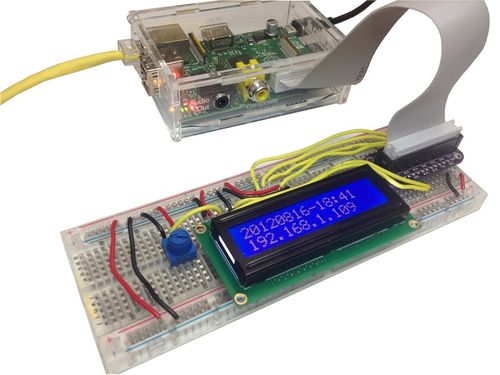
| + | Adding a LCD to any project immediately kicks it up a notch. This tutorial explains how to connect a inexpensive HDD44780 compatible LCD to the raspberry pi using 6 GPIOs. While there are other ways to connect using I2C or the UART this is the most direct method that get right down to the bare metal. | ||
| + | |||
| + | This technique: | ||
| + | |||
| + | * allows for inexpensive LCDs to be used | ||
| + | * does not require any i2c drivers | ||
| + | * won't steal the only serial port on the Pi. | ||
| + | |||
| + | |||
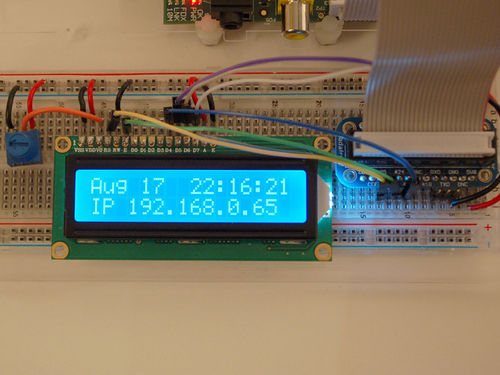
| + | The example python code sends date, time and the ip address to the display. If you are running a Pi in headless mode being able to determine the IP address at a glance is really handy. | ||
| + | |||
| + | [[Fichier:Rasp-Hack-Afficheur-LCD-INTRO-2.JPG|500px]] | ||
| + | |||
| + | To Follow This Tutorial You Will Need | ||
| + | |||
| + | * Standard LCD 16x2 + extras | ||
| + | * Adafruit Pi Cobbler - follow the tutorial to assemble it | ||
| + | * Half or Full-size breadboard | ||
| + | * Hook-up Wire | ||
| + | * A Raspberry Pi | ||
| + | |||
| + | {{Ambox | ||
| + | | type = delete | ||
| + | | image = [[File:StopHand.png|40px|alt=Stop]] | ||
| + | | textstyle = color: red; font-weight: bold; font-style: italic; | ||
| + | | text = You can use nearly any character LCD with this tutorial - it will work with 16x1, 16x2, 20x2, 20x4 LCDs. It will not work with 40x4 LCDs | ||
| + | }} | ||
{{Rasp-Hack-Afficheur-LCD-TRAILER}} | {{Rasp-Hack-Afficheur-LCD-TRAILER}} | ||
Version du 27 janvier 2013 à 16:17
Adding a LCD to any project immediately kicks it up a notch. This tutorial explains how to connect a inexpensive HDD44780 compatible LCD to the raspberry pi using 6 GPIOs. While there are other ways to connect using I2C or the UART this is the most direct method that get right down to the bare metal.
This technique:
- allows for inexpensive LCDs to be used
- does not require any i2c drivers
- won't steal the only serial port on the Pi.
The example python code sends date, time and the ip address to the display. If you are running a Pi in headless mode being able to determine the IP address at a glance is really handy.
To Follow This Tutorial You Will Need
- Standard LCD 16x2 + extras
- Adafruit Pi Cobbler - follow the tutorial to assemble it
- Half or Full-size breadboard
- Hook-up Wire
- A Raspberry Pi
| You can use nearly any character LCD with this tutorial - it will work with 16x1, 16x2, 20x2, 20x4 LCDs. It will not work with 40x4 LCDs |
Source: Character LCD with Raspberry Pi or BeagleBone Black écrit par Tony Dicola pour Adafruit Industries.
Traduit avec l'autorisation d'AdaFruit Industries - Translated with the permission from Adafruit Industries - www.adafruit.com
Toute référence, mention ou extrait de cette traduction doit être explicitement accompagné du texte suivant : « Traduction par MCHobby (www.MCHobby.be) - Vente de kit et composants » avec un lien vers la source (donc cette page) et ce quelque soit le média utilisé.
L'utilisation commercial de la traduction (texte) et/ou réalisation, même partielle, pourrait être soumis à redevance. Dans tous les cas de figures, vous devez également obtenir l'accord du(des) détenteur initial des droits. Celui de MC Hobby s'arrêtant au travail de traduction proprement dit.


