Différences entre versions de « RASP-PCF8523-Brancher »
| Ligne 14 : | Ligne 14 : | ||
== Raccorder == | == Raccorder == | ||
| + | === Brancher l'horloge PCF8523 === | ||
| + | L'horloge PCF8523 pour Raspberry-Pi se branche directement sur les premières broches du GPIO. | ||
| + | |||
| + | [[Fichier:RASP-PCF8523-Brancher.png]] | ||
| + | |||
=== Raccorder un module RTC brute === | === Raccorder un module RTC brute === | ||
| − | + | Brancher un DS1307 se fait très facilement: | |
| − | * | + | * Connecter VCC sur: |
| − | * | + | ** Pour DS1307: la broche 5.0V du Raspberry-Pi |
| − | * | + | ** Pour PCF8523 ou DS3231: la broche 3.3V du Raspberry-Pi |
| − | * | + | * Connecter GND du breakout sur la broche GND du Raspberry-Pi |
| − | * | + | * Connecter SDA du breakout sur la broche SDA du Raspberry-Pi |
| + | * Connecter SCL du breakout sur la broche SCL du Raspberry-Pi | ||
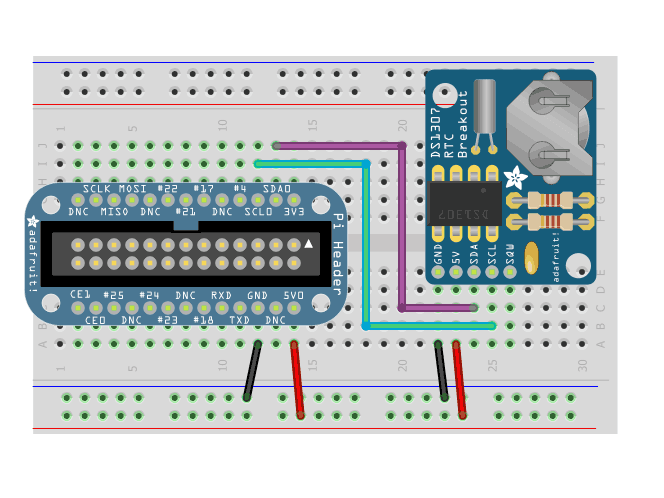
{{ADFImage|RASP-DS1307-Brancher-00.gif}} | {{ADFImage|RASP-DS1307-Brancher-00.gif}} | ||
| − | |||
| − | |||
| − | |||
| − | |||
| − | |||
{{RASP-PCF8523-TRAILER}} | {{RASP-PCF8523-TRAILER}} | ||
Version du 21 août 2017 à 19:20
Brancher la RTC
To keep costs low, the Raspberry Pi does not include a Real Time Clock module. Instead, users are expected to have it always connected to WiFi or Ethernet and keep time by checking the network. Since we want to include an external module, we'll have to wire one up.
We have three different RTC we suggest, PCF8523 is inexpensive, DS1307 is most common, and DS3231 is most precise. Any of them will do!
While the DS1307 is historically the most common, its not the best RTC chipset, we've found!
Placer la pile
Don't forget to also install a CR1220 coin cell. In particular the DS1307 wont work at all without it and none of the RTCs will keep time when the Pi is off and no coin battery is in place.
Raccorder
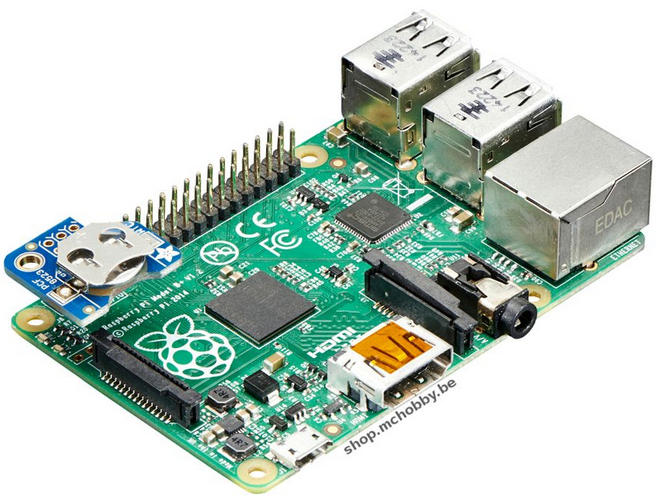
Brancher l'horloge PCF8523
L'horloge PCF8523 pour Raspberry-Pi se branche directement sur les premières broches du GPIO.
Raccorder un module RTC brute
Brancher un DS1307 se fait très facilement:
- Connecter VCC sur:
- Pour DS1307: la broche 5.0V du Raspberry-Pi
- Pour PCF8523 ou DS3231: la broche 3.3V du Raspberry-Pi
- Connecter GND du breakout sur la broche GND du Raspberry-Pi
- Connecter SDA du breakout sur la broche SDA du Raspberry-Pi
- Connecter SCL du breakout sur la broche SCL du Raspberry-Pi

Crédit: AdaFruit Industries www.adafruit.com
Source: Adding real time clock to Rasberry-Pi
Tutoriel créé par Ada pour AdaFruit Industries. Tutorial created by Lady Ada for AdaFruit Industries
Traduit avec l'autorisation d'AdaFruit Industries - Translated with the permission from Adafruit Industries - www.adafruit.com
Toute référence, mention ou extrait de cette traduction doit être explicitement accompagné du texte suivant : « Traduction par MCHobby (www.MCHobby.be) - Vente de kit et composants » avec un lien vers la source (donc cette page) et ce quelque soit le média utilisé.
L'utilisation commercial de la traduction (texte) et/ou réalisation, même partielle, pourrait être soumis à redevance. Dans tous les cas de figures, vous devez également obtenir l'accord du(des) détenteur initial des droits. Celui de MC Hobby s'arrêtant au travail de traduction proprement dit.

