Différences entre versions de « FEATHER-M0-ArduinoIDE-Utiliser »
| Ligne 3 : | Ligne 3 : | ||
{{traduction}} | {{traduction}} | ||
| + | == Introduction == | ||
Since the Feather/Metro/Gemma/Trinket M0 use an ATSAMD21 chip running at 48 MHz, you can pretty easily get it working with the Arduino IDE. Most libraries (including the popular ones like NeoPixels and display) will work with the M0, especially devices & sensors that use i2c or SPI. | Since the Feather/Metro/Gemma/Trinket M0 use an ATSAMD21 chip running at 48 MHz, you can pretty easily get it working with the Arduino IDE. Most libraries (including the popular ones like NeoPixels and display) will work with the M0, especially devices & sensors that use i2c or SPI. | ||
Version du 22 octobre 2017 à 20:46
Introduction
Since the Feather/Metro/Gemma/Trinket M0 use an ATSAMD21 chip running at 48 MHz, you can pretty easily get it working with the Arduino IDE. Most libraries (including the popular ones like NeoPixels and display) will work with the M0, especially devices & sensors that use i2c or SPI.
Now that you have added the appropriate URLs to the Arduino IDE preferences in the previous page, you can open the Boards Manager by navigating to the Tools->Board menu.
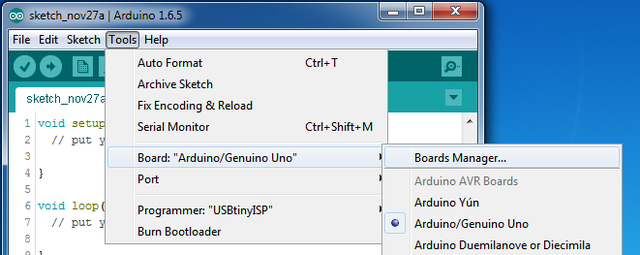
Crédit: AdaFruit Industries www.adafruit.com
Once the Board Manager opens, click on the category drop down menu on the top left hand side of the window and select Contributed. You will then be able to select and install the boards supplied by the URLs added to the prefrences.
Install SAMD Support
First up, install the Arduino SAMD Boards version 1.6.15 or later
You can type Arduino SAMD in the top search bar, then when you see the entry, click Install
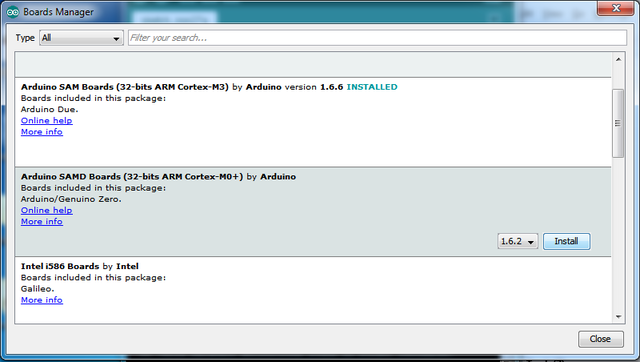
Crédit: AdaFruit Industries www.adafruit.com
Install Adafruit SAMD
Next you can install the Adafruit SAMD package to add the board file definitions
You can type Adafruit SAMD in the top search bar, then when you see the entry, click Install
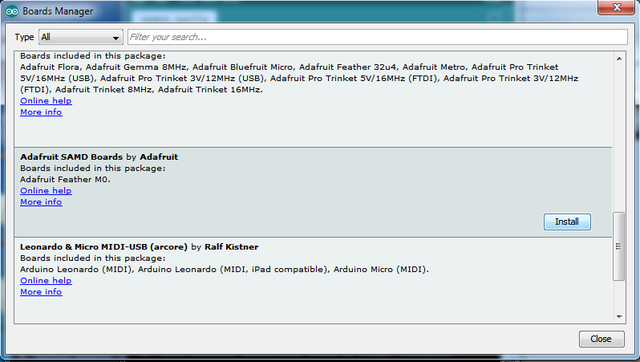
Crédit: AdaFruit Industries www.adafruit.com
Even though in theory you don't need to - I recommend rebooting the IDE
Quit and reopen the Arduino IDE to ensure that all of the boards are properly installed. You should now be able to select and upload to the new boards listed in the Tools->Board menu.
Select the matching board, the current options are:
- Feather M0 (for use with any Feather M0 other than the Express)
- Feather M0 Express
- Metro M0 Express
- Circuit Playground Express
- Gemma M0
- Trinket M0
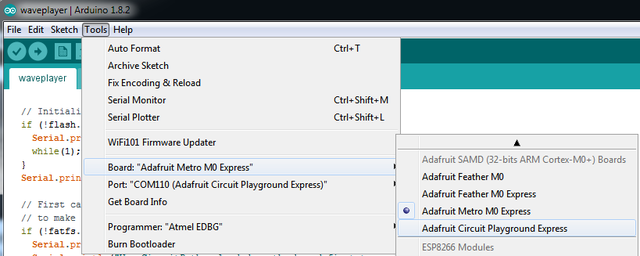
Crédit: AdaFruit Industries www.adafruit.com
Install Drivers (Windows 7 Only)
When you plug in the board, you'll need to possibly install a driver
Click below to download our Driver Installer
Download and run the installer
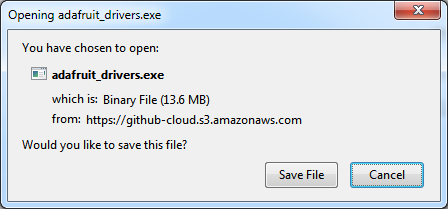
Crédit: AdaFruit Industries www.adafruit.com
Run the installer! Since we bundle the SiLabs and FTDI drivers as well, you'll need to click through the license
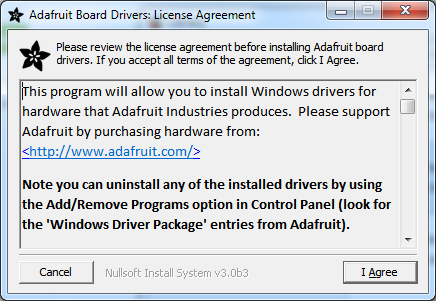
Crédit: AdaFruit Industries www.adafruit.com
Select which drivers you want to install, the defaults will set you up with just about every Adafruit board!
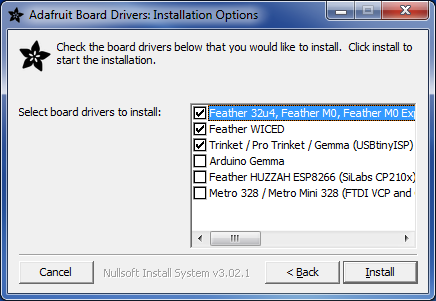
Crédit: AdaFruit Industries www.adafruit.com
Click Install to do the installin'
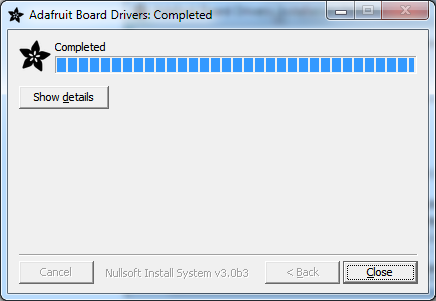
Crédit: AdaFruit Industries www.adafruit.com
Blink
Now you can upload your first blink sketch!
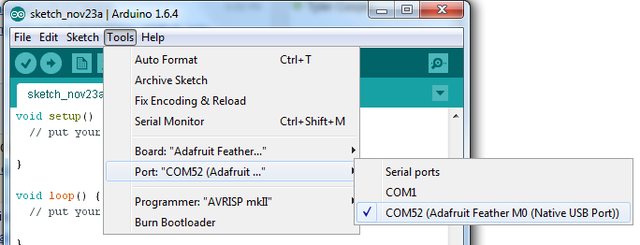
Plug in the Gemma M0, Trinket M0, Metro M0 or Feather M0 and wait for it to be recognized by the OS (just takes a few seconds). It will create a serial/COM port, you can now select it from the dropdown, it'll even be 'indicated' as Trinket/Gemma/Metro/Feather M0!
Crédit: AdaFruit Industries www.adafruit.com
Now load up the Blink example
And click upload! That's it, you will be able to see the LED blink rate change as you adapt the delay() calls.
No class registered in CONVERSION_CLASS for section build-alert alert-info
<div class="alert">
<i class='fa fa-exclamation-circle'></i>
If you are having issues, make sure you selected the matching Board in the menu that matches the hardware you have in your hand.
Sucessful Upload
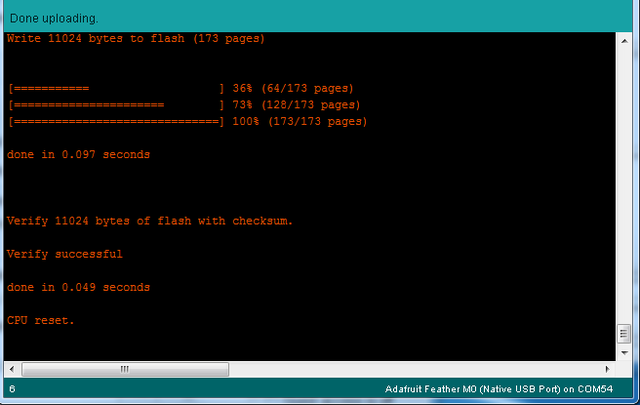
If you have a successful upload, you'll get a bunch of red text that tells you that the device was found and it was programmed, verified & reset
Crédit: AdaFruit Industries www.adafruit.com
Compilation Issues
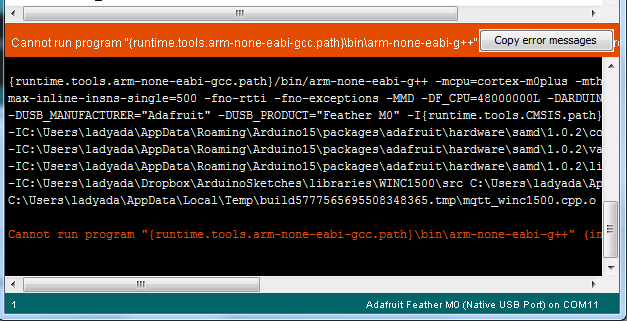
If you get an alert that looks like
Cannot run program "{runtime.tools.arm-none-eabi-gcc.path}\bin\arm-non-eabi-g++"
Make sure you have installed the Arduino SAMD boards package, you need both Arduino & Adafruit SAMD board packages
Crédit: AdaFruit Industries www.adafruit.com
Manually bootloading
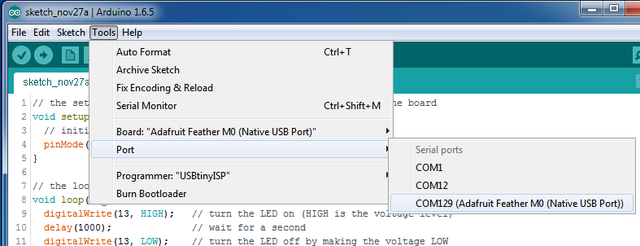
If you ever get in a 'weird' spot with the bootloader, or you have uploaded code that crashes and doesn't auto-reboot into the bootloader, click the RST button twice (like a double-click)to get back into the bootloader.
The red LED will pulse, so you know that its in bootloader mode.
Once it is in bootloader mode, you can select the newly created COM/Serial port and re-try uploading.
Crédit: AdaFruit Industries www.adafruit.com
You may need to go back and reselect the 'normal' USB serial port next time you want to use the normal upload.
Ubuntu & Linux Issue Fix
Note if you're using Ubuntu 15.04 (or perhaps other more recent Linux distributions) there is an issue with the modem manager service which causes the Bluefruit LE micro to be difficult to program. If you run into errors like "device or resource busy", "bad file descriptor", or "port is busy" when attempting to program then <a href="https://bugs.launchpad.net/ubuntu/+source/modemmanager/+bug/1473246">you are hitting this issue.</a>
The fix for this issue is to make sure Adafruit's custom udev rules are applied to your system. One of these rules is made to configure modem manager not to touch the Feather board and will fix the programming difficulty issue. <a href="../../../../adafruit-arduino-ide-setup/linux-setup#udev-rules">Follow the steps for installing Adafruit's udev rules on this page.</a>
Source: Adafruit Feather M0 Express - Designed for CircuitPython créé par LadyAda, Tony DiCola, Scorr Shawcroft, Dan Halbert pour AdaFruit Industries. Crédit AdaFruit Industries
Traduit par Meurisse D. pour MCHobby.be
Traduit avec l'autorisation d'AdaFruit Industries - Translated with the permission from Adafruit Industries - www.adafruit.com
Toute référence, mention ou extrait de cette traduction doit être explicitement accompagné du texte suivant : « Traduction par MCHobby (www.MCHobby.be) - Vente de kit et composants » avec un lien vers la source (donc cette page) et ce quelque soit le média utilisé.
L'utilisation commercial de la traduction (texte) et/ou réalisation, même partielle, pourrait être soumis à redevance. Dans tous les cas de figures, vous devez également obtenir l'accord du(des) détenteur initial des droits. Celui de MC Hobby s'arrêtant au travail de traduction proprement dit.
