Différences entre versions de « FEATHER-M0-MicroPython-REPL »
| Ligne 17 : | Ligne 17 : | ||
=== Identifier votre port série === | === Identifier votre port série === | ||
| − | + | Ensuite, il est nécessaire de déterminer le nom du port série associé avec votre carte. Il est plus facile d'identifier le port série si la carte n'est pas pas encore connectée (sur Windows, ouvrez le '''gestionnaire de périphérique''' et explorez le noeud '''Ports (COM/LPT)'''). | |
| − | + | Il sera nommé '''Adafruit Circuit Playground''', '''Adafruit Gemma M0''', '''Adafruit Trinket M0''' ou '''Adafruit Feather M0''' | |
{{ADFImage|FEATHER-M0-MicroPython-REPL-01.png}} | {{ADFImage|FEATHER-M0-MicroPython-REPL-01.png}} | ||
Version du 16 décembre 2017 à 21:32
Introduction
CircuitPython envoi la sortie d'un fichier .py en cours d'exécution vers la connexion USB-série. Par conséquent, il est nécessaire de se connecter sur la carte avec un câble console pour voir l'affichage des commandes print et des erreurs.
Etant donné que CircuitPython est une variante de MicroPython, il d dispose également d'une boucle REPL (Read-Evaluate-Print-Loop, signifiant boucle-lecture-évaluation-affichage). REPL permet d'exécuter des commandes individuelles, de charger du code de manière interactive. Cette fonctionnalité est géniale tester du code ou de nouvelles idées. Cependant, toutes les saisies REPL ne sont pas sauvegardées où que ce soi, assurez-vous donc d'avoir une copie de ce code quelque-part (par exemple: dans le fichier code.py)
Windows
Pilote Série (pour Windows 7)
Si vous utilisez Windows 7 alors il sera nécessaire d'installer un pilote. Cliquez sur le lien de téléchargement ci-dessous pour le télécharger et l'installer! Cette opération n'est pas nécessaire sur Mac, Linux ou Windows 10+.
Vous pouvez également retrouver le lien de téléchargement directement depuis cette page du tutoriel Adafruit
Identifier votre port série
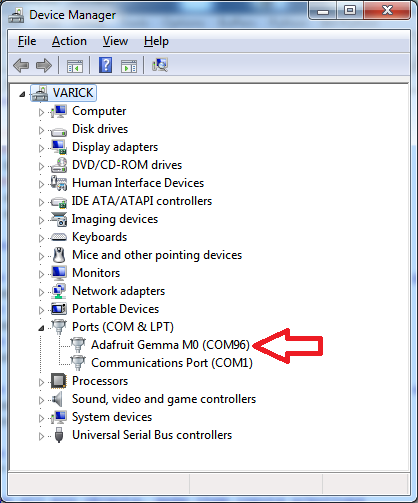
Ensuite, il est nécessaire de déterminer le nom du port série associé avec votre carte. Il est plus facile d'identifier le port série si la carte n'est pas pas encore connectée (sur Windows, ouvrez le gestionnaire de périphérique et explorez le noeud Ports (COM/LPT)).
Il sera nommé Adafruit Circuit Playground, Adafruit Gemma M0, Adafruit Trinket M0 ou Adafruit Feather M0
Crédit: AdaFruit Industries www.adafruit.com
Install Serial Port Terminal Software
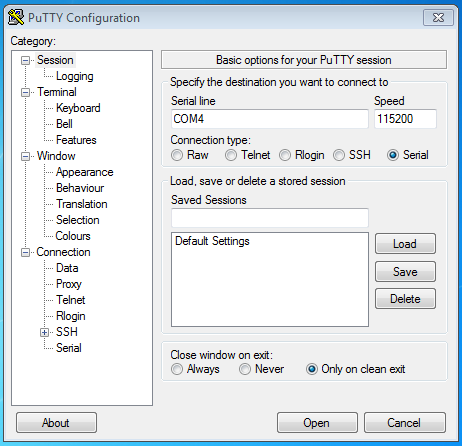
On Windows you'll want to use a tool like PuTTY to connect to the serial port. Download and run PuTTY, then configure it to use a serial connection to the board's COM port at 115200 baud similar to as shown below:
Crédit: AdaFruit Industries www.adafruit.com
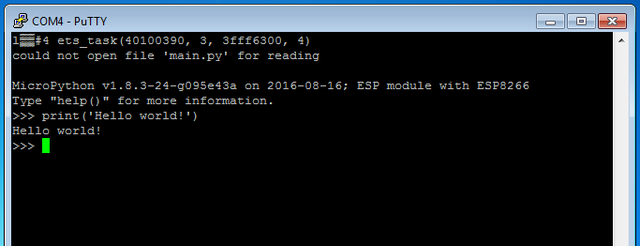
After clicking Open you should see a new window pop up with the current output from the running code. If no code is running, it may be blank so hit Ctrl - C to get to the REPL prompt.
Crédit: AdaFruit Industries www.adafruit.com
Mac OSX and Linux
Connecting to the serial terminal on is more straightforward than on Windows. Neither OS requires additional drivers.
First open a terminal program. On Mac OSX, Terminal comes installed and iTerm2 can be downloaded. On Linux there are a variety available such as gnome-terminal (called Terminal) and Konsole on KDE.
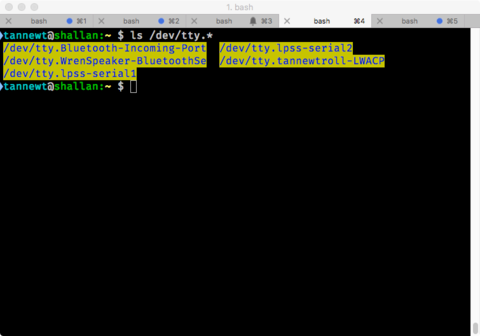
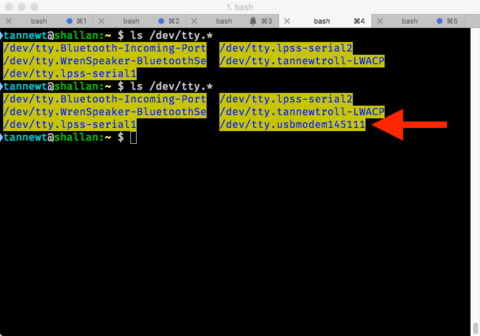
Now before plugging in the board, type ls /dev/tty.* to view existing serial connections.
Crédit: AdaFruit Industries www.adafruit.com
Next, plug in the board. There should be one new serial connection that is for your board. Typically on Mac OSX its something like /dev/tty.usbmodem* and on Linux its /dev/ttyACM*.
Crédit: AdaFruit Industries www.adafruit.com
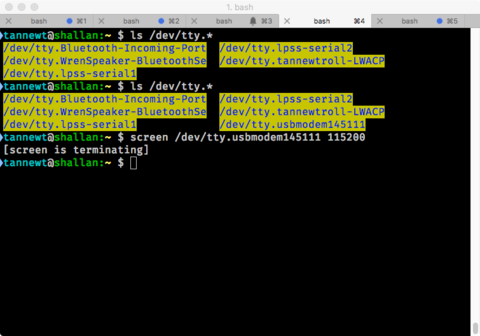
Now that we know the device name, the screen command can be used to connect to the serial port. Its installed on Mac OSX by default but Linux users may need to install it using their package manager. Run the following command to connect at 115200 baud:
screen /dev/tty.board_name 115200
Where /dev/tty.board_name is the name of the board's serial port.
When you're done using screen most versions of it allow you to exit by pressing Ctrl-a then k then y or pressing Ctrl-a then typing :quit and pressing enter.
Crédit: AdaFruit Industries www.adafruit.com
Using the REPL
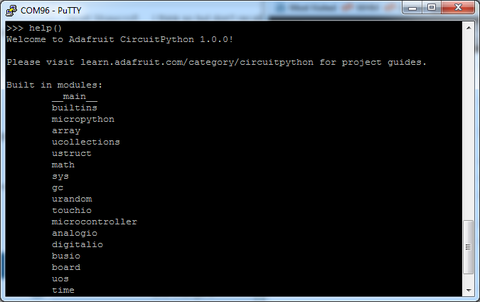
After you're connected to the serial REPL try pressing enter to confirm you see the >>> prompt. You can also type help() and press enter on most boards to see basic usage information.
Crédit: AdaFruit Industries www.adafruit.com
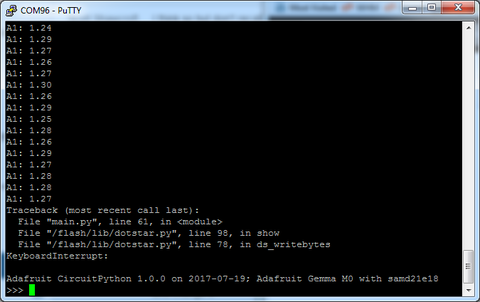
If you can't get a >>> prompt to appear try pressing Ctrl-c a couple times to interrupt any running program on the board.
You might get a Traceback and KeyboardInterrupt that lets you know the current Python program has stopped, and you'll get a prompt:
Crédit: AdaFruit Industries www.adafruit.com
That's all there is to connecting to the board's serial REPL, you're ready to start typing in and running CircuitPython code!
Source: Adafruit Feather M0 Express - Designed for CircuitPython créé par LadyAda, Tony DiCola, Scorr Shawcroft, Dan Halbert pour AdaFruit Industries. Crédit AdaFruit Industries
Traduit par Meurisse D. pour MCHobby.be
Traduit avec l'autorisation d'AdaFruit Industries - Translated with the permission from Adafruit Industries - www.adafruit.com
Toute référence, mention ou extrait de cette traduction doit être explicitement accompagné du texte suivant : « Traduction par MCHobby (www.MCHobby.be) - Vente de kit et composants » avec un lien vers la source (donc cette page) et ce quelque soit le média utilisé.
L'utilisation commercial de la traduction (texte) et/ou réalisation, même partielle, pourrait être soumis à redevance. Dans tous les cas de figures, vous devez également obtenir l'accord du(des) détenteur initial des droits. Celui de MC Hobby s'arrêtant au travail de traduction proprement dit.
