FEATHER-M0-ArduinoIDE-SPI-Flash
Introduction
Une des fonctionnalités les plus captivante du M0 express est la petite puce mémoire flash additionnel (en SPI) placée sur la carte. Cette mémoire peut être utilisé pour fournir de nombreux services tels que le stockage de fichiers de données, du code Python et plus.
Voyez cette mémoire flash additionnel comme une petite carte SD continuellement branchée sur la carte à laquelle vous pouvez accéder en utilisant une bibliothèque similaire à la bibliothèque Carte SD d'Arduino. Vous pouvez même lire et écrire les fichaiers que CircuitPython stocker sur cette mémoire Flash!
Vous aurez besoin d'installer la bibliothèque SPI Flash Memory d'Adafruit dans Arduino IDE pour utiliser cette mémoire flash avec Arduino. Cliquez sur le bouton ci-dessous pour télécharger les sources de la bibliothèque, ouvrez le fichier zip, et copiez le dans un répertoire Adafruit_SPIFlash (retirez le '-master' ajouté par GitHub au nom du répertoire lorsqu'il est téléchargé depuis GitHub) au côté des autres bibliothèques Arduino:
Une fois la bibliothèque installée, ouvrez Arduino IDE pour accéder aux différents exemples de la bibliothèque:
- fatfs_circuitpython
- fatfs_datalogging
- fatfs_format
- fatfs_full_usage
- fatfs_print_file
- flash_erase
Ces exemples vous permettent de formater la mémoire flash avec un système de fichier FAT (la même type de système de fichier que l'on retrouve sur une carte SD), lire et écrire des fichiers comme ont le fait sur une carte SD.
Lire et écrire des fichiers CircuitPython
L'exemple fatfs_circuitpython montre comment lire et écrire des fichiers sur la mémoire flash de sorte qu'ils puissent être accéssible depuis CircuitPython/MicroPython. Cela signifie que vous pouvez exécuter un programme CircuitPython sur votre carte pour y stocker des données, puis utiliser un croquis Arduino qui utilise cette bibliothèque pour interagir avec ces mêmes données.
Notez qu'avant d'utiliser l'exemple fatfs_circuitpython vous devez avoir chargé CircuitPython sur votre carte. Voyez ce guide pour charger la dernière version de CircuitPython afin que le système de fichier CircuitPython soit écrit et initialisé sur la puce Flash. Une fois CircuitPython chargé sur la carte, vous pouvez exécuter le croquis fatfs_circuitpython.
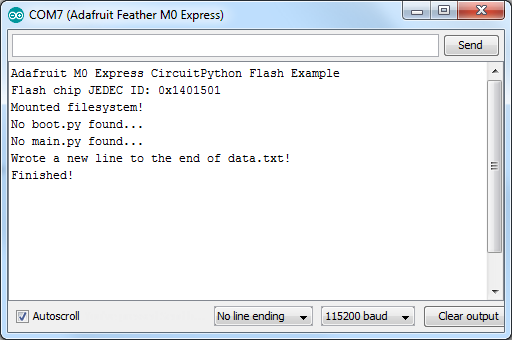
Pour exécuter le croquis, il faut le charger dans Arduino IDE et le téléverser sur la carte Feather M0. Ensuite, il faut ouvrir le moniteur série à 115200 baud. Vous devriez voir des messages s'afficher lorsqu'il essaye de lire et écrire des fichiers sur la mémoire Flash.
Plus spécifiquement, l'exemple cherche les fichiers boot.py et main.py (puisque CircuitPython exécute ces fichiers au démarrage) et affiche leur contenu. Puis il ajoute une ligne à la fin du fichier data.txt présent sur la carte (le fichier est créé s'il n'existe pas encore). Après avoir exécuté le croquis, vous pouvez recharger CircuitPython sur la carte et charger et lire le fichier data.txt depuis CircuitPython!
Voyons un peu le code du croquis pour comprendre comment lire et écrire des fichiers CircuitPython. Pour commencer une instance de la classe Adafruit_M0_Express_CircuitPython est crée en lui passant un instance de la classe SPIFlash (permettant d'accéder à la mémoire Flash):
#define FLASH_SS       SS1                    // broche SSP de la Flash
#define FLASH_SPI_PORT SPI1                   // port SPI surlequel est branché la mémoire Flash

Adafruit_SPIFlash flash(FLASH_SS, &FLASH_SPI_PORT);     // Utiliser le bus SPI matériel

// Il est possible d'utiliser d'autres broches comme bus SPI (SPI logiciel)!
//Adafruit_SPIFlash flash(SCK1, MISO1, MOSI1, FLASH_SS);

// Pour finir, créer un objet Adafruit_M0_Express_CircuitPython qui offre un accès
// à une interface de type Carte SD pour interagir avec les fichiers stockés dans
// le système de fichier Flash de CircuitPython.
Adafruit_M0_Express_CircuitPython pythonfs(flash);
En utilisant la classe Adafruit_M0_Express_CircuitPython vous obtenez un objet de type système de fichier compatible avec en lecture et écriture avec le formattage de la mémoire Flash de CircuitPython. C'est très important pour l'interopérabilité entre CircuitPython et Arduino étant donné que CircuitPython dispose d'un partitionnement spécifique et d'un agencement particulier de la mémoire flash qui n'est pas compatible avec des bibliothèque plus "simple" (que vous pourriez rencontrer dans les autres exemples).
Une fois l'instance de la classe Adafruit_M0_Express_CircuitPython créée (instance appelée pythonfs dans le croquis) vous pouvez interagir avec elle comme s'il s'agissait de la bibliothèque carte SD d'Arduino. Vous pouvez ouvrir des fichiers en lecture ou écriture, créer des répertoires, effacer des fichiers et répertoires et plus encore.
Voici un croquis qui vérifie la présence du fichier boot.py et affiche sont contenu (un caractère à la fois):
  // Vérifie si le fichier boot.py existe puis affiche le contenu.
  if (pythonfs.exists("boot.py")) {
    File bootPy = pythonfs.open("boot.py", FILE_READ);
    Serial.println("Afficher boot.py...");
    while (bootPy.available()) {
      char c = bootPy.read();
      Serial.print(c);
    }
    Serial.println();
  }
  else {
    Serial.println("Pas de fichier boot.py...");
  }
Notez l'appel de la fonction exists qui vérifie la présence du fichier boot.py, puis l'utilisation de la fonction open pour ouvrir celui-ci en mode lecture (read en anglais). Une fois fichier ouvert vous obtenez une référence vers un objet de la classe File qui permet de lire et écrire dans le fichier comme s'il s'agissait d'un périphérique Serial (encore une fois, toutes les fonctions de la classe File sont identiques à celle de la classe carte SD).
Dans ce cas, la fonction available retournera le nombre d'octets (bytes) restant à lire jusqu'à la fin du fichier -et- la fonction read lit un caractère à la fois (pour l'afficher sur le moniteur série).
L'écriture d'un fichier est tout aussi simple, voici comment le croquis ajoute des données dans le fichier data.txt:
  // Créer et ajouter des données dans le fichier data.txt
  // puis ajouter un retour à la ligne.
  // Le code CircuitPython pourra, plus tard, ou consulter
  // le contenu de ce fichier!
  File data = pythonfs.open("data.txt", FILE_WRITE);
  if (data) {
    // Ajouter une nouvelle ligne de donnée:
    data.println("Un bonjour a CircuitPython de la part d Arduino!");
    data.close();
    // Voir les autre exemples fatfs comme fatfs_full_usage
    // et fatfs_datalogging pour plus d'exemples concernant
    // les interactions avec les fichiers.
    Serial.println("Nouvelle ligne ajoutée au fichier data.txt!");
  }
  else {
    Serial.println("Erreur, ne sais pas ouvrir le fichier en écriture!");
  }
Again the open function is used but this time it's told to open the file for writing. In this mode the file will be opened for appending (i.e. data added to the end of it) if it exists, or it will be created if it doesn't exist. Once the file is open print functions like print and println can be used to write data to the file (just like writing to the serial monitor). Be sure to close the file when finished writing!
That's all there is to basic file reading and writing. Check out the fatfs_full_usage example for examples of even more functions like creating directories, deleting files & directories, checking the size of files, and more! Remember though to interact with CircuitPython files you need to use the Adafruit_Feather_M0_CircuitPython class as shown in the fatfs_circuitpython example above!
Format Flash Memory
The fatfs_format example will format the SPI flash with a new blank filesystem. Be warned this sketch will delete all data on the flash memory, including any Python code or other data you might have stored! The format sketch is useful if you'd like to wipe everything away and start fresh, or to help get back in a good state if the memory should get corrupted for some reason.
Be aware too the fatfs_format and examples below are not compatible with a CircuitPython-formatted flash chip! If you need to share data between Arduino & CircuitPython check out the fatfs_circuitpython example above.
To run the format sketch load it in the Arduino IDE and upload it to the Feather M0 board. Then open the serial monitor at 115200 baud. You should see the serial monitor display a message asking you to confirm formatting the flash. If you don't see this message then close the serial monitor, press the board's reset button, and open the serial monitor again.

Crédit: AdaFruit Industries www.adafruit.com
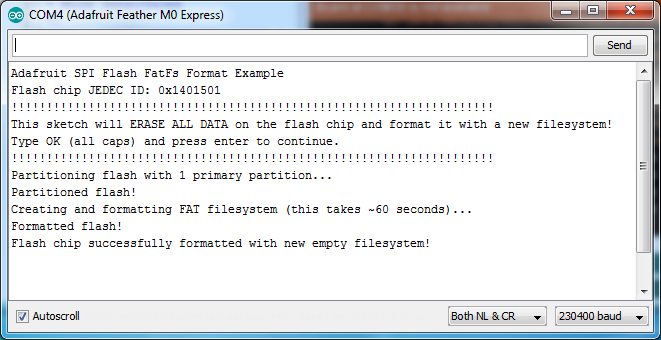
Type OK and press enter in the serial monitor input to confirm that you'd like to format the flash memory. You need to enter OK in all capital letters!
Once confirmed the sketch will format the flash memory. The format process takes about a minute so be patient as the data is erased and formatted. You should see a message printed once the format process is complete. At this point the flash chip will be ready to use with a brand new empty filesystem.
Datalogging Example
One handy use of the SPI flash is to store data, like datalogging sensor readings. The fatfs_datalogging example shows basic file writing/datalogging. Open the example in the Arduino IDE and upload it to your Feather M0 board. Then open the serial monitor at 115200 baud. You should see a message printed every minute as the sketch writes a new line of data to a file on the flash filesystem.
To understand how to write to a file look in the loop function of the sketch:
  // Open the datalogging file for writing.  The FILE_WRITE mode will open
  // the file for appending, i.e. it will add new data to the end of the file.
  File dataFile = fatfs.open(FILE_NAME, FILE_WRITE);
  // Check that the file opened successfully and write a line to it.
  if (dataFile) {
    // Take a new data reading from a sensor, etc.  For this example just
    // make up a random number.
    int reading = random(0,100);
    // Write a line to the file.  You can use all the same print functions
    // as if you're writing to the serial monitor.  For example to write
    // two CSV (commas separated) values:
    dataFile.print("Sensor #1");
    dataFile.print(",");
    dataFile.print(reading, DEC);
    dataFile.println();
    // Finally close the file when done writing.  This is smart to do to make
    // sure all the data is written to the file.
    dataFile.close();
    Serial.println("Wrote new measurement to data file!");
  }
Just like using the Arduino SD card library you create a File object by calling an open function and pointing it at the name of the file and how you'd like to open it (FILE_WRITE mode, i.e. writing new data to the end of the file). Notice however instead of calling open on a global SD card object you're calling it on a fatfs object created earlier in the sketch (look at the top after the #define configuration values).
Once the file is opened it's simply a matter of calling print and println functions on the file object to write data inside of it. This is just like writing data to the serial monitor and you can print out text, numeric, and other types of data. Be sure to close the file when you're done writing to ensure the data is stored correctly!
Reading and Printing Files
The fatfs_print_file example will open a file (by default the data.csv file created by running the fatfs_datalogging example above) and print all of its contents to the serial monitor. Open the fatfs_print_file example and load it on your Feather M0 board, then open the serial monitor at 115200 baud. You should see the sketch print out the contents of data.csv (if you don't have a file called data.csv on the flash look at running the datalogging example above first).
To understand how to read data from a file look in the setup function of the sketch:
  // Open the file for reading and check that it was successfully opened.
  // The FILE_READ mode will open the file for reading.
  File dataFile = fatfs.open(FILE_NAME, FILE_READ);
  if (dataFile) {
    // File was opened, now print out data character by character until at the
    // end of the file.
    Serial.println("Opened file, printing contents below:");
    while (dataFile.available()) {
      // Use the read function to read the next character.
      // You can alternatively use other functions like readUntil, readString, etc.
      // See the fatfs_full_usage example for more details.
      char c = dataFile.read();
      Serial.print(c);
    }
  }
Just like when writing data with the datalogging example you create a File object by calling the open function on a fatfs object. This time however you pass a file mode of FILE_READ which tells the filesystem you want to read data.
After you open a file for reading you can easily check if data is available by calling the available function on the file, and then read a single character with the read function. This makes it easy to loop through all of the data in a file by checking if it's available and reading a character at a time. However there are more advanced read functions you can use too--see the fatfs_full_usage example or even the <a href="https://www.arduino.cc/en/reference/SD">Arduino SD library documentation</a> (the SPI flash library implements the same functions).
Full Usage Example
For a more complete demonstration of reading and writing files look at the fatfs_full_usage example. This examples uses every function in the library and demonstrates things like checking for the existence of a file, creating directories, deleting files, deleting directories, and more.
Remember the SPI flash library is built to have the same functions and interface as the <a href="https://www.arduino.cc/en/reference/SD">Arduino SD library</a> so if you have code or examples that store data on a SD card they should be easy to adapt to use the SPI flash library, just create a fatfs object like in the examples above and use its open function instead of the global SD object's open function. Once you have a reference to a file all of the functions and usage should be the same between the SPI flash and SD libraries!
Accessing SPI Flash
Arduino doesn't have the ability to show up as a 'mass storage' disk drive. So instead we must use CircuitPython to do that part for us. Here's the full technique:
- Start the bootloader on the Express board. Drag over the latest circuitpython uf2 file
- After a moment, you should see a CIRCUITPY drive appear on your hard drive with boot_out.txt on it
- Now go to Arduino and upload the fatfs_circuitpython example sketch from the Adafruit SPI library. Open the serial console. It will successfully mount the filesystem and write a new line to data.txt

Crédit: AdaFruit Industries www.adafruit.com
- Back on your computer, re-start the Express board bootloader, and re-drag circuitpython.uf2 onto the BOOT drive to reinstall circuitpython
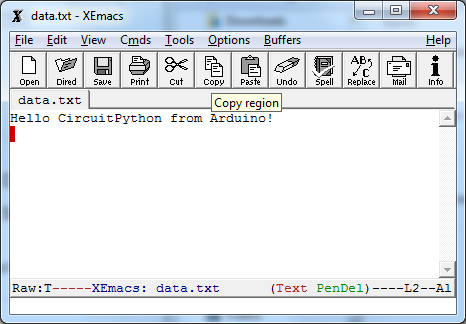
- Check the CIRCUITPY drive, you should now see data.txt which you can open to read!

Crédit: AdaFruit Industries www.adafruit.com
Once you have your Arduino sketch working well, for datalogging, you can simplify this procedure by dragging CURRENT.UF2 off of the BOOT drive to make a backup of the current program before loading circuitpython on. Then once you've accessed the file you want, re-drag CURRENT.UF2 back onto the BOOT drive to re-install the Arduino sketch!
Source: Adafruit Feather M0 Express - Designed for CircuitPython créé par LadyAda, Tony DiCola, Scorr Shawcroft, Dan Halbert pour AdaFruit Industries. Crédit AdaFruit Industries
Traduit par Meurisse D. pour MCHobby.be
Traduit avec l'autorisation d'AdaFruit Industries - Translated with the permission from Adafruit Industries - www.adafruit.com
Toute référence, mention ou extrait de cette traduction doit être explicitement accompagné du texte suivant : « Traduction par MCHobby (www.MCHobby.be) - Vente de kit et composants » avec un lien vers la source (donc cette page) et ce quelque soit le média utilisé.
L'utilisation commercial de la traduction (texte) et/ou réalisation, même partielle, pourrait être soumis à redevance. Dans tous les cas de figures, vous devez également obtenir l'accord du(des) détenteur initial des droits. Celui de MC Hobby s'arrêtant au travail de traduction proprement dit.
