Différences entre versions de « ADF-LED-BACKPACK-I2C-Adresse »
| Ligne 16 : | Ligne 16 : | ||
You can mix-and-match matrices, as long as each one has a unique address! | You can mix-and-match matrices, as long as each one has a unique address! | ||
| − | == | + | == Modifier les addresses == |
You can change the address of a backpack very easily. Look on the back to find the two or three A0, A1 or A2 solder jumpers. Each one of these is used to hardcode in the address. If a jumper is shorted with solder, that sets the address. '''A0''' sets the lowest bit with a value of '''1''', '''A1''' sets the middle bit with a value of '''2''' and '''A2''' sets the high bit with a value of '''4'''. | You can change the address of a backpack very easily. Look on the back to find the two or three A0, A1 or A2 solder jumpers. Each one of these is used to hardcode in the address. If a jumper is shorted with solder, that sets the address. '''A0''' sets the lowest bit with a value of '''1''', '''A1''' sets the middle bit with a value of '''2''' and '''A2''' sets the high bit with a value of '''4'''. | ||
| Ligne 34 : | Ligne 34 : | ||
}} | }} | ||
| − | [[Fichier:ADF-LED-BACKPACK-ARD-01.jpg]] | + | [[Fichier:ADF-LED-BACKPACK-ARD-01.jpg|300px]] |
| − | [[Fichier:ADF-LED-BACKPACK-ARD-02.jpg]] | + | [[Fichier:ADF-LED-BACKPACK-ARD-02.jpg|300px]] |
| + | |||
| + | == Changer l'adresse dans votre code == | ||
| + | |||
| + | Once you've adjusted the address on the backpack, you'll also want to adjust the address in the code! | ||
| + | For the Arduino library we wrote, its simple. For example, lets say you want to have two seven-segment matrices. One is set to address 0x70 and the other is set to 0x71. Find this code in the example | ||
<nowiki>Adafruit_7segment matrix = Adafruit_7segment(); | <nowiki>Adafruit_7segment matrix = Adafruit_7segment(); | ||
Version du 6 février 2013 à 12:08
|
|
En cours de traduction/élaboration. |
The HT16K33 driver chip on these LED backpacks has a default I2C address of 0x70. Since each device on an I2C bus must have a unique address, its important to avoid collisions or you'll get a lot of strange responses from your electronic devices!
Luckily, the HT16K33 has 2 or 3 address adjust pins, so that the address can be changed! The mini 20mm 8x8 matrix backpack has 2 address adjust pins. The 30mm 8x8, bi-color 8x8 and 4 x 7-segment backpacks have 3 address adjust pins.
That means that you can set the backpacks to these addresses:
- Mini 8x8 20mm: 0x70, 0x71, 0x72, 0x73
- Small 8x8 30mm: 0x70, 0x71, 0x72, 0x73, 0x74, 0x75, 0x76, 0x77
- 4 x 7-segments: 0x70, 0x71, 0x72, 0x73, 0x74, 0x75, 0x76, 0x77
- Bi-color 8x8 30mm: 0x70, 0x71, 0x72, 0x73, 0x74, 0x75, 0x76, 0x77
You can mix-and-match matrices, as long as each one has a unique address!
Modifier les addresses
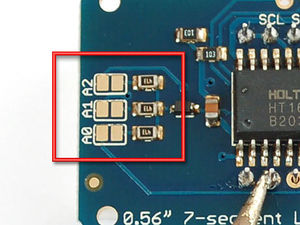
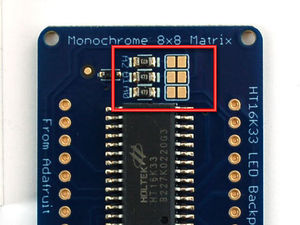
You can change the address of a backpack very easily. Look on the back to find the two or three A0, A1 or A2 solder jumpers. Each one of these is used to hardcode in the address. If a jumper is shorted with solder, that sets the address. A0 sets the lowest bit with a value of 1, A1 sets the middle bit with a value of 2 and A2 sets the high bit with a value of 4.
The final address is 0x70 + A2 + A1 + A0.
Donc, par exemple:
- if A2 is shorted and A0 is shorted, the address is 0x70 + 4 + 1 = 0x75.
- If only A1 is shorted, the address is 0x70 + 2 = 0x72
| A2 does not appear on the mini 20mm 8x8 matrix, so you cannot set the address higher than 0x73 |
| Sur le backpack de la matrice 8x8 30mm, les libellés A1 et A2 on malheureusement été inversés! |
Changer l'adresse dans votre code
Once you've adjusted the address on the backpack, you'll also want to adjust the address in the code! For the Arduino library we wrote, its simple. For example, lets say you want to have two seven-segment matrices. One is set to address 0x70 and the other is set to 0x71. Find this code in the example
Adafruit_7segment matrix = Adafruit_7segment();

    void setup() {
    Serial.begin(9600);
    Serial.println("7 Segment Backpack Test");

    matrix.begin(0x70);
    }
And change it to this:
Adafruit_7segment matrix1 = Adafruit_7segment();
Adafruit_7segment matrix2 = Adafruit_7segment();

void setup() {
Serial.begin(9600);
Serial.println("Double 7 Segment Backpack Test");

matrix1.begin(0x70);
matrix2.begin(0x71);
}
That is, instantiate two matrix objects. Then one is called with begin(0x70) and the other is called with begin(0x71). Each one can be used individually. If you need more matrices, just instantiate more objects at the top and begin() each one with the unique i2c address.
Source: Control small led matrice with ease créé par LadyAda pour AdaFruit Industries. Crédit AdaFruit Industries
Traduit avec l'autorisation d'AdaFruit Industries - Translated with the permission from Adafruit Industries - www.adafruit.com
Toute référence, mention ou extrait de cette traduction doit être explicitement accompagné du texte suivant : « Traduction par MCHobby (www.MCHobby.be) - Vente de kit et composants » avec un lien vers la source (donc cette page) et ce quelque soit le média utilisé.
L'utilisation commercial de la traduction (texte) et/ou réalisation, même partielle, pourrait être soumis à redevance. Dans tous les cas de figures, vous devez également obtenir l'accord du(des) détenteur initial des droits. Celui de MC Hobby s'arrêtant au travail de traduction proprement dit.

