ADX335-326-Calibrer-Programmer
Calibration statique
As with all sensors, there is some variation in output between samples of these accelerometers. For non-critical applications such as game controllers, or simple motion or tilt sensors, these variations are not important. But for applications requiring precise measurements, calibration to a reliable reference is required.
Gravity as a Calibration Reference
Acceleration is measured in units of gravitational force or "G", where 1G represents the gravitational pull at the surface of the earth. Despite what you may have heard, gravity is a pretty stable force and makes a convenient and reliable calibration reference if you happen to be a surface-dwelling earthling.
Méthode de calibration
To calibrate the sensor to the gravitational reference, you need to determine the sensor output for each axis when it is precisely aligned with the axis of gravitational pull. Laboratory quality calibration uses precision positioning jigs. The method described here is simple and gives surprisingly good results.
Fichier:ADX335-326-Calibr-02.jpg
Monter le senseur
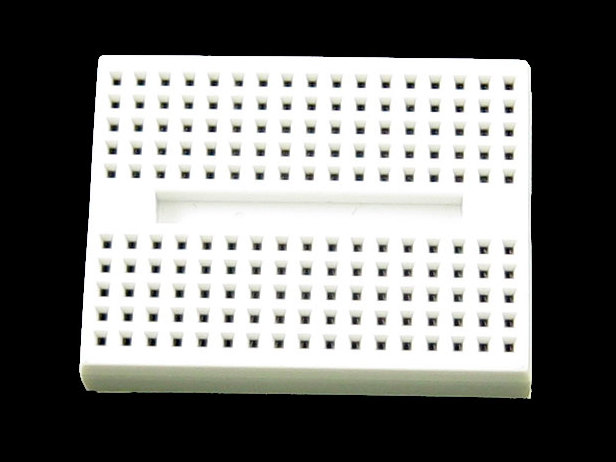
First mount the sensor to a small breadboard like the one on the left. The back and squared edges of the breadboard make a reasonably accurate set of reference planes to orient the sensor for calibration.
Raccorder le senseur
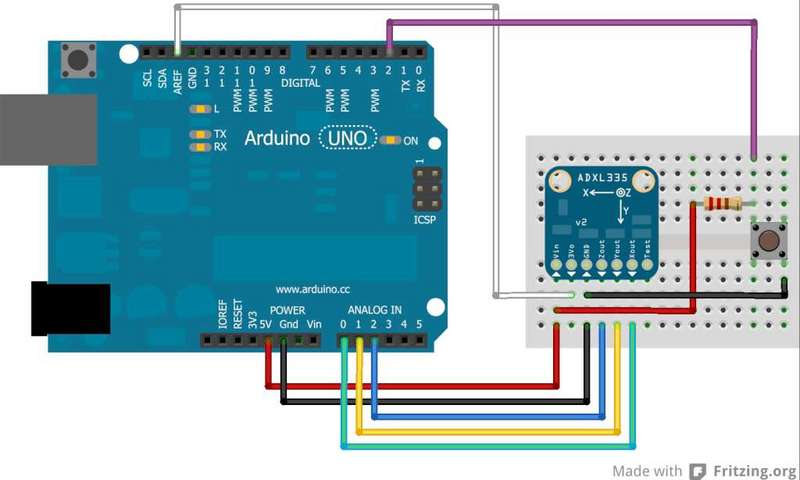
Wire the sensor as shown below. This is equivalent to the circuit shown on the previous page, with the addition of a switch.
Exécuter le sketch de calibration
- Load the sketch below onto the Arduino and run
- Open the Serial Monitor.
- Lay the breadboard with the sensor on a flat surface
- Press and hold the button until you see "Calibrate" in the serial monitor.
- This will calibrate the minimum value for the z axis.
- Stand the breadboard on the front edge and press the button again. to calibrate +y
- Repeat this for the three other edges to calibrate +x, -y and -x.
- Turn the breadboard upside down and press the button again to calibrate +z. (Hint, the underside of a table works well to steady it.)
Sortie du programme de calibration
Once calibrated, the output will show the calibrated raw range for each axis, followed by the measured "G" forces. The raw ranges can be used as constants in sketches.
Raw Ranges: X: 408-616, Y: 398-610, Z: 422-625
511, 511, 625 :: -0.01G, 0.07G, 1.00G
Raw Ranges: X: 408-616, Y: 398-610, Z: 422-625
511, 511, 625 :: -0.01G, 0.07G, 1.00G
Raw Ranges: X: 408-616, Y: 398-610, Z: 422-625
511, 511, 625 :: -0.01G, 0.07G, 1.00G
Raw Ranges: X: 408-616, Y: 398-610, Z: 422-625
511, 511, 625 :: -0.01G, 0.07G, 1.00G
Raw Ranges: X: 408-616, Y: 398-610, Z: 422-625
Programme de calibration
const int xInput = A0;
const int yInput = A1;
const int zInput = A2;
const int buttonPin = 2;

// Raw Ranges:
// initialize to mid-range and allow calibration to
// find the minimum and maximum for each axis
int xRawMin = 512;
int xRawMax = 512;

int yRawMin = 512;
int yRawMax = 512;

int zRawMin = 512;
int zRawMax = 512;

// Take multiple samples to reduce noise
const int sampleSize = 10;

void setup()
{
  analogReference(EXTERNAL);
  Serial.begin(9600);
}

void loop()
{
  int xRaw = ReadAxis(xInput);
  int yRaw = ReadAxis(yInput);
  int zRaw = ReadAxis(zInput);

  if (digitalRead(buttonPin) == LOW)
  {
    AutoCalibrate(xRaw, yRaw, zRaw);
  }
  else
  {
    Serial.print("Raw Ranges: X: ");
    Serial.print(xRawMin);
    Serial.print("-");
    Serial.print(xRawMax);

    Serial.print(", Y: ");
    Serial.print(yRawMin);
    Serial.print("-");
    Serial.print(yRawMax);

    Serial.print(", Z: ");
    Serial.print(zRawMin);
    Serial.print("-");
    Serial.print(zRawMax);
    Serial.println();
    Serial.print(xRaw);
    Serial.print(", ");
    Serial.print(yRaw);
    Serial.print(", ");
    Serial.print(zRaw);

    // Convert raw values to 'milli-Gs"
    long xScaled = map(xRaw, xRawMin, xRawMax, -1000, 1000);
    long yScaled = map(yRaw, yRawMin, yRawMax, -1000, 1000);
    long zScaled = map(zRaw, zRawMin, zRawMax, -1000, 1000);

    // re-scale to fractional Gs
    float xAccel = xScaled / 1000.0;
    float yAccel = yScaled / 1000.0;
    float zAccel = zScaled / 1000.0;

    Serial.print(" :: ");
    Serial.print(xAccel);
    Serial.print("G, ");
    Serial.print(yAccel);
    Serial.print("G, ");
    Serial.print(zAccel);
    Serial.println("G");

  delay(500);
  }
}

//
// Read "sampleSize" samples and report the average
//
int ReadAxis(int axisPin)
{
  long reading = 0;
  analogRead(axisPin);
  delay(1);
  for (int i = 0; i < sampleSize; i++)
  {
    reading += analogRead(axisPin);
  }
  return reading/sampleSize;
}

//
// Find the extreme raw readings from each axis
//
void AutoCalibrate(int xRaw, int yRaw, int zRaw)
{
  Serial.println("Calibrate");
  if (xRaw < xRawMin)
  {
    xRawMin = xRaw;
  }
  if (xRaw > xRawMax)
  {
    xRawMax = xRaw;
  }

  if (yRaw < yRawMin)
  {
    yRawMin = yRaw;
  }
  if (yRaw > yRawMax)
  {
    yRawMax = yRaw;
  }

  if (zRaw < zRawMin)
  {
    zRawMin = zRaw;
  }
  if (zRaw > zRawMax)
  {
    zRawMax = zRaw;
  }
}
Réalisé par Bill Earl Pour AdaFruit Insdustries.
Source: [1]
Traduit avec l'autorisation d'AdaFruit Industries - Translated with the permission from Adafruit Industries - www.adafruit.com
Toute référence, mention ou extrait de cette traduction doit être explicitement accompagné du texte suivant : « Traduction par MCHobby (www.MCHobby.be) - Vente de kit et composants » avec un lien vers la source (donc cette page) et ce quelque soit le média utilisé.
L'utilisation commercial de la traduction (texte) et/ou réalisation, même partielle, pourrait être soumis à redevance. Dans tous les cas de figures, vous devez également obtenir l'accord du(des) détenteur initial des droits. Celui de MC Hobby s'arrêtant au travail de traduction proprement dit.


