Différences entre versions de « BMP085-Utiliser-APIv2 »
| Ligne 8 : | Ligne 8 : | ||
== Utiliser le BMP085/BMP180 == | == Utiliser le BMP085/BMP180 == | ||
| − | + | {{bloc-etroit|text=Le calcul de l'altitude et de la pression barométrique, nécessite beaucoup d'opérations mathématique... ce qui n'est pas franchement plaisant. Vous pouvez prendre connaissance de ces opérations dans la fiche technique mais cela n'est ni vraiment intuitive ni très pédagogique - cela indique juste comment le senseur fonctionne. | |
| − | [https://github.com/adafruit/Adafruit_BMP085_Unified | + | Heureusement, la bibliothèque Arduino prend en charge toute cette complexité.}} |
| + | |||
| + | [https://github.com/adafruit/Adafruit_BMP085_Unified Vous pouvez trouver cette bibliothèque Arduino sur ce dépôt GitHub] puis l'installer. Pour installer la bibliothèque, cliquez sur le bouton "Download" pour télécharger le l'archive ZIP et pour l'installer. Vous pouvez trouver plus d'information [[Installation d'un librairie Arduino|notre tutoriel sur l'installation de bibliothèque]] . | ||
* [https://github.com/adafruit/Adafruit_BMP085_Unified/archive/master.zip Télécharger la bibliothèque Adafruit_BMP085 pour Arduino ('''API v2''')] | * [https://github.com/adafruit/Adafruit_BMP085_Unified/archive/master.zip Télécharger la bibliothèque Adafruit_BMP085 pour Arduino ('''API v2''')] | ||
| − | + | N'oubliez pas de redémarrer votre IDE. | |
| − | + | Vous pouvez maintenant utiliser ce premier croquis/sketch d'exemple et le téléverser sur votre Arduino: | |
<nowiki>#include <Wire.h> | <nowiki>#include <Wire.h> | ||
| Ligne 57 : | Ligne 59 : | ||
}</nowiki> | }</nowiki> | ||
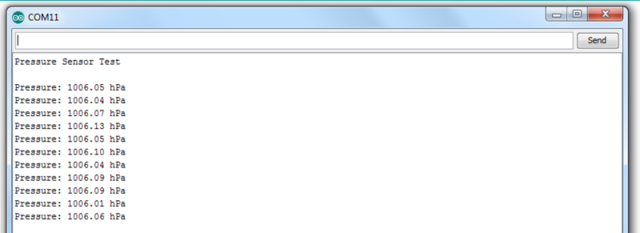
| − | + | Ouvrez ensuite la console série (dans Arduino IDE) configuré sur 9600 bauds. Le croquis/sketch affichera continuellement la pression en hPa (hectoPascals). Vous pouvez tester le senseur en mesurant une variation de pression simplement en placant votre doigt au dessus du petit trou sur le dessus du senseur. | |
| + | |||
| + | Comme vous pouvez le constater ci-dessous, la pression s'accroit: | ||
{{ADFImage|BMP085-Utiliser-APIv2-01.png|640px}} | {{ADFImage|BMP085-Utiliser-APIv2-01.png|640px}} | ||
Version du 17 février 2014 à 19:03
Utiliser l'API v2
Cette page est basée sur la nouvelle API unifiée utilisée avec le pilote BMP085/BMP180. Le pilote unifié fournir un meilleur support pour le calcul d'altitude, et permet de remplacer plus facilement le BMP085/BMP180 dans vos projets par un autre senseur prenant en charge la mesure de pression.
Si vous ne l'avez pas encore fait, il sera nécessaire d'installer la bibliothèque Adafruit_Sensor sur votre ssystème, la bibliothèque Adafruit_BMP085 utilisant cette dernière pour générer les données senseurs d'une façon universelle.
Utiliser le BMP085/BMP180
Le calcul de l'altitude et de la pression barométrique, nécessite beaucoup d'opérations mathématique... ce qui n'est pas franchement plaisant. Vous pouvez prendre connaissance de ces opérations dans la fiche technique mais cela n'est ni vraiment intuitive ni très pédagogique - cela indique juste comment le senseur fonctionne.
Heureusement, la bibliothèque Arduino prend en charge toute cette complexité.
Vous pouvez trouver cette bibliothèque Arduino sur ce dépôt GitHub puis l'installer. Pour installer la bibliothèque, cliquez sur le bouton "Download" pour télécharger le l'archive ZIP et pour l'installer. Vous pouvez trouver plus d'information notre tutoriel sur l'installation de bibliothèque .
N'oubliez pas de redémarrer votre IDE.
Vous pouvez maintenant utiliser ce premier croquis/sketch d'exemple et le téléverser sur votre Arduino:
#include <Wire.h>
#include <Adafruit_Sensor.h>
#include <Adafruit_BMP085.h>

Adafruit_BMP085 bmp = Adafruit_BMP085(10085);

void setup(void)
{
  Serial.begin(9600);
  Serial.println("Pressure Sensor Test"); Serial.println("");

  /* Initialise the sensor */
  if(!bmp.begin())
  {
    /* There was a problem detecting the BMP085 ... check your connections */
    Serial.print("Ooops, no BMP085 detected ... Check your wiring or I2C ADDR!");
    while(1);
  }
}

void loop(void)
{
  /* Get a new sensor event */
  sensors_event_t event;
  bmp.getEvent(&event);

  /* Display the results (barometric pressure is measure in hPa) */
  if (event.pressure)
  {
    /* Display atmospheric pressure in hPa */
    Serial.print("Pressure: "); Serial.print(event.pressure); Serial.println(" hPa");
  }
  else
  {
    Serial.println("Sensor error");
  }
  delay(250);
}
Ouvrez ensuite la console série (dans Arduino IDE) configuré sur 9600 bauds. Le croquis/sketch affichera continuellement la pression en hPa (hectoPascals). Vous pouvez tester le senseur en mesurant une variation de pression simplement en placant votre doigt au dessus du petit trou sur le dessus du senseur.
Comme vous pouvez le constater ci-dessous, la pression s'accroit:

Crédit: AdaFruit Industries www.adafruit.com
Evaluer l'altitude
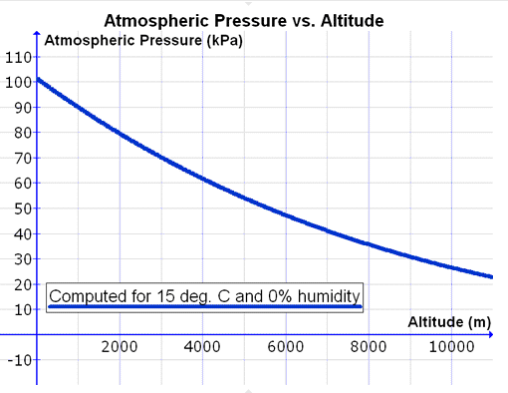
Since we know that pressure drops as we gain altitude (that's why air is so thin on mountain-tops) we can compute the current altitude knowing the pressure and temperature. Again, there's a bit of hairy math involved, you can read about the calculations on wikipedia (where this graph is from).

Crédit: AdaFruit Industries www.adafruit.comGraphique de la Pression Atmosphérique (kPa) en fonction de l'altitude
With the Arduino library, we take care of that for you! Simply update the 'void loop()' function above with the code below to get the altitude based on the pressure and temperature:
void loop(void)
{
  /* Get a new sensor event */
  sensors_event_t event;
  bmp.getEvent(&event);

  /* Display the results (barometric pressure is measure in hPa) */
  if (event.pressure)
  {
    /* Display atmospheric pressue in hPa */
    Serial.print("Pressure:    ");
    Serial.print(event.pressure);
    Serial.println(" hPa");

    /* Calculating altitude with reasonable accuracy requires pressure    *
     * sea level pressure for your position at the moment the data is     *
     * converted, as well as the ambient temperature in degress           *
     * celcius.  If you don't have these values, a 'generic' value of     *
     * 1013.25 hPa can be used (defined as SENSORS_PRESSURE_SEALEVELHPA   *
     * in sensors.h), but this isn't ideal and will give variable         *
     * results from one day to the next.                                  *
     *                                                                    *
     * You can usually find the current SLP value by looking at weather   *
     * websites or from environmental information centers near any major  *
     * airport.                                                           *
     *                                                                    *
     * For example, for Paris, France you can check the current mean      *
     * pressure and sea level at: http://bit.ly/16Au8ol                   */

    /* First we get the current temperature from the BMP085 */
    float temperature;
    bmp.getTemperature(&temperature);
    Serial.print("Temperature: ");
    Serial.print(temperature);
    Serial.println(" C");

    /* Then convert the atmospheric pressure, SLP and temp to altitude    */
    /* Update this next line with the current SLP for better results      */
    float seaLevelPressure = SENSORS_PRESSURE_SEALEVELHPA;
    Serial.print("Altitude:    ");
    Serial.print(bmp.pressureToAltitude(seaLevelPressure,
                                        event.pressure,
                                        temperature));
    Serial.println(" m");
    Serial.println("");
  }
  else
  {
    Serial.println("Sensor error");
  }
  delay(1000);
}
Run the sketch to see the calculated altitude.

Crédit: AdaFruit Industries www.adafruit.com
The data above is reasonably close to what I'd expect at my location, but we can improve the accuracy by changing the reference sea level pressure, which will change depending on the weather conditions. Every 1 hPa that we are off on the sea level pressure equals about 8.5 m of error in the altitude calculations!
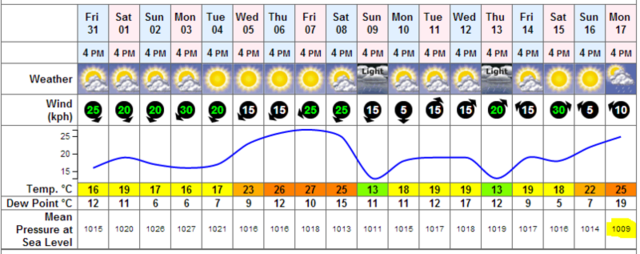
Many weather sites, (particularly near major airports) will provide pressure readings. If you happened to be near Paris, France, for example, you might look up the current air pressure at Charles de Gaulle airport, which we can see is 1009 hPa (a meaningful difference from the generoc 1013.25 hPa value we are plugging in via the SENSORS_PRESSURE_SEALEVELHPA macro):

Crédit: AdaFruit Industries www.adafruit.com
Updating the following line to 1009 will give us a more accurate altitude:
float seaLevelPressure = 1009;
| If you don't know the current mean pressure at sea level for your current weather conditions and location, SENSORS_PRESSURE_SEALEVELHPA is still a safe starting point: |
This now gives us the following results, which shows that calibrating for your local conditions is often worthwhile when working with low altitudes!

Crédit: AdaFruit Industries www.adafruit.com
Just be careful looking for local mean pressure at sea level values, since the functions in the driver are expecting hPa units, not one of the dozens of other values you may encounter, but you should be able to convert anything you find to hPa which is a standard SI unit.
Source: Bosch BMP085 Breakout Board réalisé par LadyAda pour AdaFruit Industries
Créé par LadyAda pour AdaFruit Indrustries.
Traduit avec l'autorisation d'AdaFruit Industries - Translated with the permission from Adafruit Industries - www.adafruit.com
Toute référence, mention ou extrait de cette traduction doit être explicitement accompagné du texte suivant : « Traduction par MCHobby (www.MCHobby.be) - Vente de kit et composants » avec un lien vers la source (donc cette page) et ce quelque soit le média utilisé.
L'utilisation commercial de la traduction (texte) et/ou réalisation, même partielle, pourrait être soumis à redevance. Dans tous les cas de figures, vous devez également obtenir l'accord du(des) détenteur initial des droits. Celui de MC Hobby s'arrêtant au travail de traduction proprement dit.