Différences entre versions de « FEATHER-CHARGER-MICROPYTHON-ESP8266 »
| Ligne 13 : | Ligne 13 : | ||
<nowiki>sudo pip install esptool</nowiki> | <nowiki>sudo pip install esptool</nowiki> | ||
| − | + | {{ADFImage|FEATHER-CHARGER-MICROPYTHON-ESP8266-20.png}} | |
If you receive an error that esptool.py only supports Python 2.x try running again with the '''pip2''' command instead of pip (likely your system is using Python 3 and the pip command is getting confused which version to use). | If you receive an error that esptool.py only supports Python 2.x try running again with the '''pip2''' command instead of pip (likely your system is using Python 3 and the pip command is getting confused which version to use). | ||
| Ligne 19 : | Ligne 19 : | ||
Next [http://micropython.org/download/#esp8266 download the latest MicroPython ESP8266 firmware file]. These firmware files are generated daily from the latest code on Github. If you'd like to build your own MicroPython ESP8266 firmware (like if you're customizing it or including other modules & scripts) check out [https://learn.adafruit.com/building-and-running-micropython-on-the-esp8266/overview this handy guide on compiling firmware in a special virtual machine]. | Next [http://micropython.org/download/#esp8266 download the latest MicroPython ESP8266 firmware file]. These firmware files are generated daily from the latest code on Github. If you'd like to build your own MicroPython ESP8266 firmware (like if you're customizing it or including other modules & scripts) check out [https://learn.adafruit.com/building-and-running-micropython-on-the-esp8266/overview this handy guide on compiling firmware in a special virtual machine]. | ||
| − | + | {{ADFImage|FEATHER-CHARGER-MICROPYTHON-ESP8266-21.png}} | |
Now you'll need to put the ESP8266 into its firmware flashing mode. Each ESP8266 board is slightly different: | Now you'll need to put the ESP8266 into its firmware flashing mode. Each ESP8266 board is slightly different: | ||
| Ligne 32 : | Ligne 32 : | ||
Where /path/to/ESP8266 is the path or name of the serial port that is connected to the ESP8266. The exact name of the device varies depending on the type of serial to USB converter chip so you might need to look at the serial ports with and without the device connected to find its name. | Where /path/to/ESP8266 is the path or name of the serial port that is connected to the ESP8266. The exact name of the device varies depending on the type of serial to USB converter chip so you might need to look at the serial ports with and without the device connected to find its name. | ||
| − | + | {{ADFImage|FEATHER-CHARGER-MICROPYTHON-ESP8266-22.png}} | |
Now put the ESP8266 back into firmware flashing mode and run the following command to load the downloaded firmware file: | Now put the ESP8266 back into firmware flashing mode and run the following command to load the downloaded firmware file: | ||
| Ligne 40 : | Ligne 40 : | ||
Again set '''/path/to/ESP8266''' to the path or name of the serial port that is connected to the ESP8266. In addition set '''firmware.bin''' to the name or path to the firmware file you would like to load. | Again set '''/path/to/ESP8266''' to the path or name of the serial port that is connected to the ESP8266. In addition set '''firmware.bin''' to the name or path to the firmware file you would like to load. | ||
| − | + | {{ADFImage|FEATHER-CHARGER-MICROPYTHON-ESP8266-23.png}} | |
Once the tool finishes flashing the firmware (you'll usually see a blue light on the ESP8266 module flashing during this process) press the RESET button on the ESP8266 board or disconnect and reconnect it to your computer. You should be all set to start using the latest MicroPython firmware on the board! | Once the tool finishes flashing the firmware (you'll usually see a blue light on the ESP8266 module flashing during this process) press the RESET button on the ESP8266 board or disconnect and reconnect it to your computer. You should be all set to start using the latest MicroPython firmware on the board! | ||
Version du 8 novembre 2016 à 10:55
|
|
En cours de traduction/élaboration. |
To use MicroPython with the ESP8266 you'll need to first flash it with the latest MicroPython firmware. Follow the official instructions to load MicroPython ESP8266 firmware which are summarized below.
First install the esptool.py software which enables firmware flashing on the ESP8266. The easiest way to install this tool is from Python's pip package manager. If you don't have it already you'll need to install Python 2.7 (make sure you check the box to put Python in your system path when installing on Windows) and then run the following command in a terminal:
pip install esptool
Note on Mac OSX and Linux you might need to run the command as root with sudo, like:
sudo pip install esptool

Crédit: AdaFruit Industries www.adafruit.com
If you receive an error that esptool.py only supports Python 2.x try running again with the pip2 command instead of pip (likely your system is using Python 3 and the pip command is getting confused which version to use).
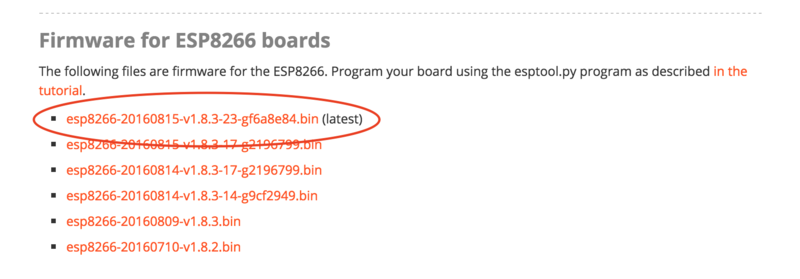
Next download the latest MicroPython ESP8266 firmware file. These firmware files are generated daily from the latest code on Github. If you'd like to build your own MicroPython ESP8266 firmware (like if you're customizing it or including other modules & scripts) check out this handy guide on compiling firmware in a special virtual machine.

Crédit: AdaFruit Industries www.adafruit.com
Now you'll need to put the ESP8266 into its firmware flashing mode. Each ESP8266 board is slightly different:
- For a raw ESP8266 module you'll need to wire up buttons to ground for the GPIO0 and RESET pins. Hold the GPIO0 button down (or connect the line to ground) and while still holding GPIO0 to ground press and release the RESET button (or connect and release the line from ground), then release GPIO0.
- For the HUZZAH ESP8266 breakout buttons for GPIO0 and RESET are built in to the board. Hold GPIO0 down, then press and release RESET (while still holding GPIO0), and finally release GPIO0.
- For the Feather HUZZAH ESP8266 you don't need to do anything special to go into firmware flashing mode. This board is built to detect when the serial port is opened for flashing and automatically configure the ESP8266 module to receive firmware. Be sure to first install the SiLabs CP210x driver on Windows and Mac OSX to make the board's serial port visible! On Windows you want the normal VCP driver, not the 'with Serial Enumeration' driver.
It's recommended to erase the entire flash memory of the ESP8266 board before uploading firmware. Run the following command in a terminal to perform this erase:
esptool.py --port /path/to/ESP8266 erase_flash
Where /path/to/ESP8266 is the path or name of the serial port that is connected to the ESP8266. The exact name of the device varies depending on the type of serial to USB converter chip so you might need to look at the serial ports with and without the device connected to find its name.

Crédit: AdaFruit Industries www.adafruit.com
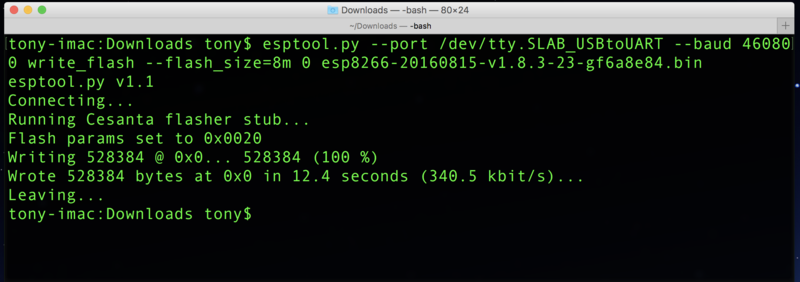
Now put the ESP8266 back into firmware flashing mode and run the following command to load the downloaded firmware file:
esptool.py --port /path/to/ESP8266 --baud 460800 write_flash --flash_size=8m 0 firmware.bin
Again set /path/to/ESP8266 to the path or name of the serial port that is connected to the ESP8266. In addition set firmware.bin to the name or path to the firmware file you would like to load.

Crédit: AdaFruit Industries www.adafruit.com
Once the tool finishes flashing the firmware (you'll usually see a blue light on the ESP8266 module flashing during this process) press the RESET button on the ESP8266 board or disconnect and reconnect it to your computer. You should be all set to start using the latest MicroPython firmware on the board!
Jump to the Serial REPL page in this guide to learn how to access MicroPython's 'command prompt' on the board.
Source: MicroPython Basics: How to Load MicroPython on a Board
Créé par Tony DiCola pour AdaFruit Industries.
Traduit par Meurisse D. pour MCHobby
Toute référence, mention ou extrait de cette traduction doit être explicitement accompagné du texte suivant : « Traduction par MCHobby (www.MCHobby.be) - Vente de kit et composants » avec un lien vers la source (donc cette page) et ce quelque soit le média utilisé.
L'utilisation commercial de la traduction (texte) et/ou réalisation, même partielle, pourrait être soumis à redevance. Dans tous les cas de figures, vous devez également obtenir l'accord du(des) détenteur initial des droits. Celui de MC Hobby s'arrêtant au travail de traduction proprement dit.
Traduit avec l'autorisation d'AdaFruit Industries - Translated with the permission from Adafruit Industries - www.adafruit.com